


The Best Brakes for Bikepacking? Mechanical vs Hydraulic


Good brakes are an essential part of any bike, but does it really matter what type of brake you use for bikepacking? There are many factors to consider, including mechanical vs. hydraulic, types of pads, and reliability. In this article, we take a look at the pros and cons of different types of brakes, reveal some of our favorites, and present a video on the subject…
PUBLISHED Aug 31, 2021
A lot has changed with bike brakes during the last decade, not to mention how they’re perceived in the bike touring and bikepacking community. When I was researching bike components for my first multi-month tour, I distinctly remember how mechanical disc brakes were considered “a risky proposition” by a large faction of internet experts at the time. Bent rotors and a lack of replacement parts and pads were the main concerns. Concurrently, a growing number of riders were tossing old standards into the wind and running disc brakes on big around-the-world bike tours.
After that peculiar bike brake renaissance, mechanical discs became the gold standard for bike tourers, and disc brakes have all but replaced rim brakes across all categories of cycling—save retro-tech aficionados, classic bike enthusiasts, and the budget/mass-market side of the industry. Much of that paradigm shift can be attributed to hydraulic disc brakes becoming a mainstream spec on mountain bikes throughout the early 2000s. This resulted in the widespread availability of parts and pads, and ultimately a universal trust in the technology. Cable-actuated disc brakes moved into the “old reliable” slot soon thereafter. Nowadays, hydraulic brakes have become a new norm for a lot of bikepackers, as “wire brakes” get denigrated to the old-tech bin.
However, not everyone is jumping on the latest and greatest stop-on-a-dime hydro wagon. Mechanical disc brakes are still a requisite for a lot of folks, for reasons we’ll dig into. Read on to find out the pros and cons of the two main types of disc brakes, some of our favorite models, the results of a reader survey we sent out last week, and what other factors you should consider. Plus, find our latest video on the subject.
Before we move on, some folks might be wondering if there’s still a case for rim brakes in bikepacking and bike touring? I’ll probably get blasted for this, but I would say not really. Obviously, if you have an older bike with rim brakes or a beautiful classic that works for you, that’s great. Carry on. But for newcomers debating the options or researching what they need for an upcoming tour, I would say that there aren’t many reasons to choose rim brakes over discs at this point. Frankly, disc brakes provide better braking power and performance. This is particularly important with the added weight of bags and gear. They also don’t wear and erode rims. Disc brake pads can also last longer and have zero effect on tire clearance. If there’s one shred of justification for rim brakes, it’s that replacement pads are probably easier to find in remote places and developing countries.
Mechanical Disc Brakes
The best thing about mechanical disc brakes is the simplicity of the system. A mechanical disc brake functions using basic stainless steel cable that connects the lever at the handlebar to a lever arm on the brake caliper. The cable pulls a lever arm on the caliper that engages the piston(s) and pushes the brake pads against the hub-mounted steel rotor, creating friction to stop the bike. Replacement cables can easily be carried by stashing them inside your bike tubing, or, since they’re generally the same cables used for most rim brakes, they can be found in virtually any bike shop around the world. Good metal/sintered brake pads can last 1,000+ miles and are easy to replace. Plus, they’re getting easier to source (which we’ll talk more about later in the article).
Pros
- Mechanical disc calipers are generally very reliable
- They’re also simple, making them easy to repair, maintain, and change pads
- Replacement cables and levers are easy to source since they’re essentially the same as rim brakes
- Mechanical disc brakes are less expensive than good hydraulics
- Many popular models use common types of brake pads, making them relatively easy to source replacements
Cons
- Mechanical disc calipers offer very little modulation (feathering, or control of braking force)
- They’re not as powerful as hydraulics
- The additional force required can result in hand fatigue
- They require regular pad adjustment because of cable stretch
- Mechanical disc calipers are heavier and brake slower
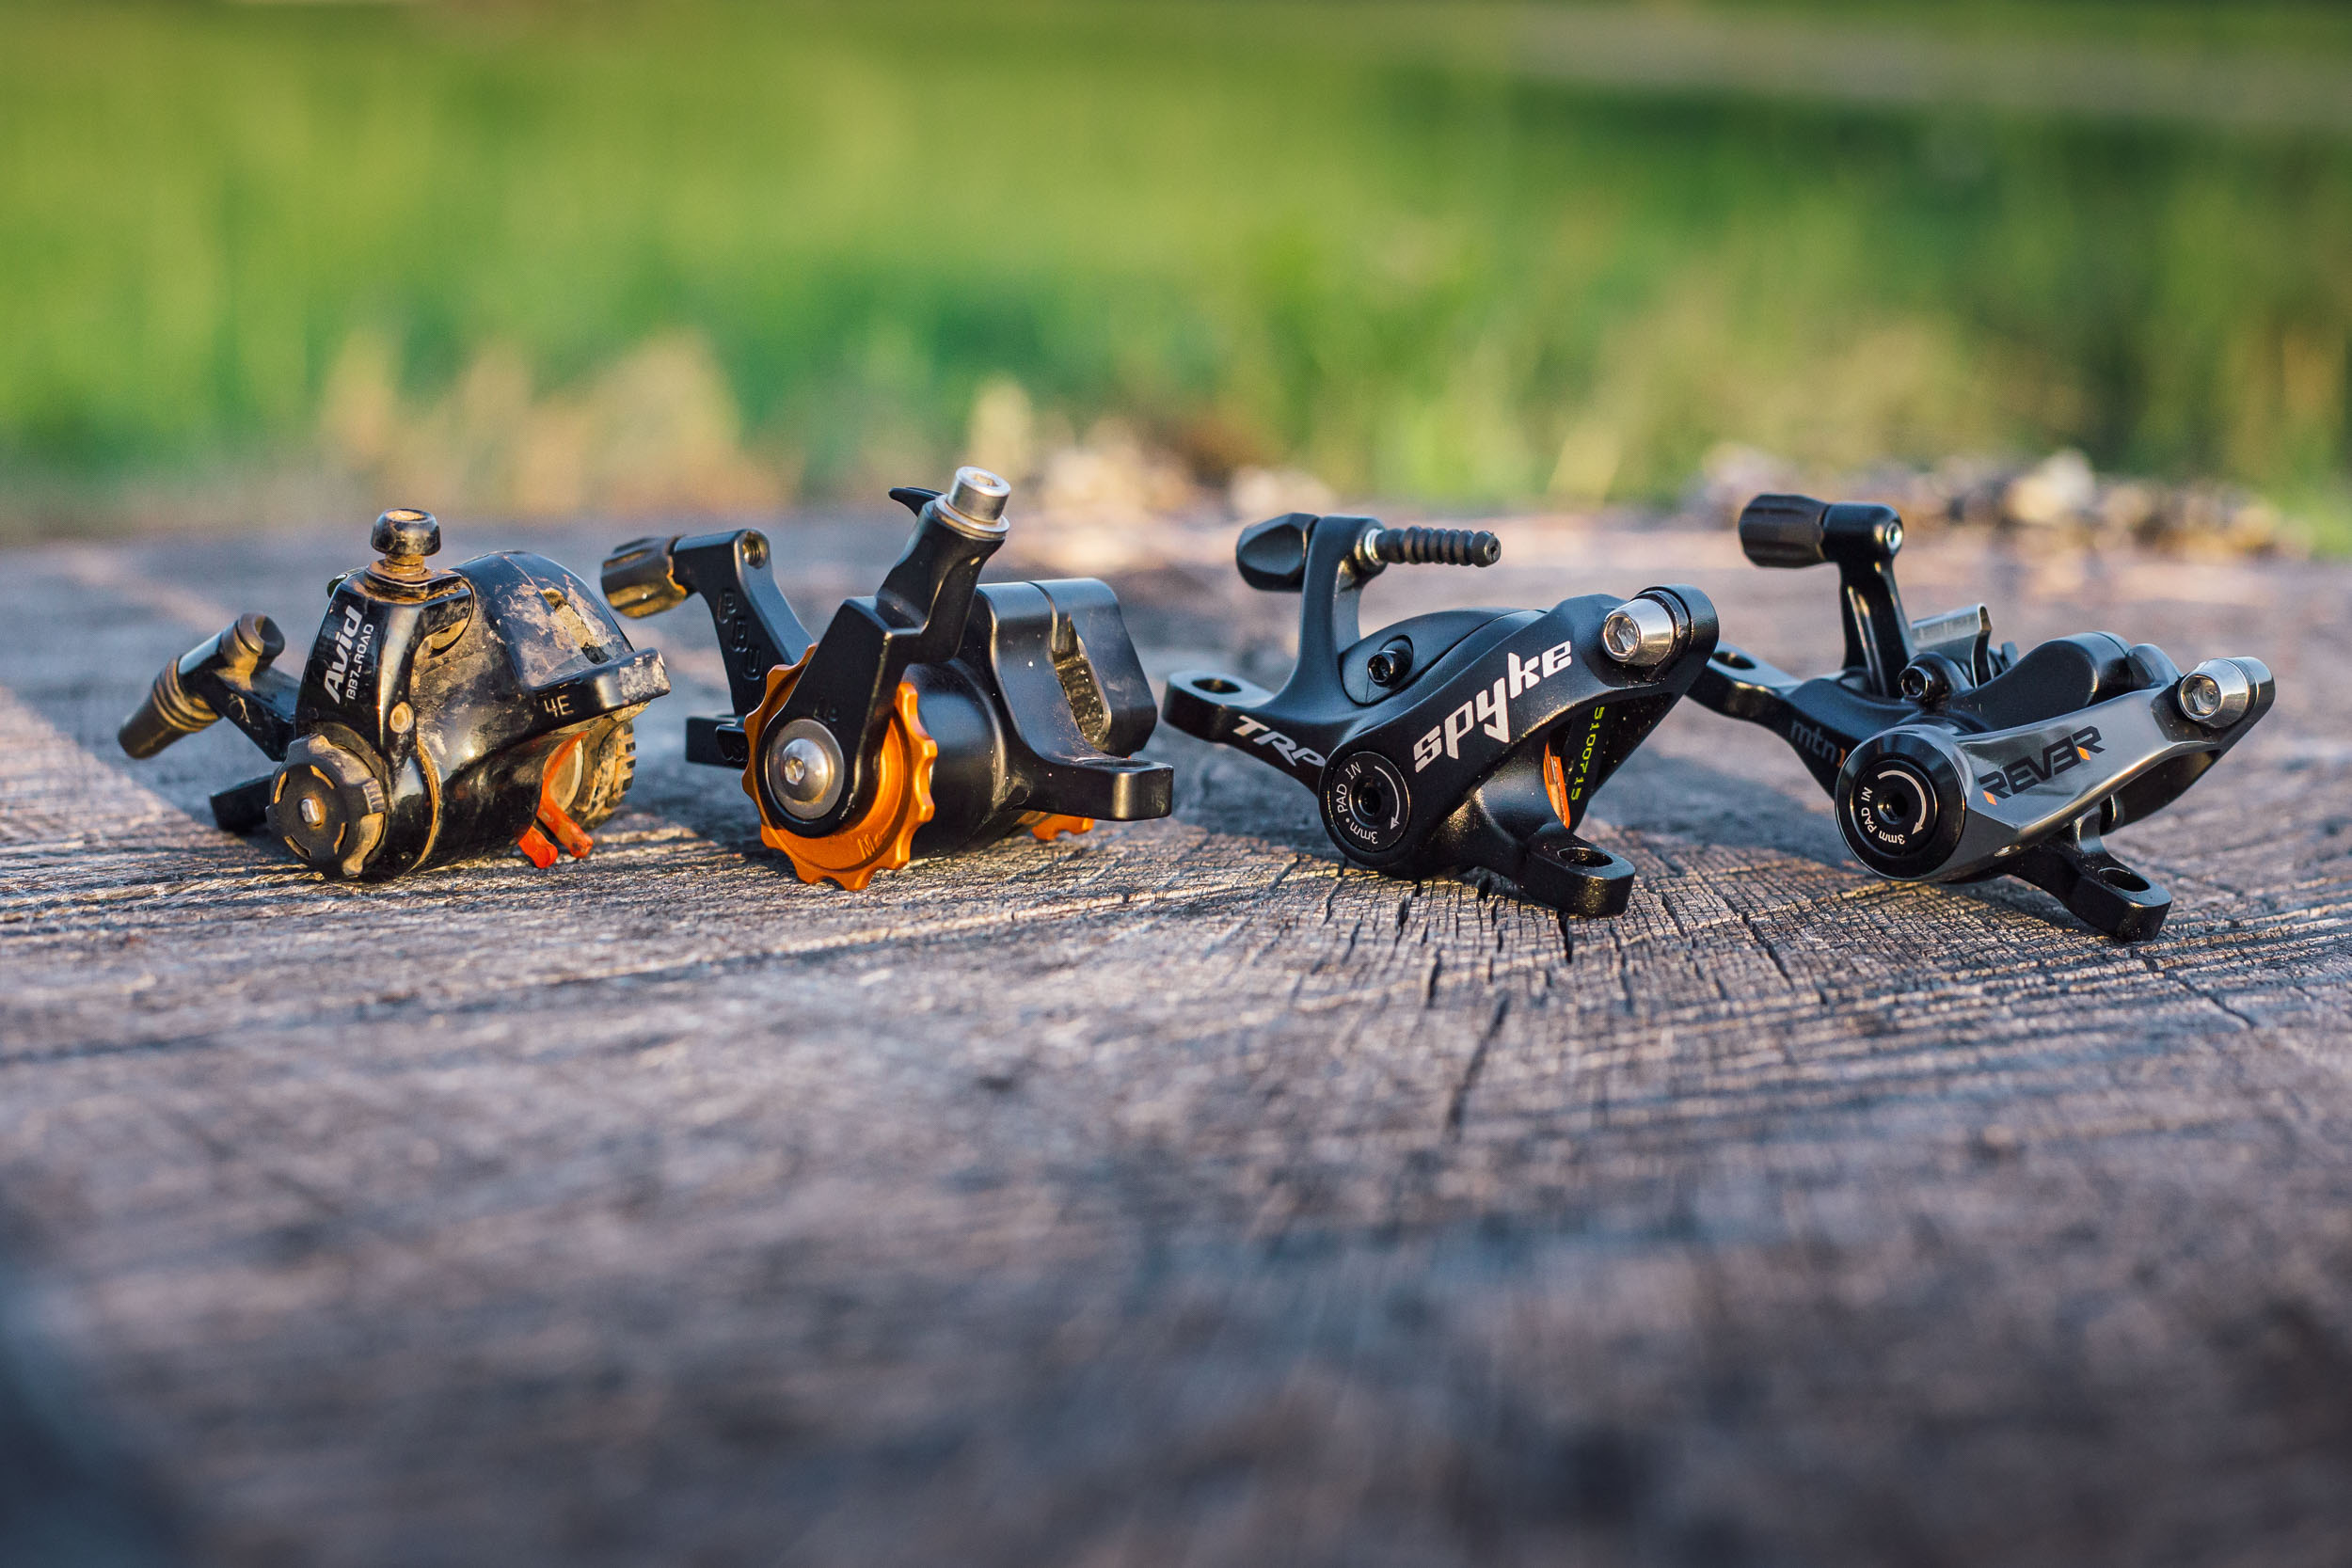
Recommended Mechanical Disc Brakes
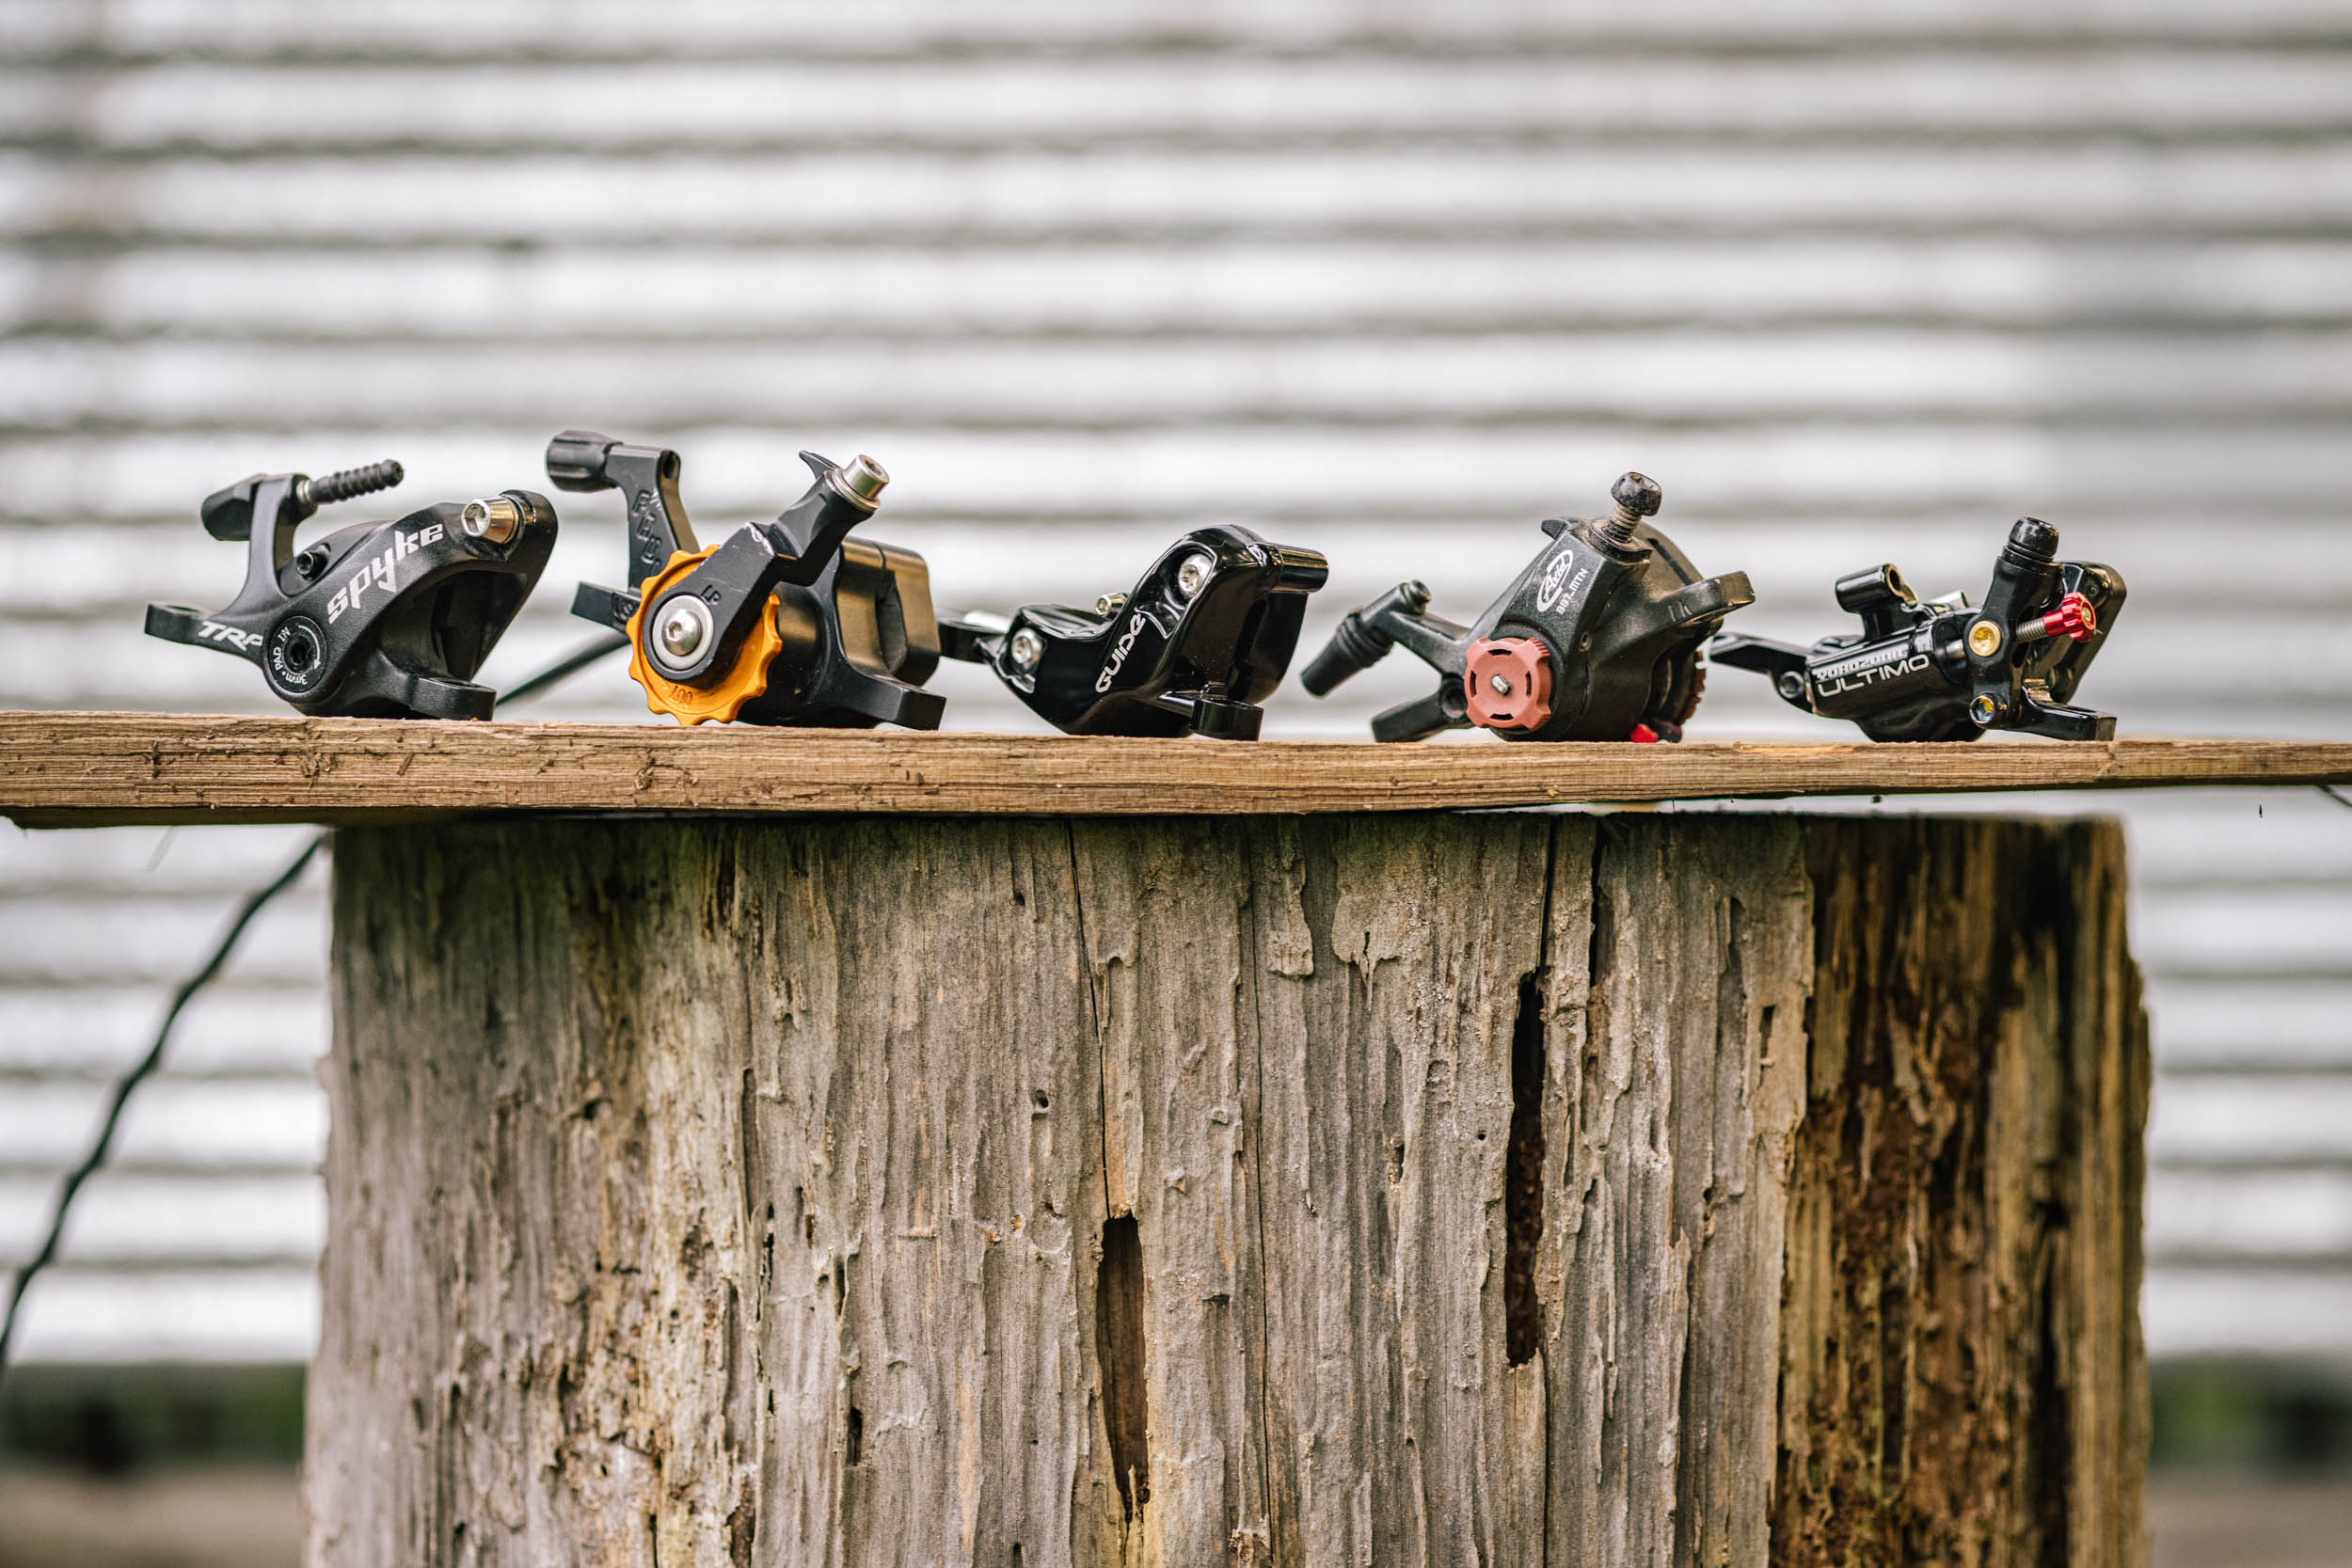
All in all, there aren’t a ton of options for mechanical disc brakes on the market, and even fewer that rise to the top when it comes to performance. We can safely claim that we’ve put multiple thousands of miles on each of these options:
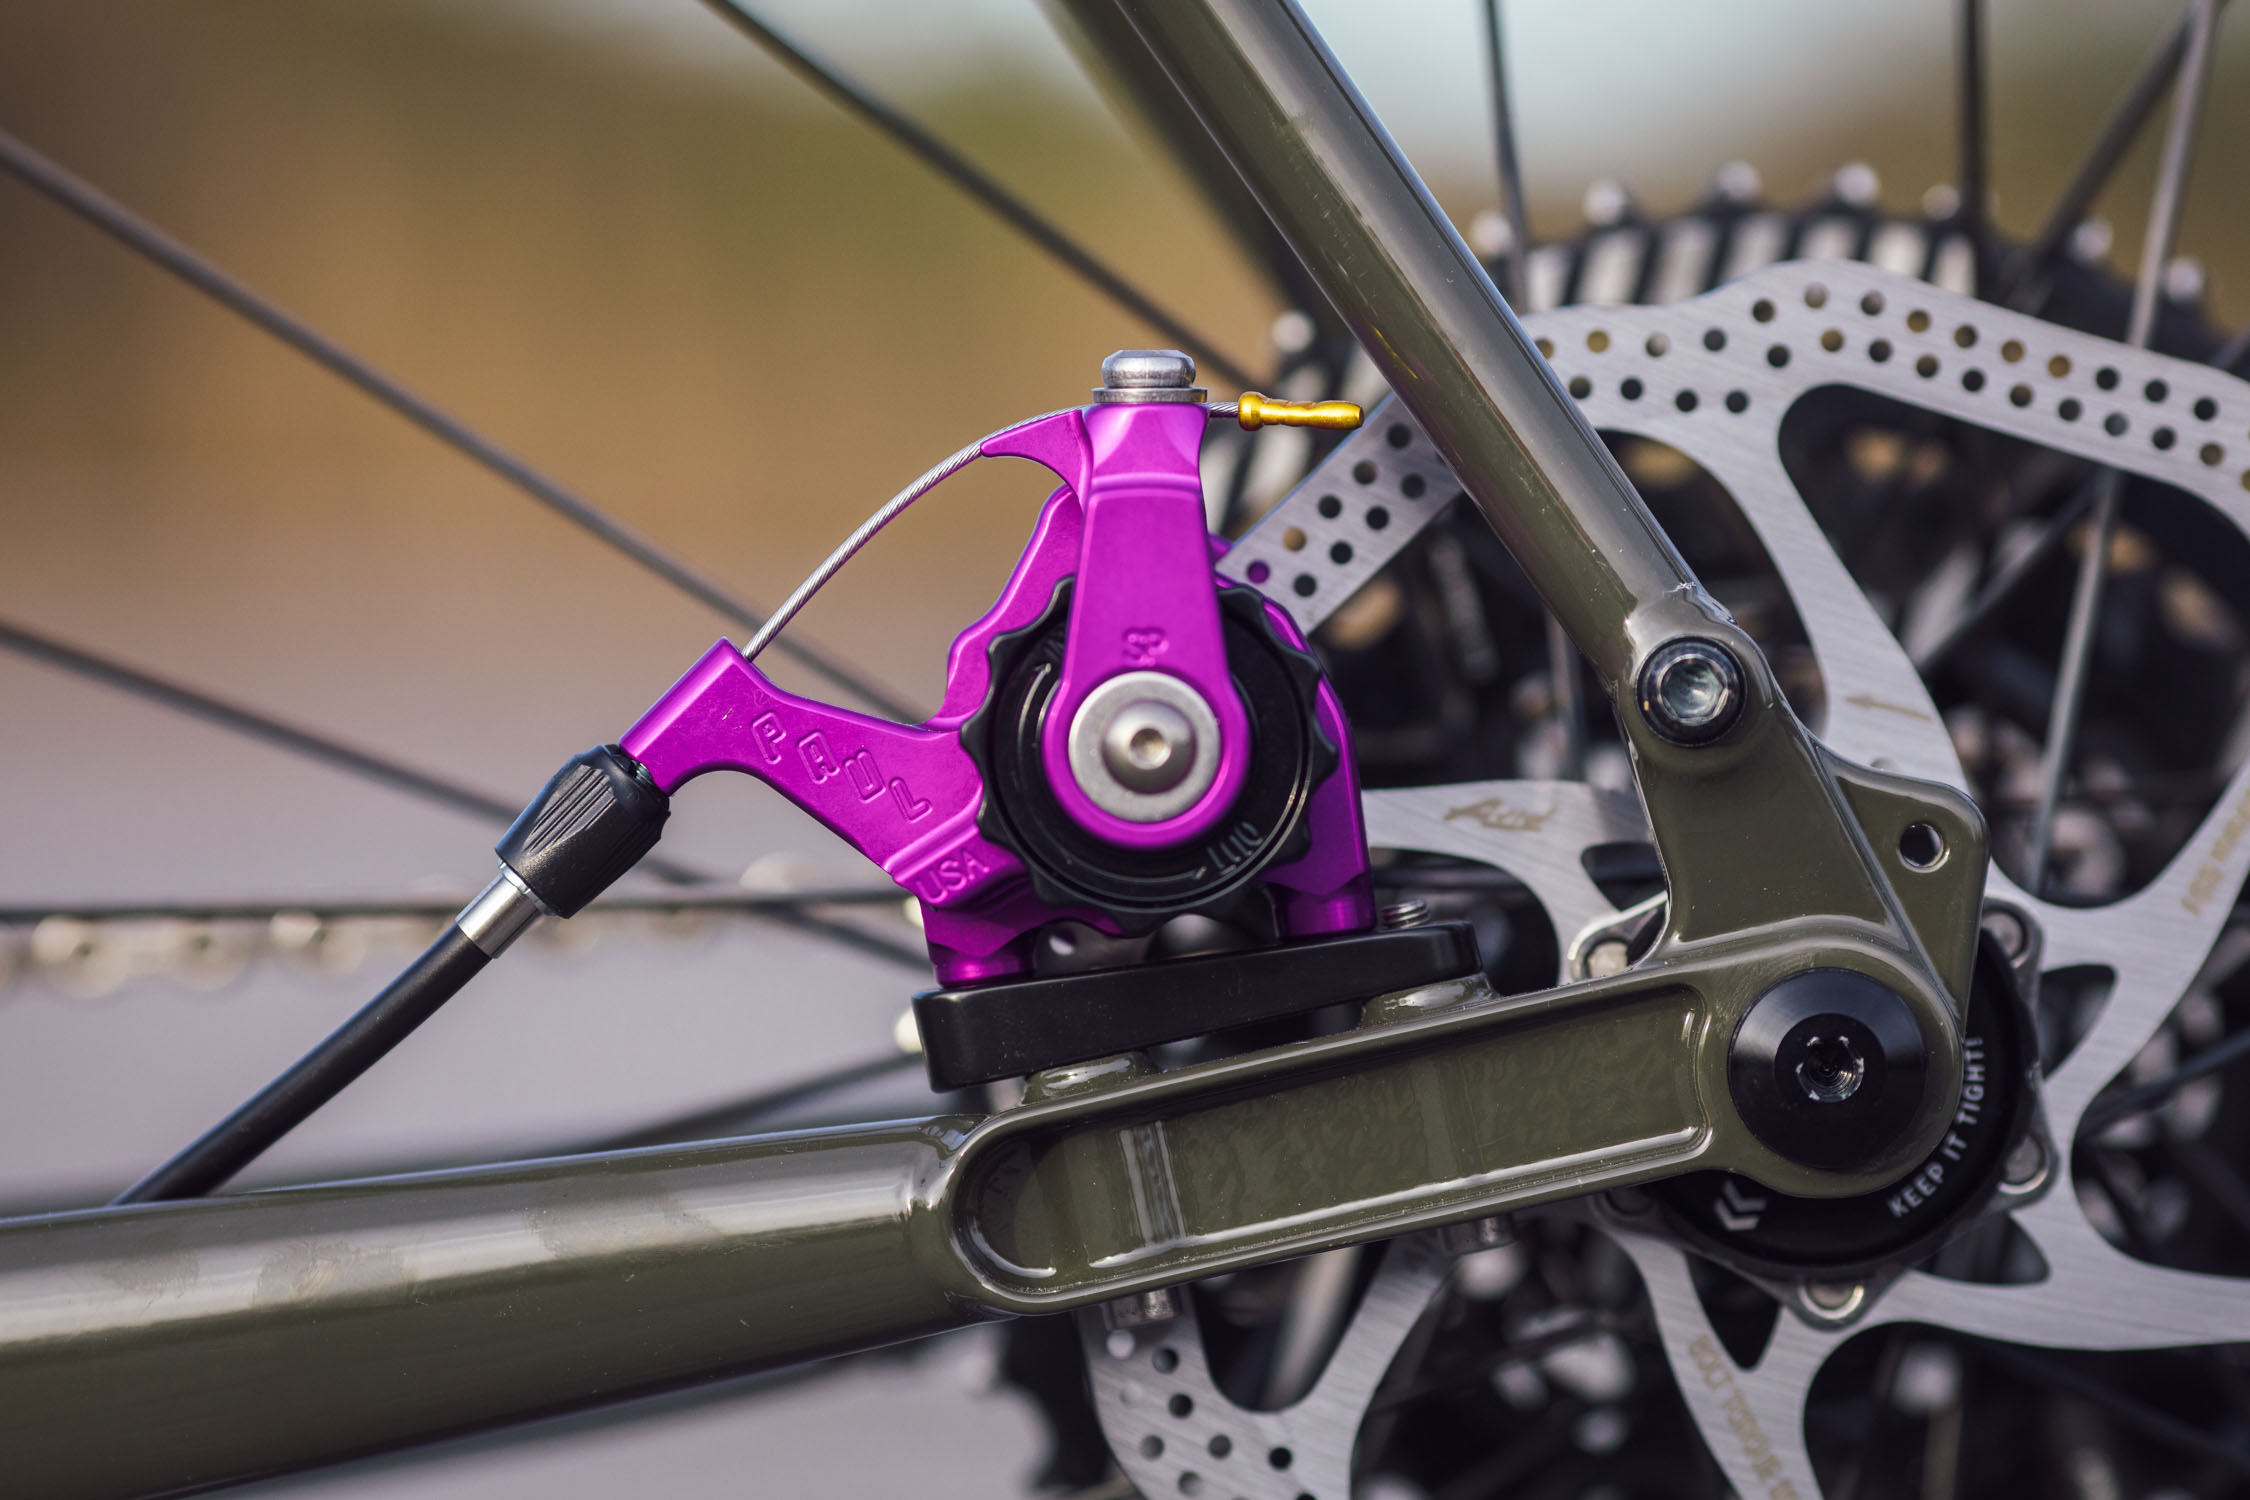
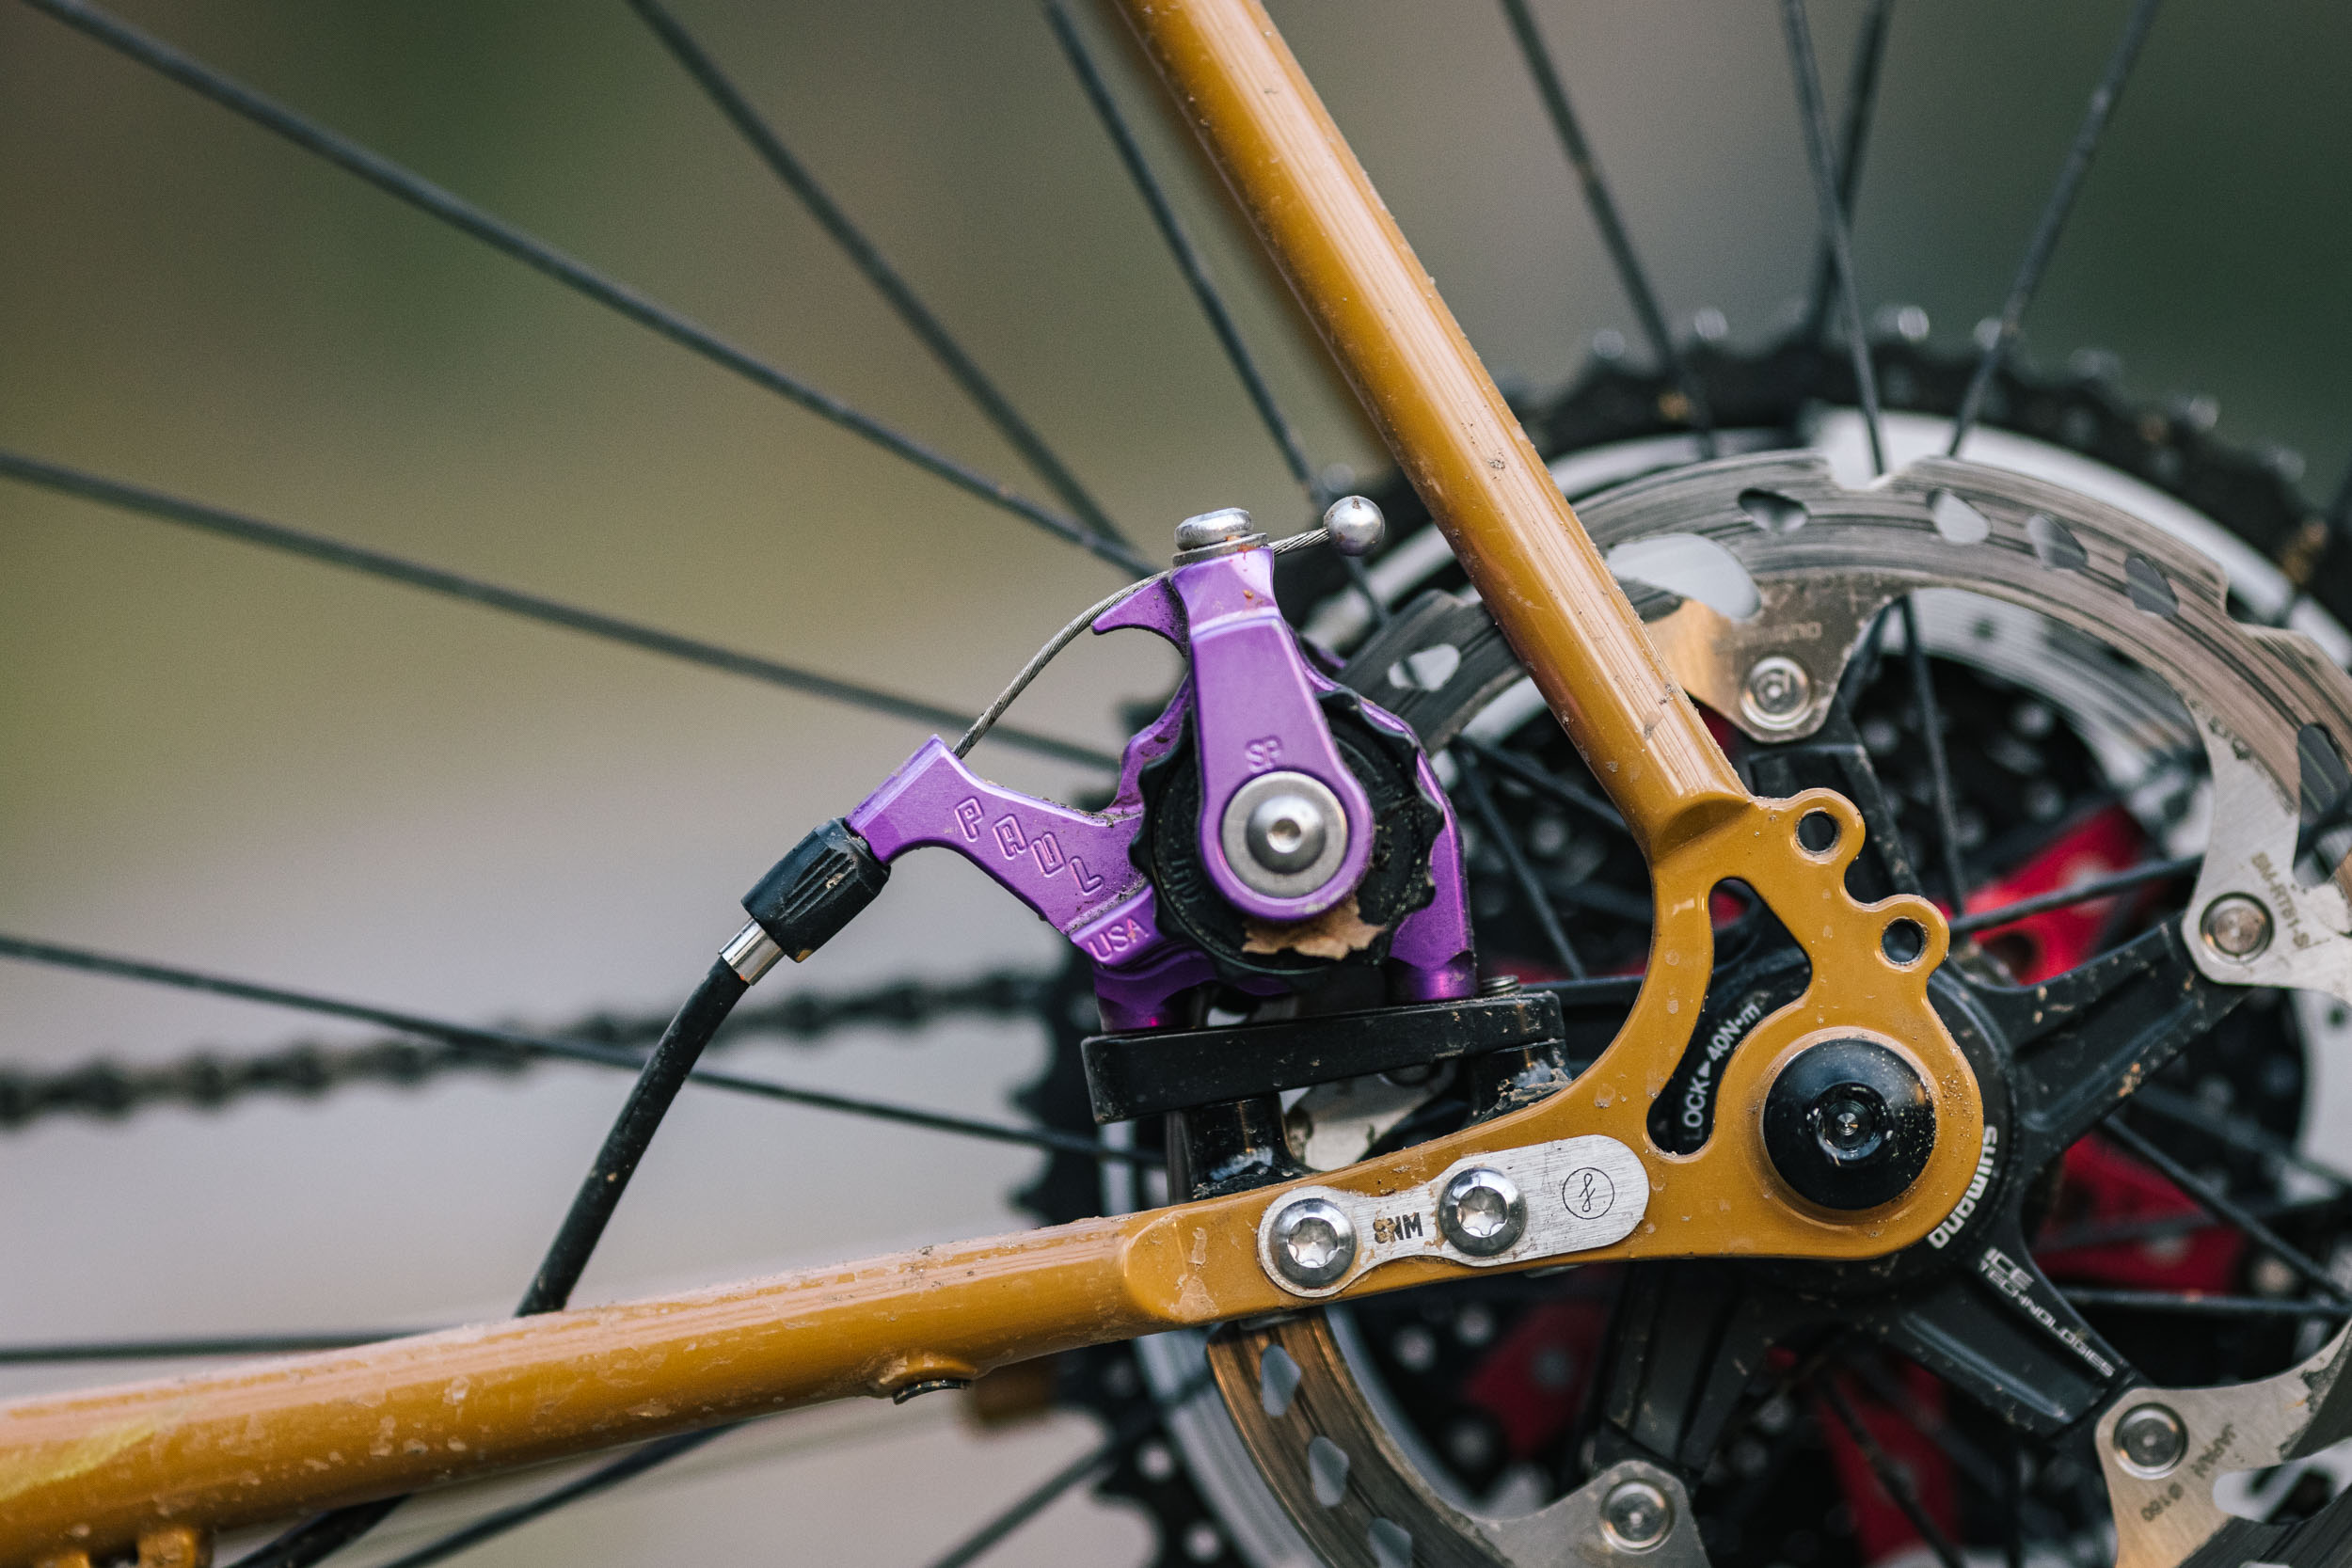
PAUL Klampers
While not cheap, PAUL Klampers are made in the USA and are as well-built and reliable as they come. As such, we consider them to be a pretty good long-term investment. They’re one of my top choices for big multi-month trips. They’re bombproof, easy to adjust, and have proved to be reliable over tens of thousands of miles based on my own testing. Klampers come in short or long-pull and in post and flat mount. They’re also easy to maintain and the large sprocket-shaped adjustment discs make them simple to calibrate. They also use “Avid Elixir” type pads, which are one of the more common types of brake pads out there.
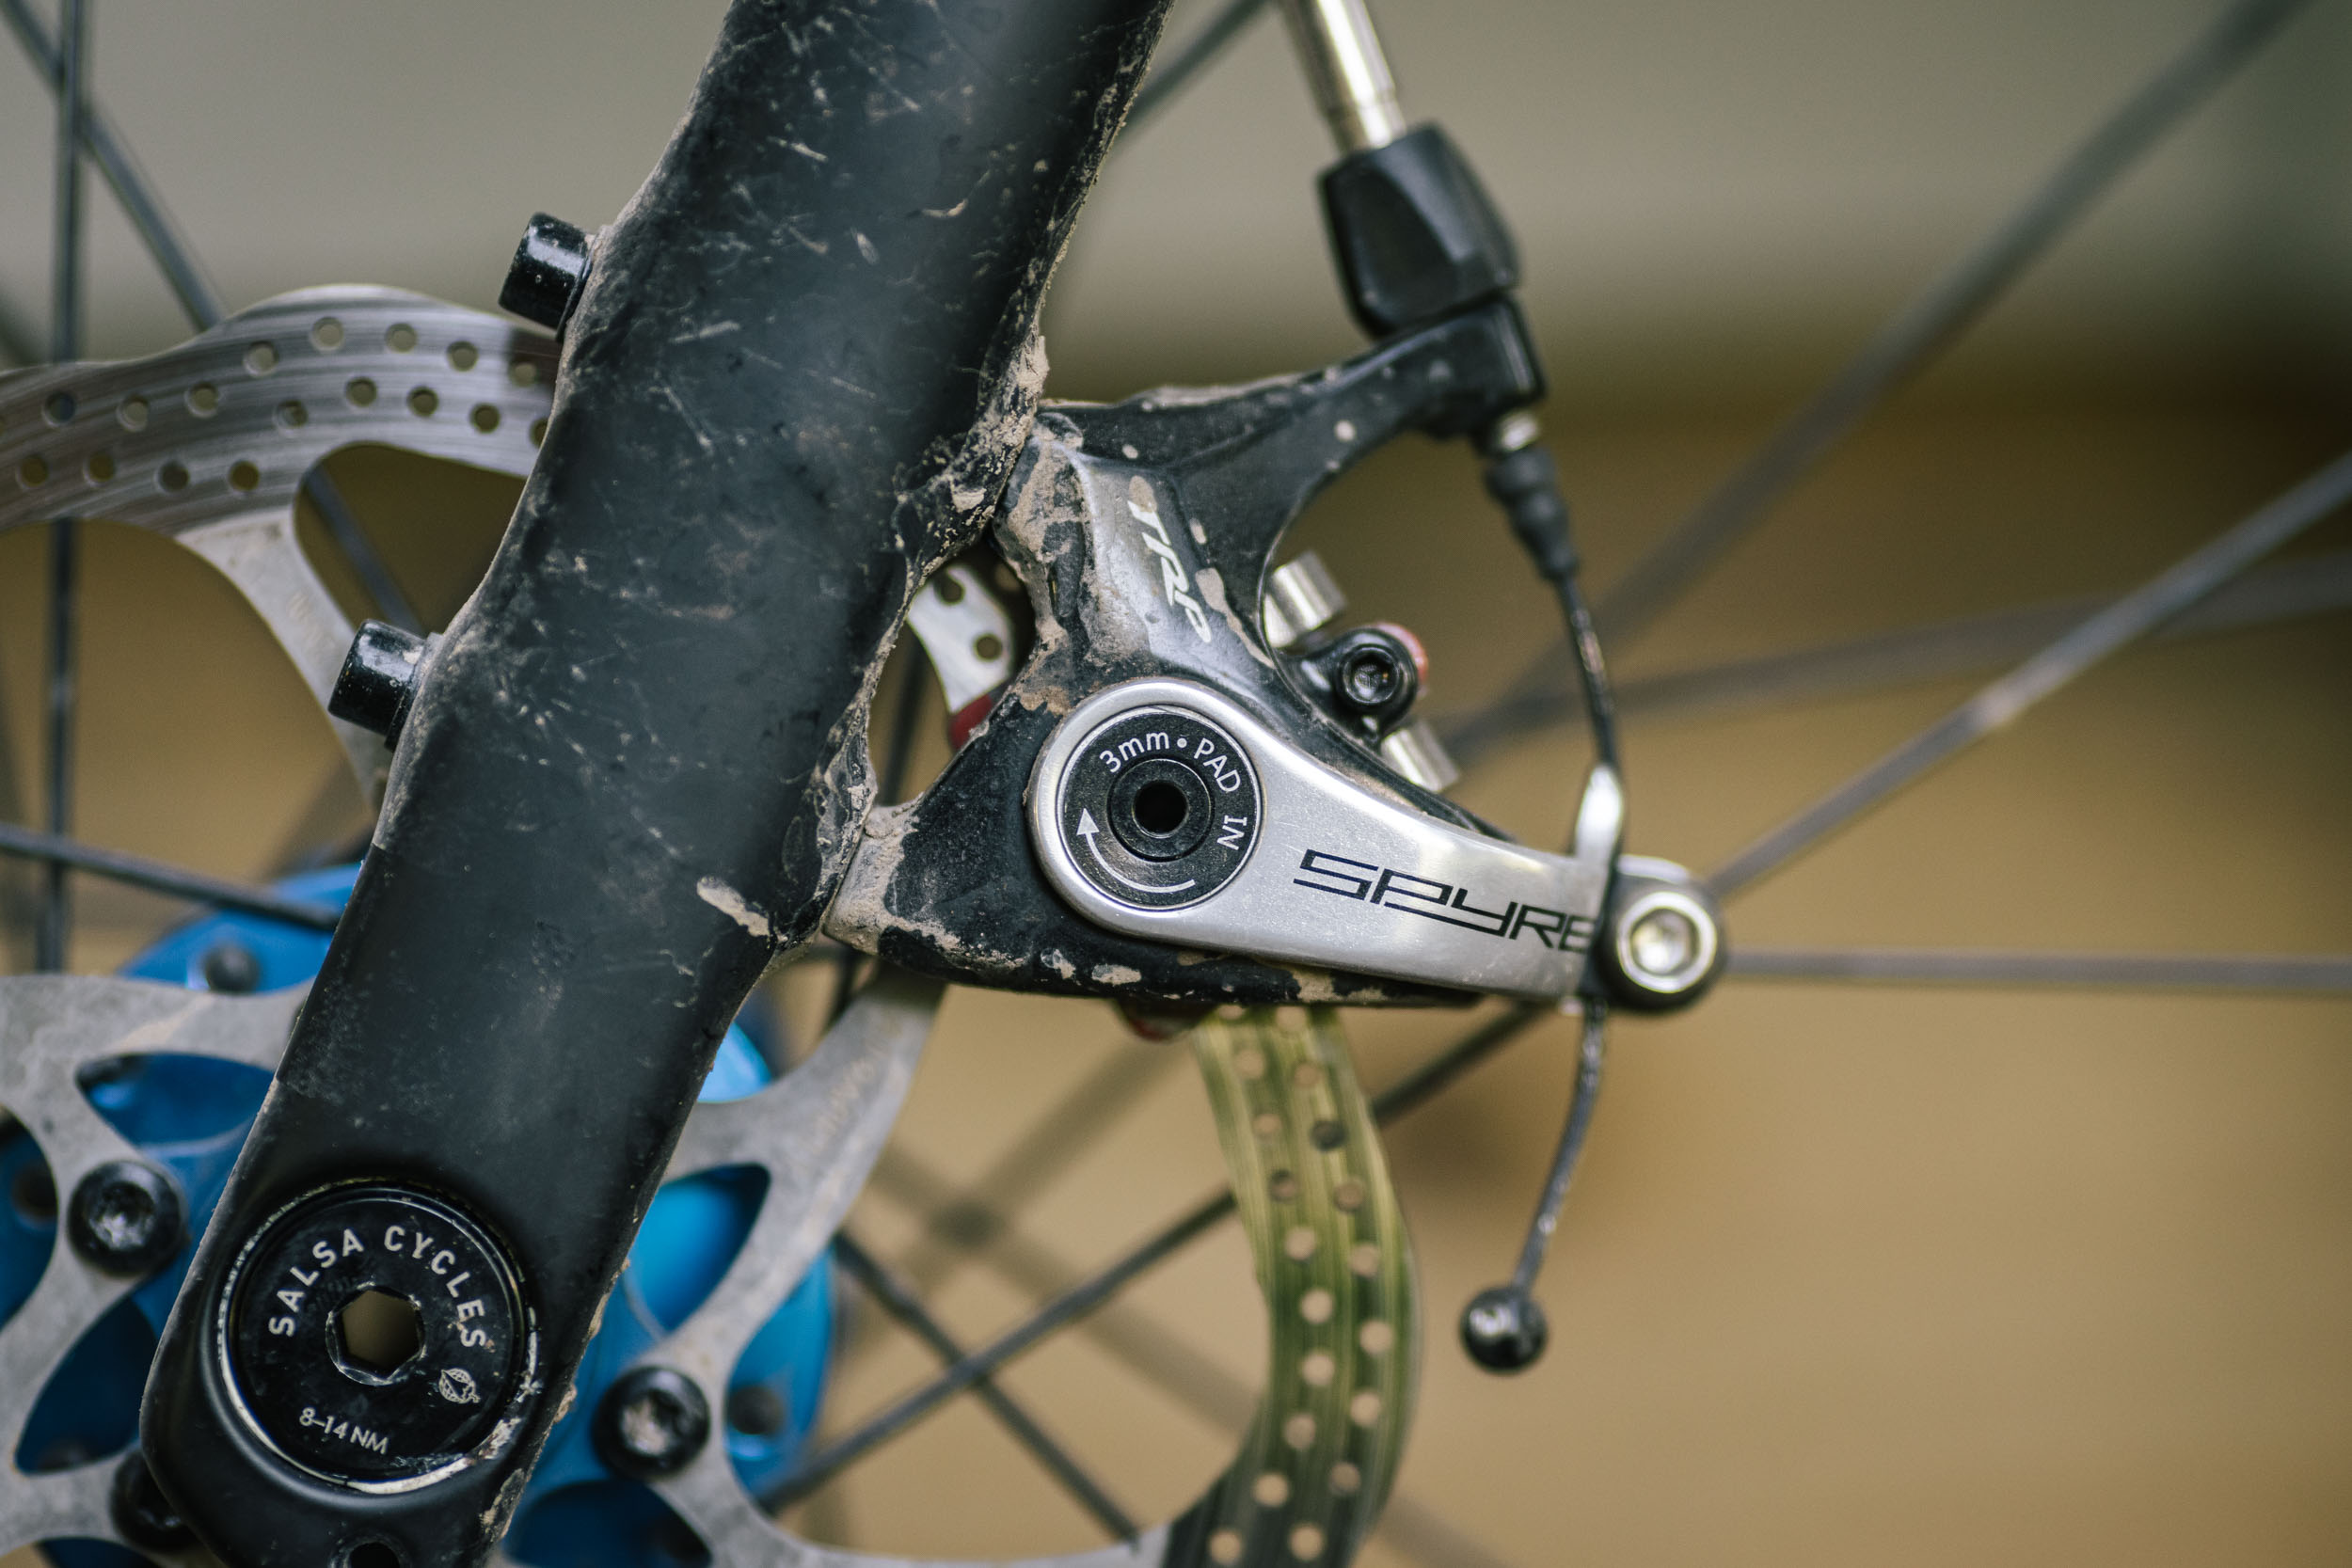
TRP Spyke/Spyre
Several of us like TRP Spyke (MTB) and Spyres (drop-bars), which arguably have a little bit better modulation than Klampers and are quite powerful. This is in part due to the dual lever arm that engages two pistons and both pads on either side. Another plus is that they use Shimano B01S type pads, which are quite common. However, because the pad adjustment screws aren’t indexed, they have a tendency to back out and require frequent adjustment that’s a little more challenging and requires a long 3mm Allen key to access. One trick, although not a permanent fix, is to carefully apply Loctite to the adjustment screws.
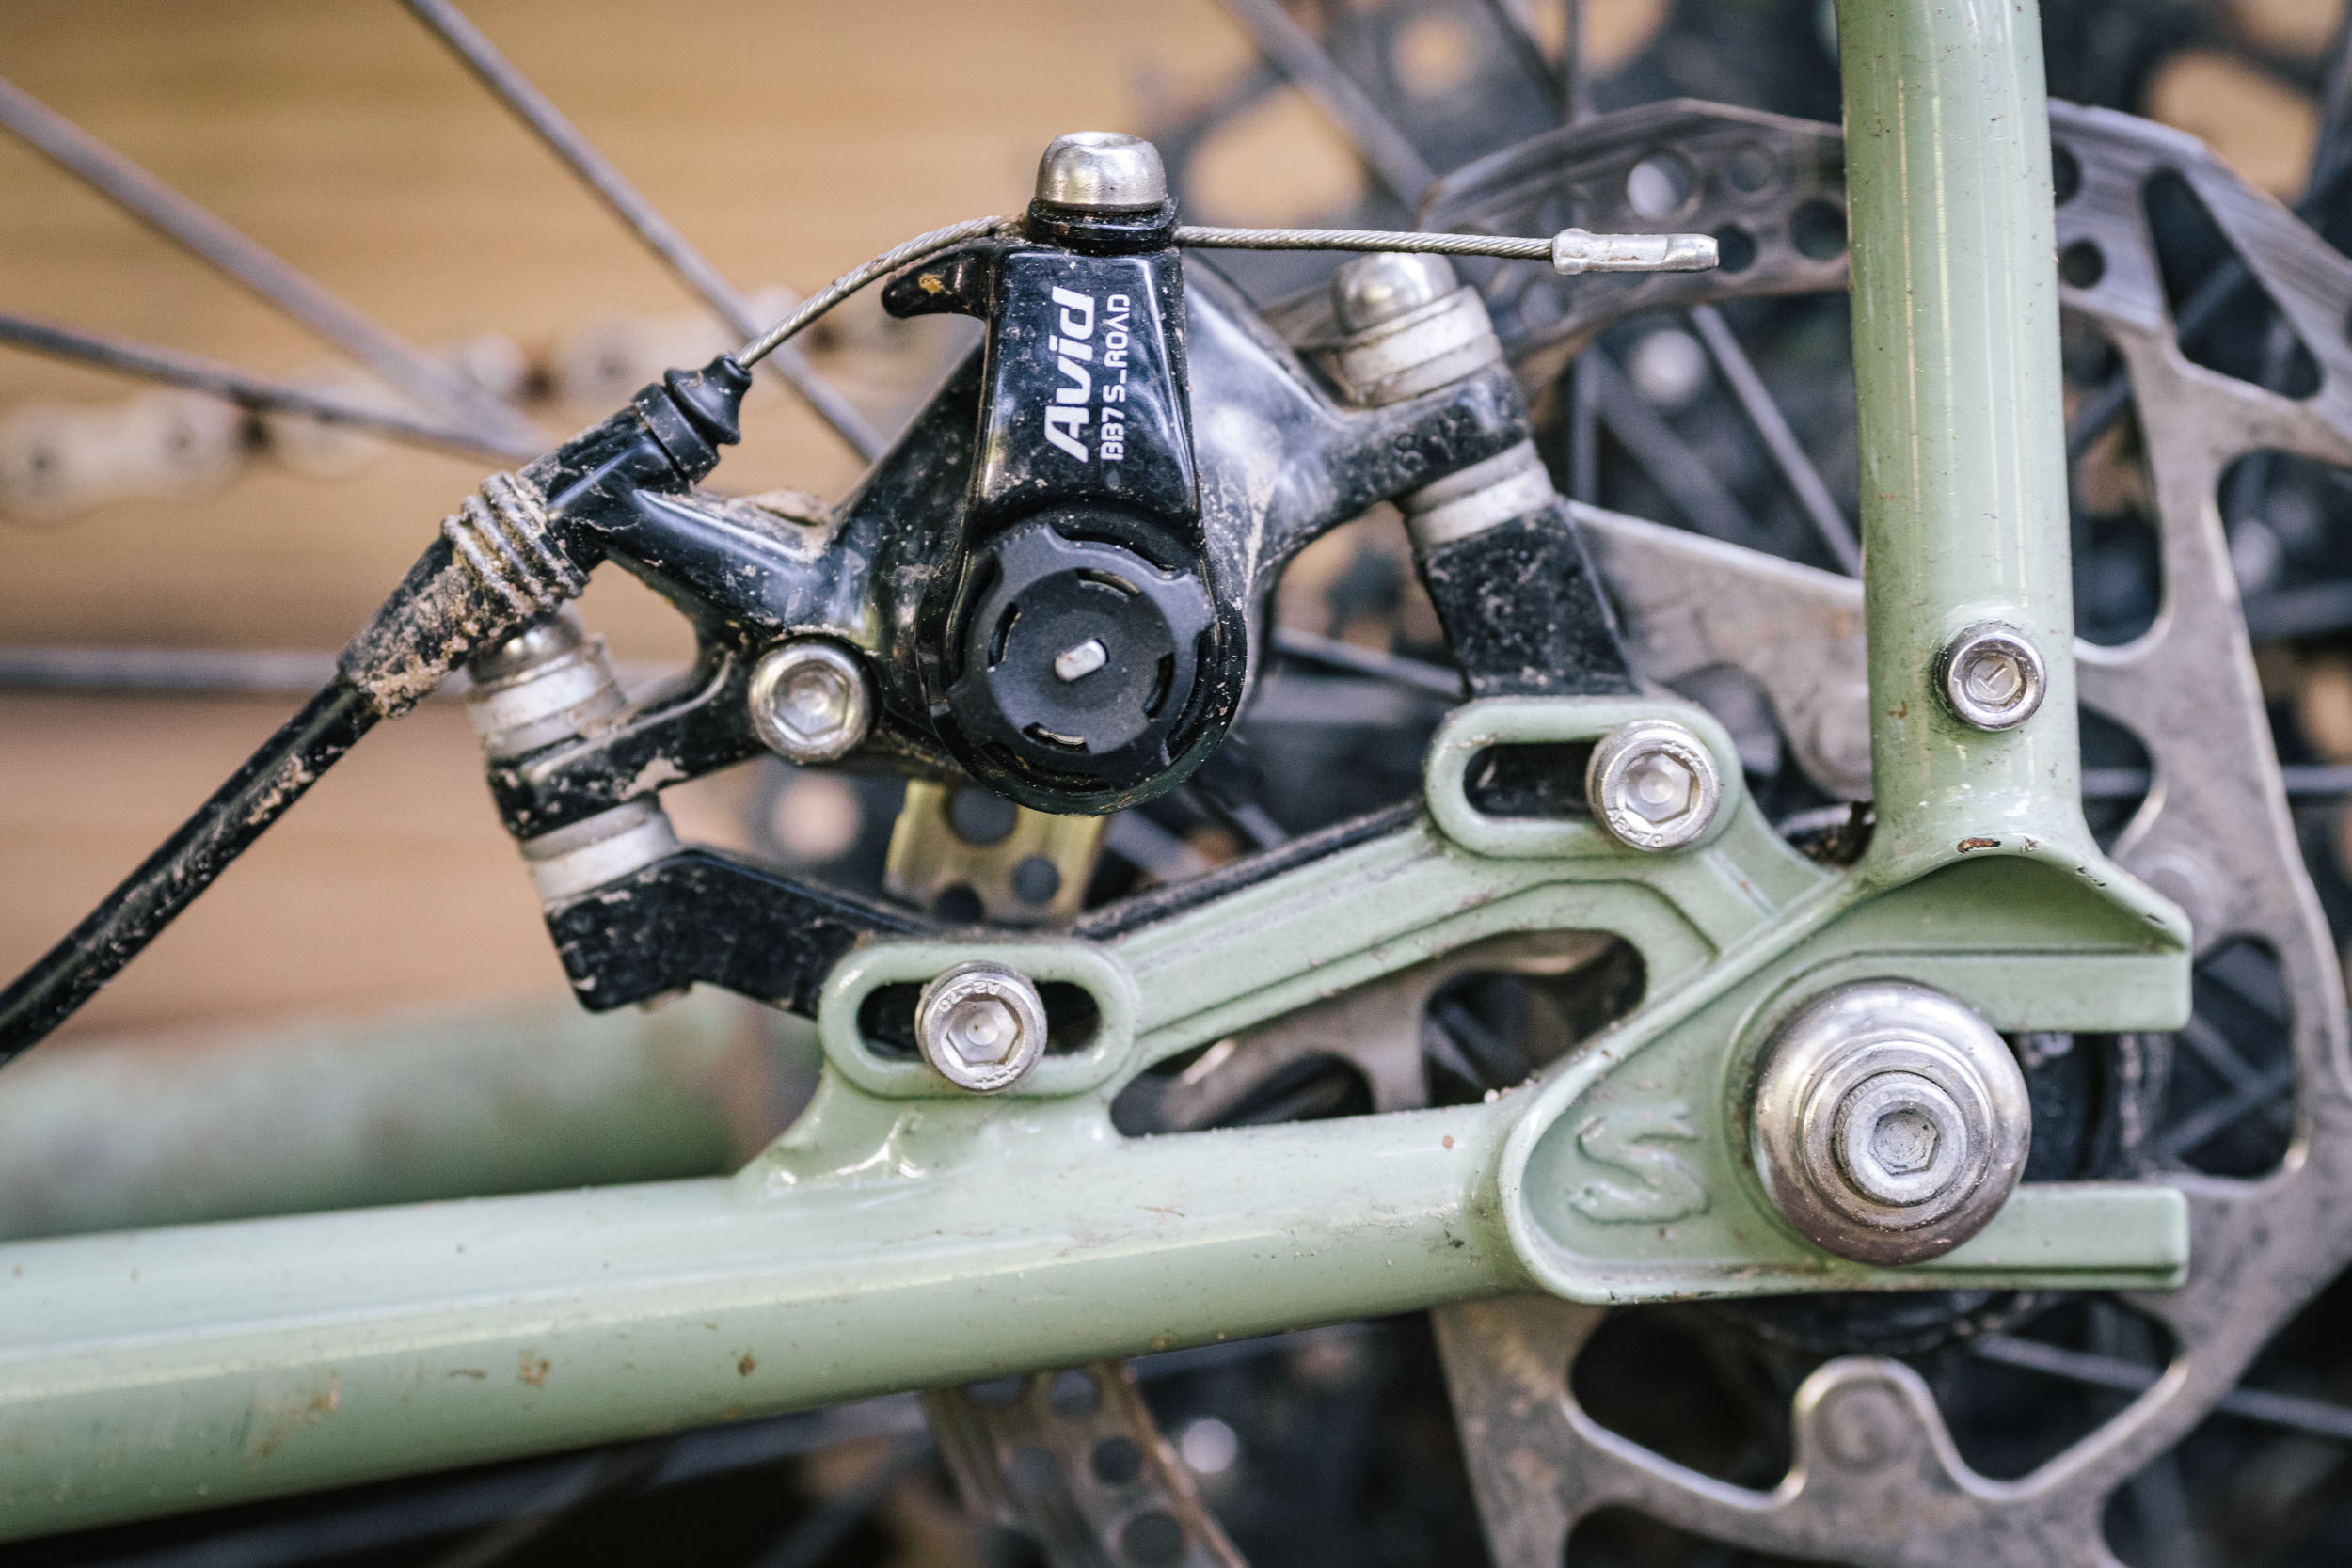
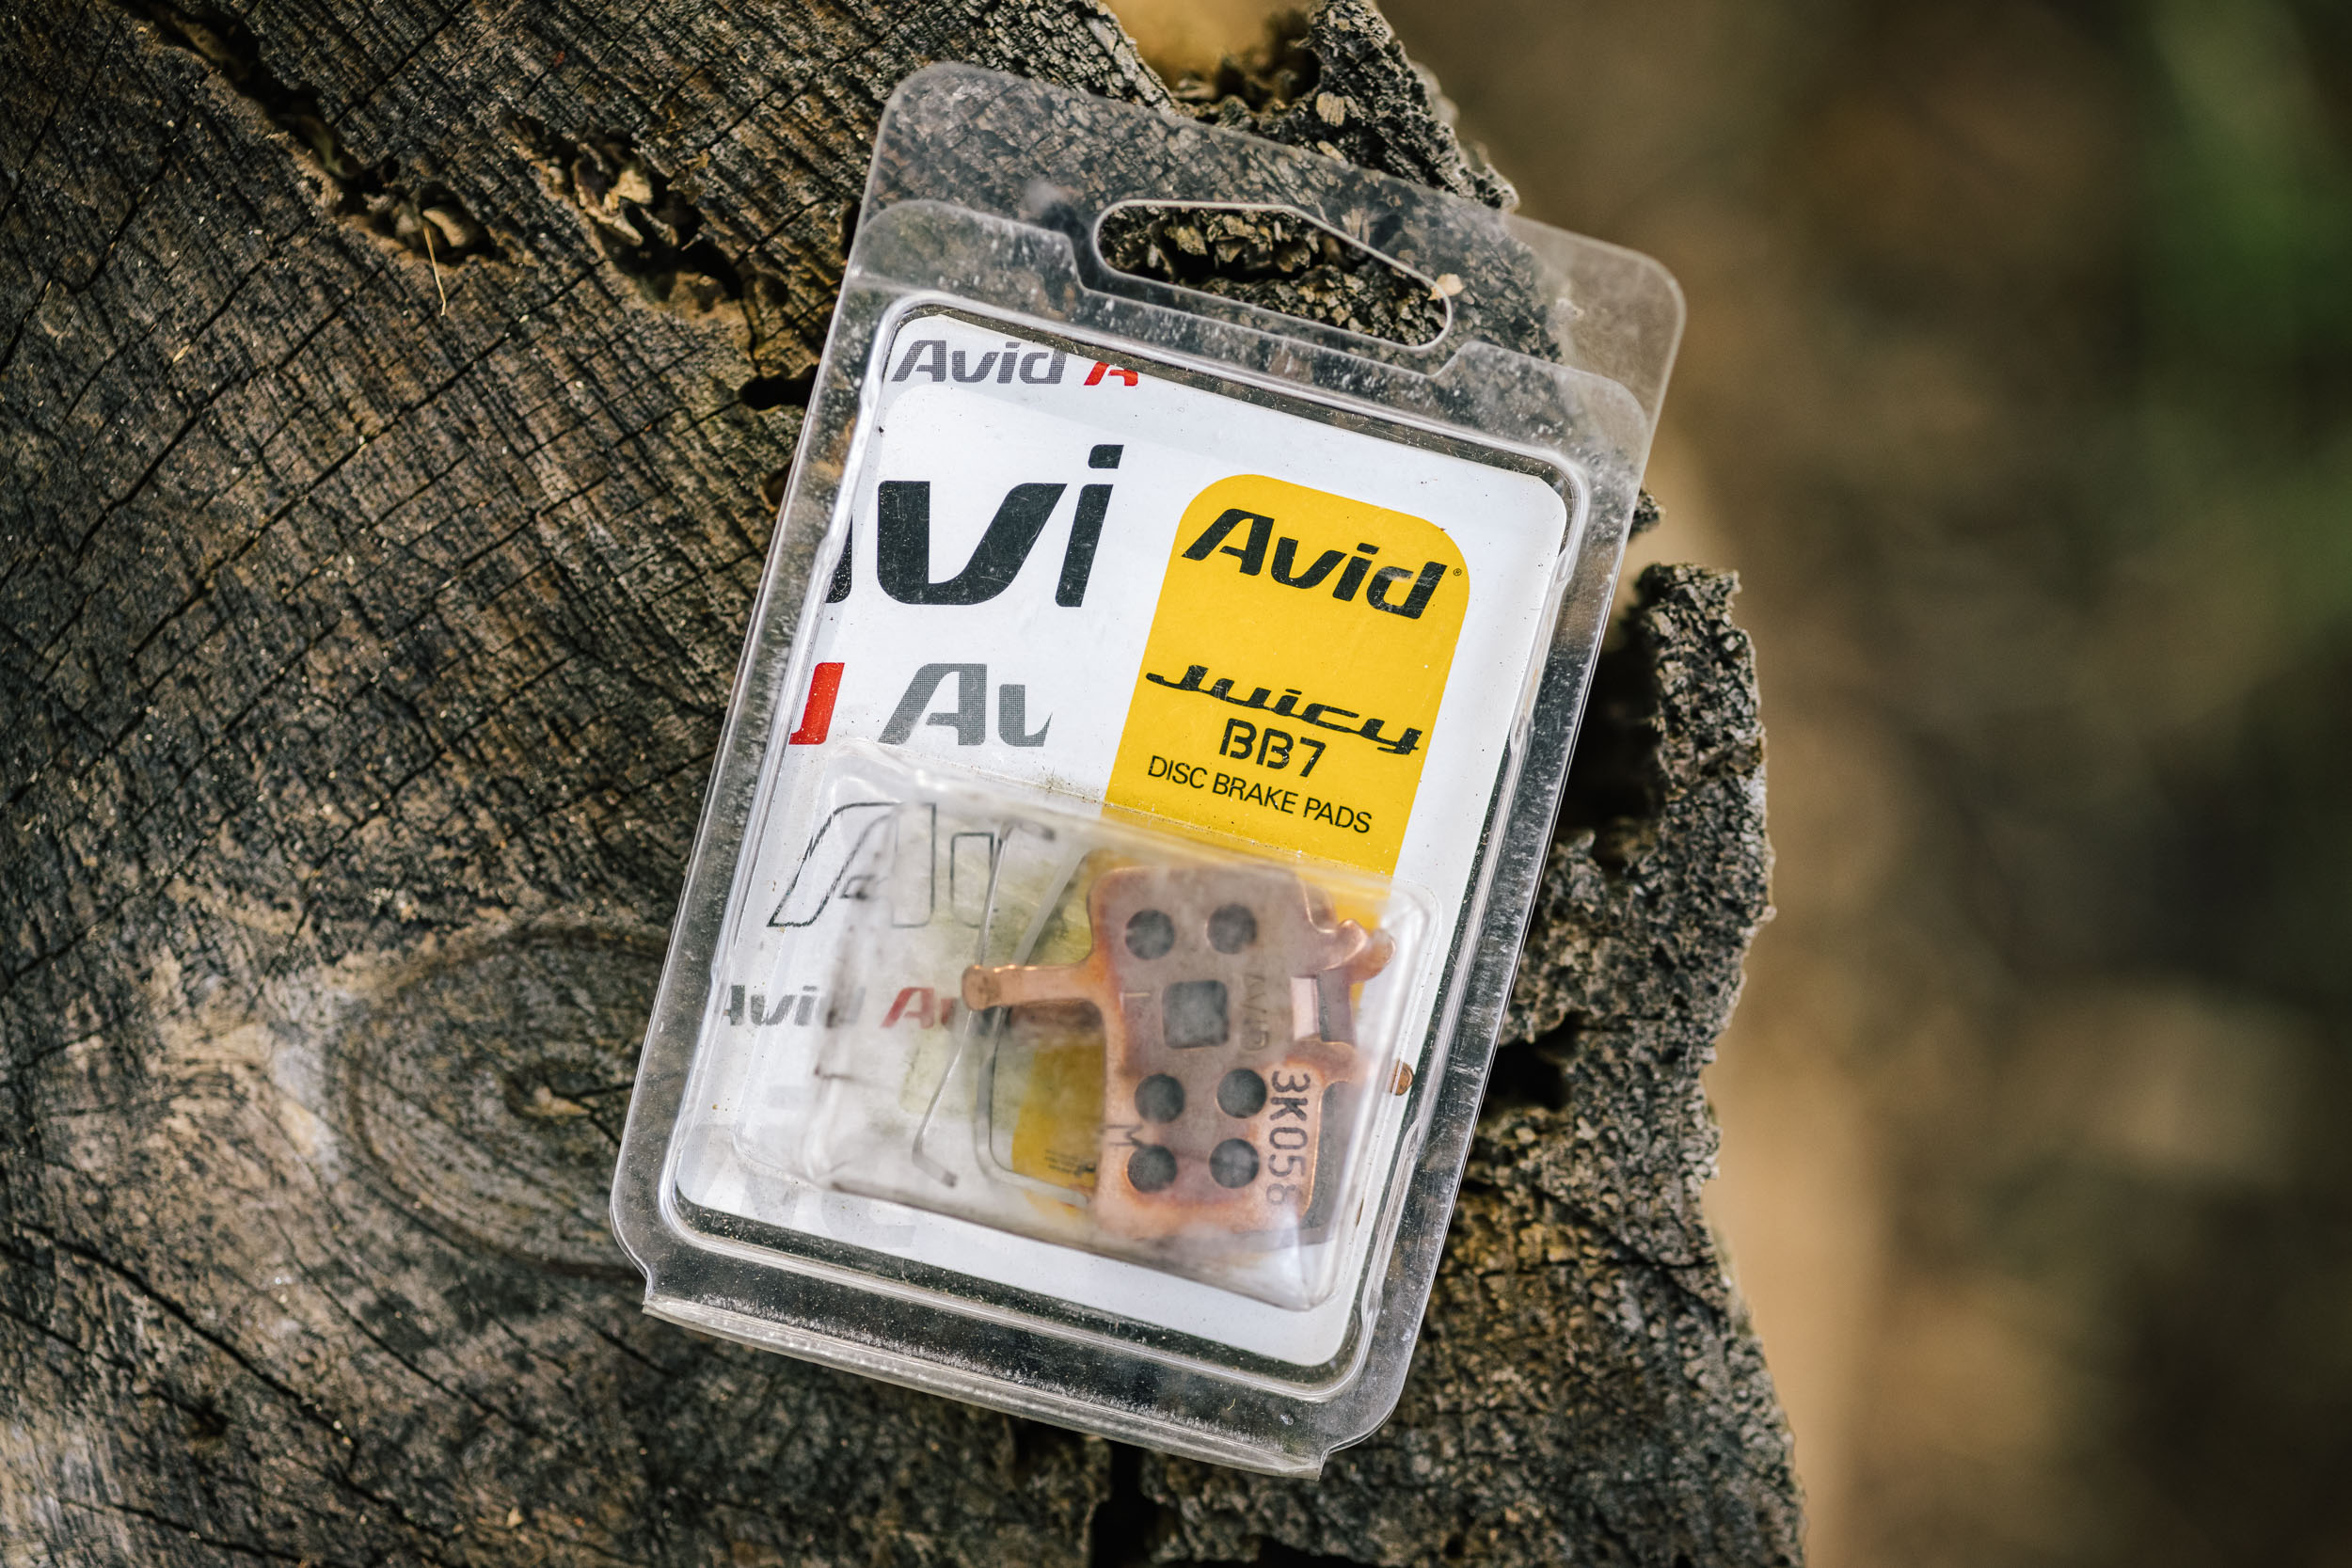
Avid BB7
You can’t ignore BB7s for a long-term travel bike. Here’s what Cass Gilbert had to say: “It’s hard to go back to mechanicals after hydros… but when I do, it’s generally Avid BB7s set up with compressionless cable housing. In some ways, I prefer TRP Spykes, but they have a habit of backing off over bumpy descents. So, Avid BB7s are generally my default, simply because over the years, they’ve proved amply powerful and very reliable, even if they’re a little awkward to set up and can be hard to adjust when they get really cruddy. I run 203/180mm rotors front and rear, which helps for bikepacking too.”
Hydraulic Disc Brakes
While hydraulic brakes seem much more complicated than mechanical disc brakes, the reality is, they’re really not. They use the same technology that’s been in cars or motorcycles since the 1920s. On a bicycle, the hydraulic lever engages a plunger that pushes brake fluid from the master cylinder in the lever body through the brake line. This is a sealed system, so the master cylinder and line are full of brake fluid. The pressure in the line engages pistons in the brake caliper, which pushes the two brake pads against the rotor.
The reason hydraulic disc brakes are more powerful than mechanical disc brakes is that the master cylinder multiplies the force put into the brake lever through the line, creating more braking force than what was applied at the brake lever. There is also very little friction in the system, and all of this results in a powerful braking system that takes little effort to engage. Most hydraulic brakes can be operated with just one finger, which frees up the others for better handlebar control, resulting in less hand fatigue on long rides.
Pros
- Hydraulic disc brakes are more powerful and faster stopping
- There’s less force required, resulting in less hand fatigue
- One-finger operation frees up more digits for better control off-road
- Hydros offer superior modulation (control of braking force)
- There’s very little adjustment required because calipers/pistons self-adjust
- Hydraulic disc brakes have smoother operation because there is no cable friction
Cons
- Hydros require a periodic bleed (depending on the model)
- They’re a royal pain to move from bike to bike
- Because hydraulic brakes rely on in-compressible fluid, they can fail due to the fluid being compromised (details in Traveling with Hydros section below)
- Some models may use pads that are more difficult to source in places lacking modern bike shops
- You have to be careful not to accidentally compress the pads when the front wheel is out
- There may be a worry aspect when touring, such as housing getting snagged during transportation (like on the roof of a bus)
Recommended Hydraulic Disc Brakes
There are a lot more choices out there when it comes to hydraulic disc brakes. Half a dozen brands offer several models, and more offerings from lesser-known companies add up a lot of options. Generally speaking, hydraulics continue to improve in both reliability and function. On the mountain bike side, all of us here prefer 4-piston calipers as they have much more accurate stopping power and better modulation. Here are a few that we really like, all of which we’ve put thousands of miles on, both bikepacking and unloaded riding.
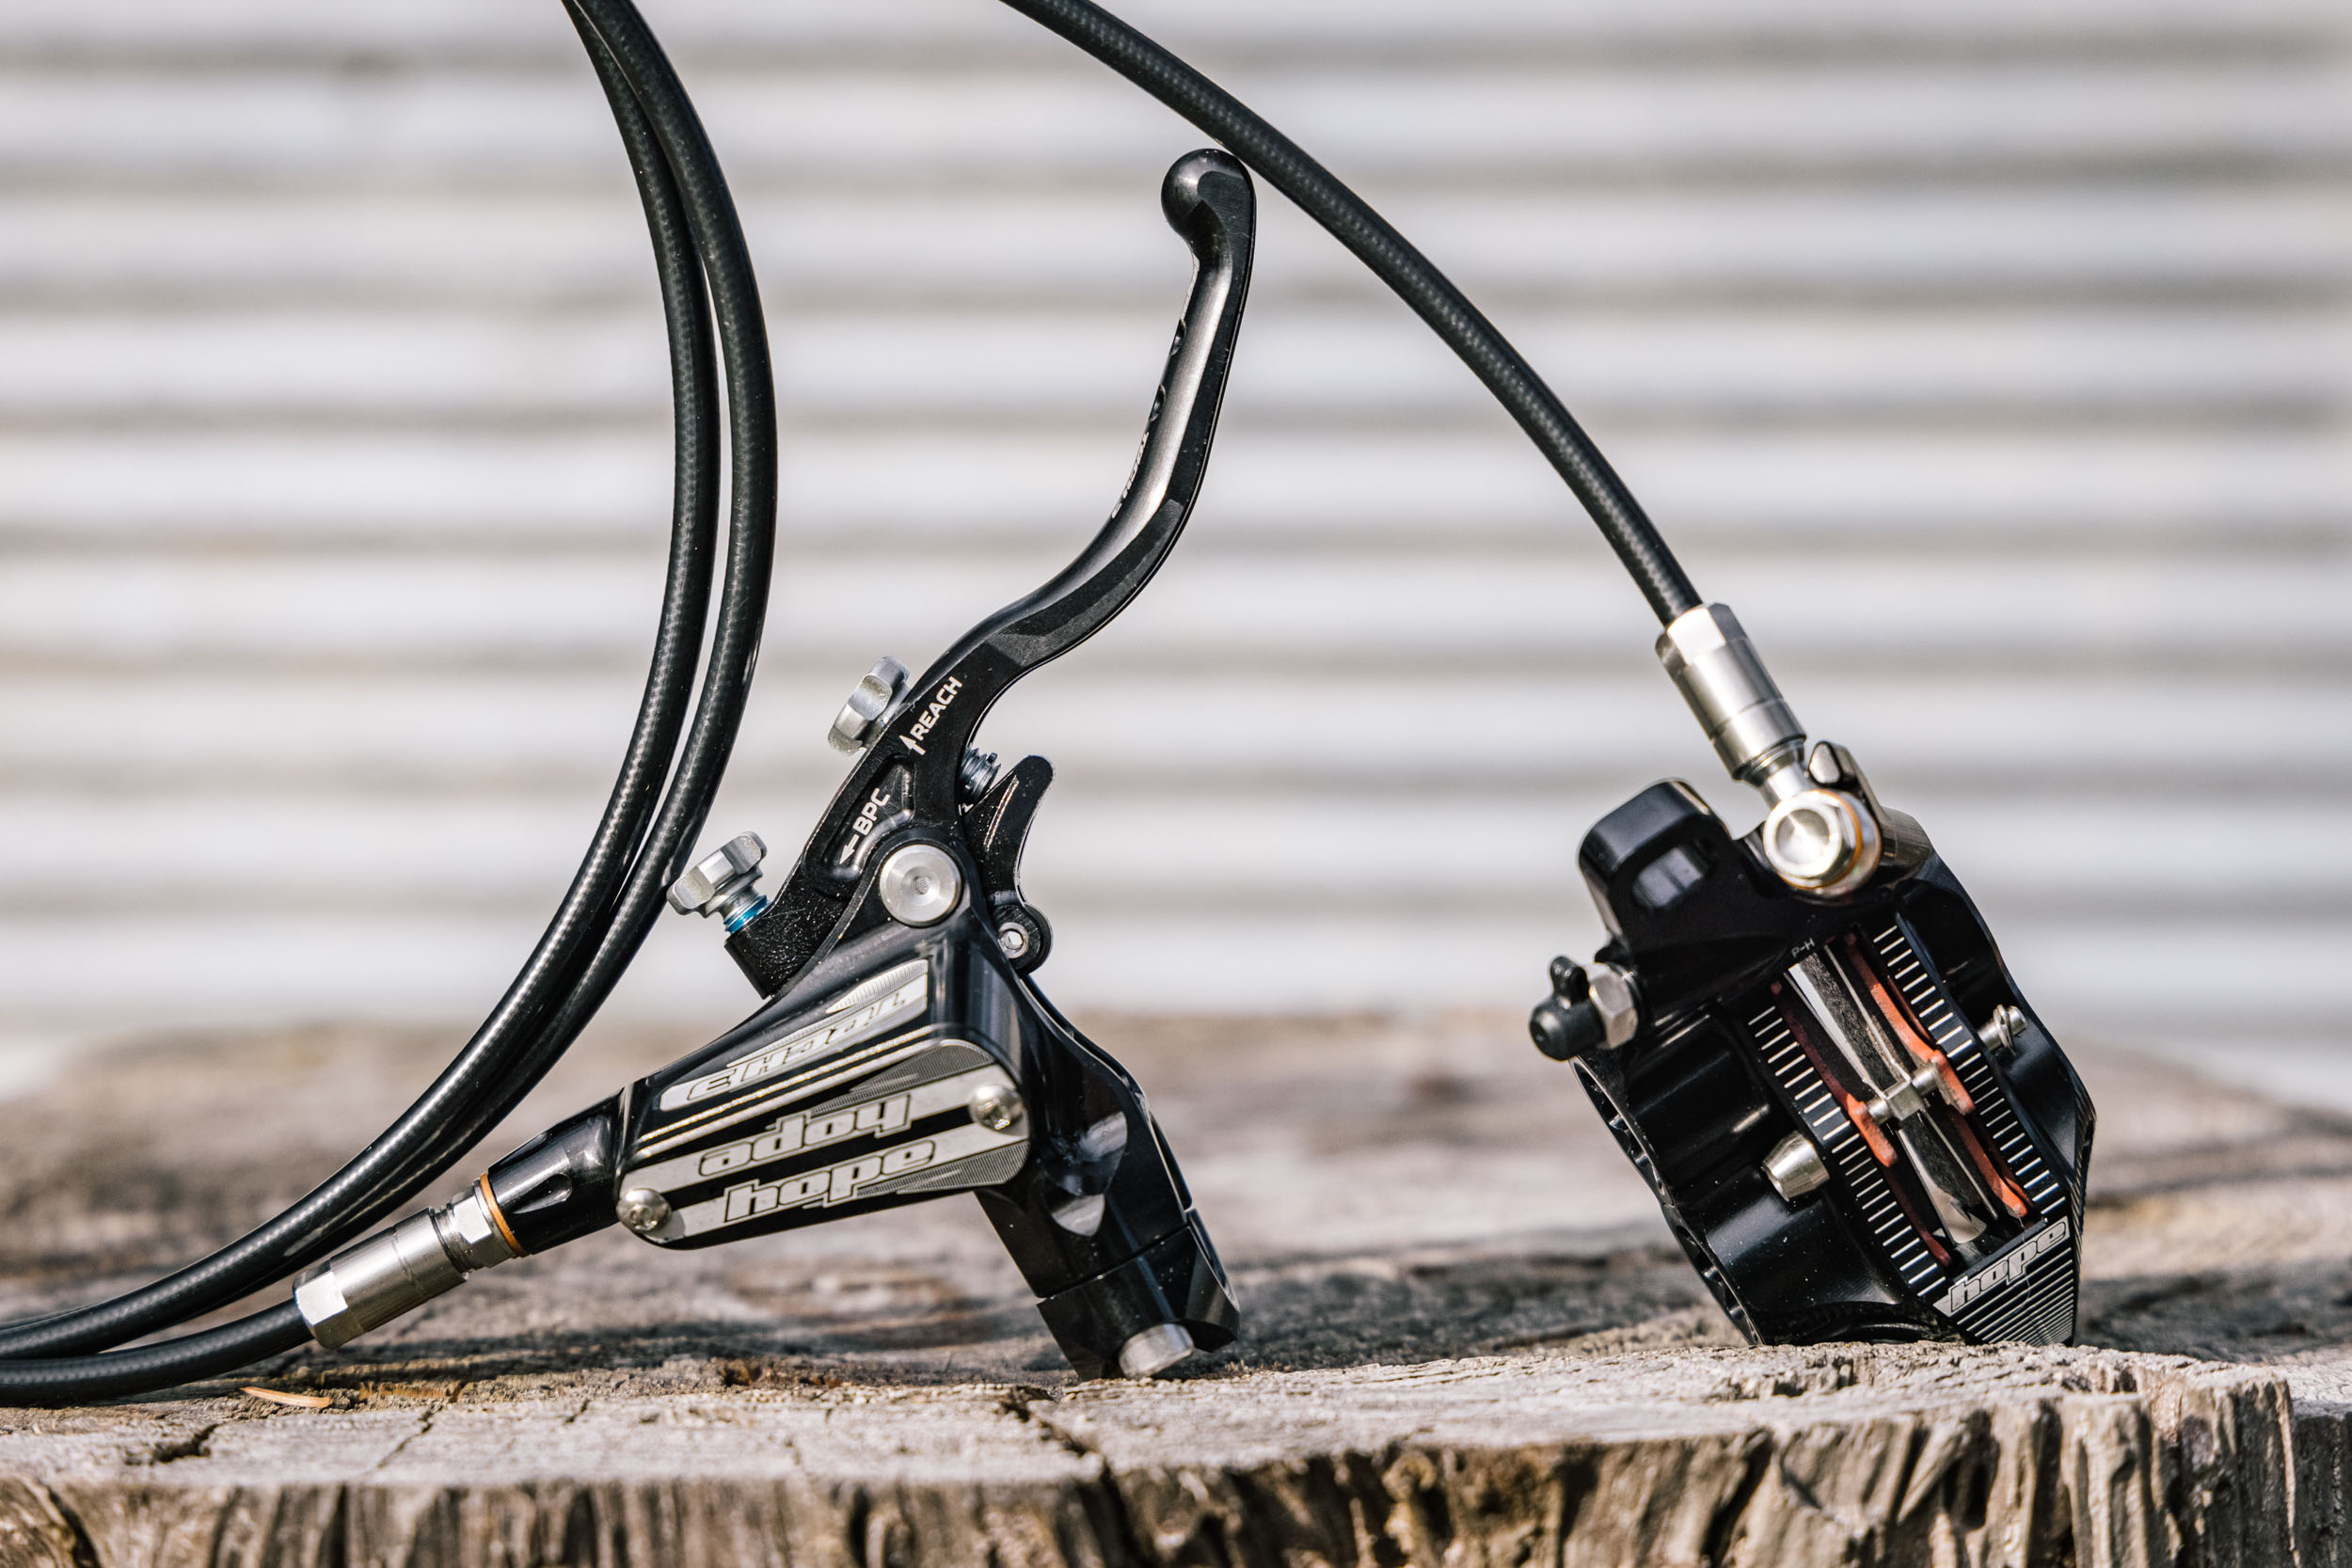
Hope Tech3 E4
The 4-piston Tech3 E4 is Hope’s enduro/trail brake that I’ve personally been testing for over 1,200 miles now. I’m extremely impressed with these brakes and have found them to be unmatched in the lever feel and modulation department. They were trimmed and installed without the need for a bleed, and have been working flawlessly since day one, save a little chirping squeak in the front brake that eventually went away. Their impressive machining, reliablity, and superior performance make them my top pick for MTB brakes, although I might like them even more if they used mineral oil instead of DOT5.1 fluid.
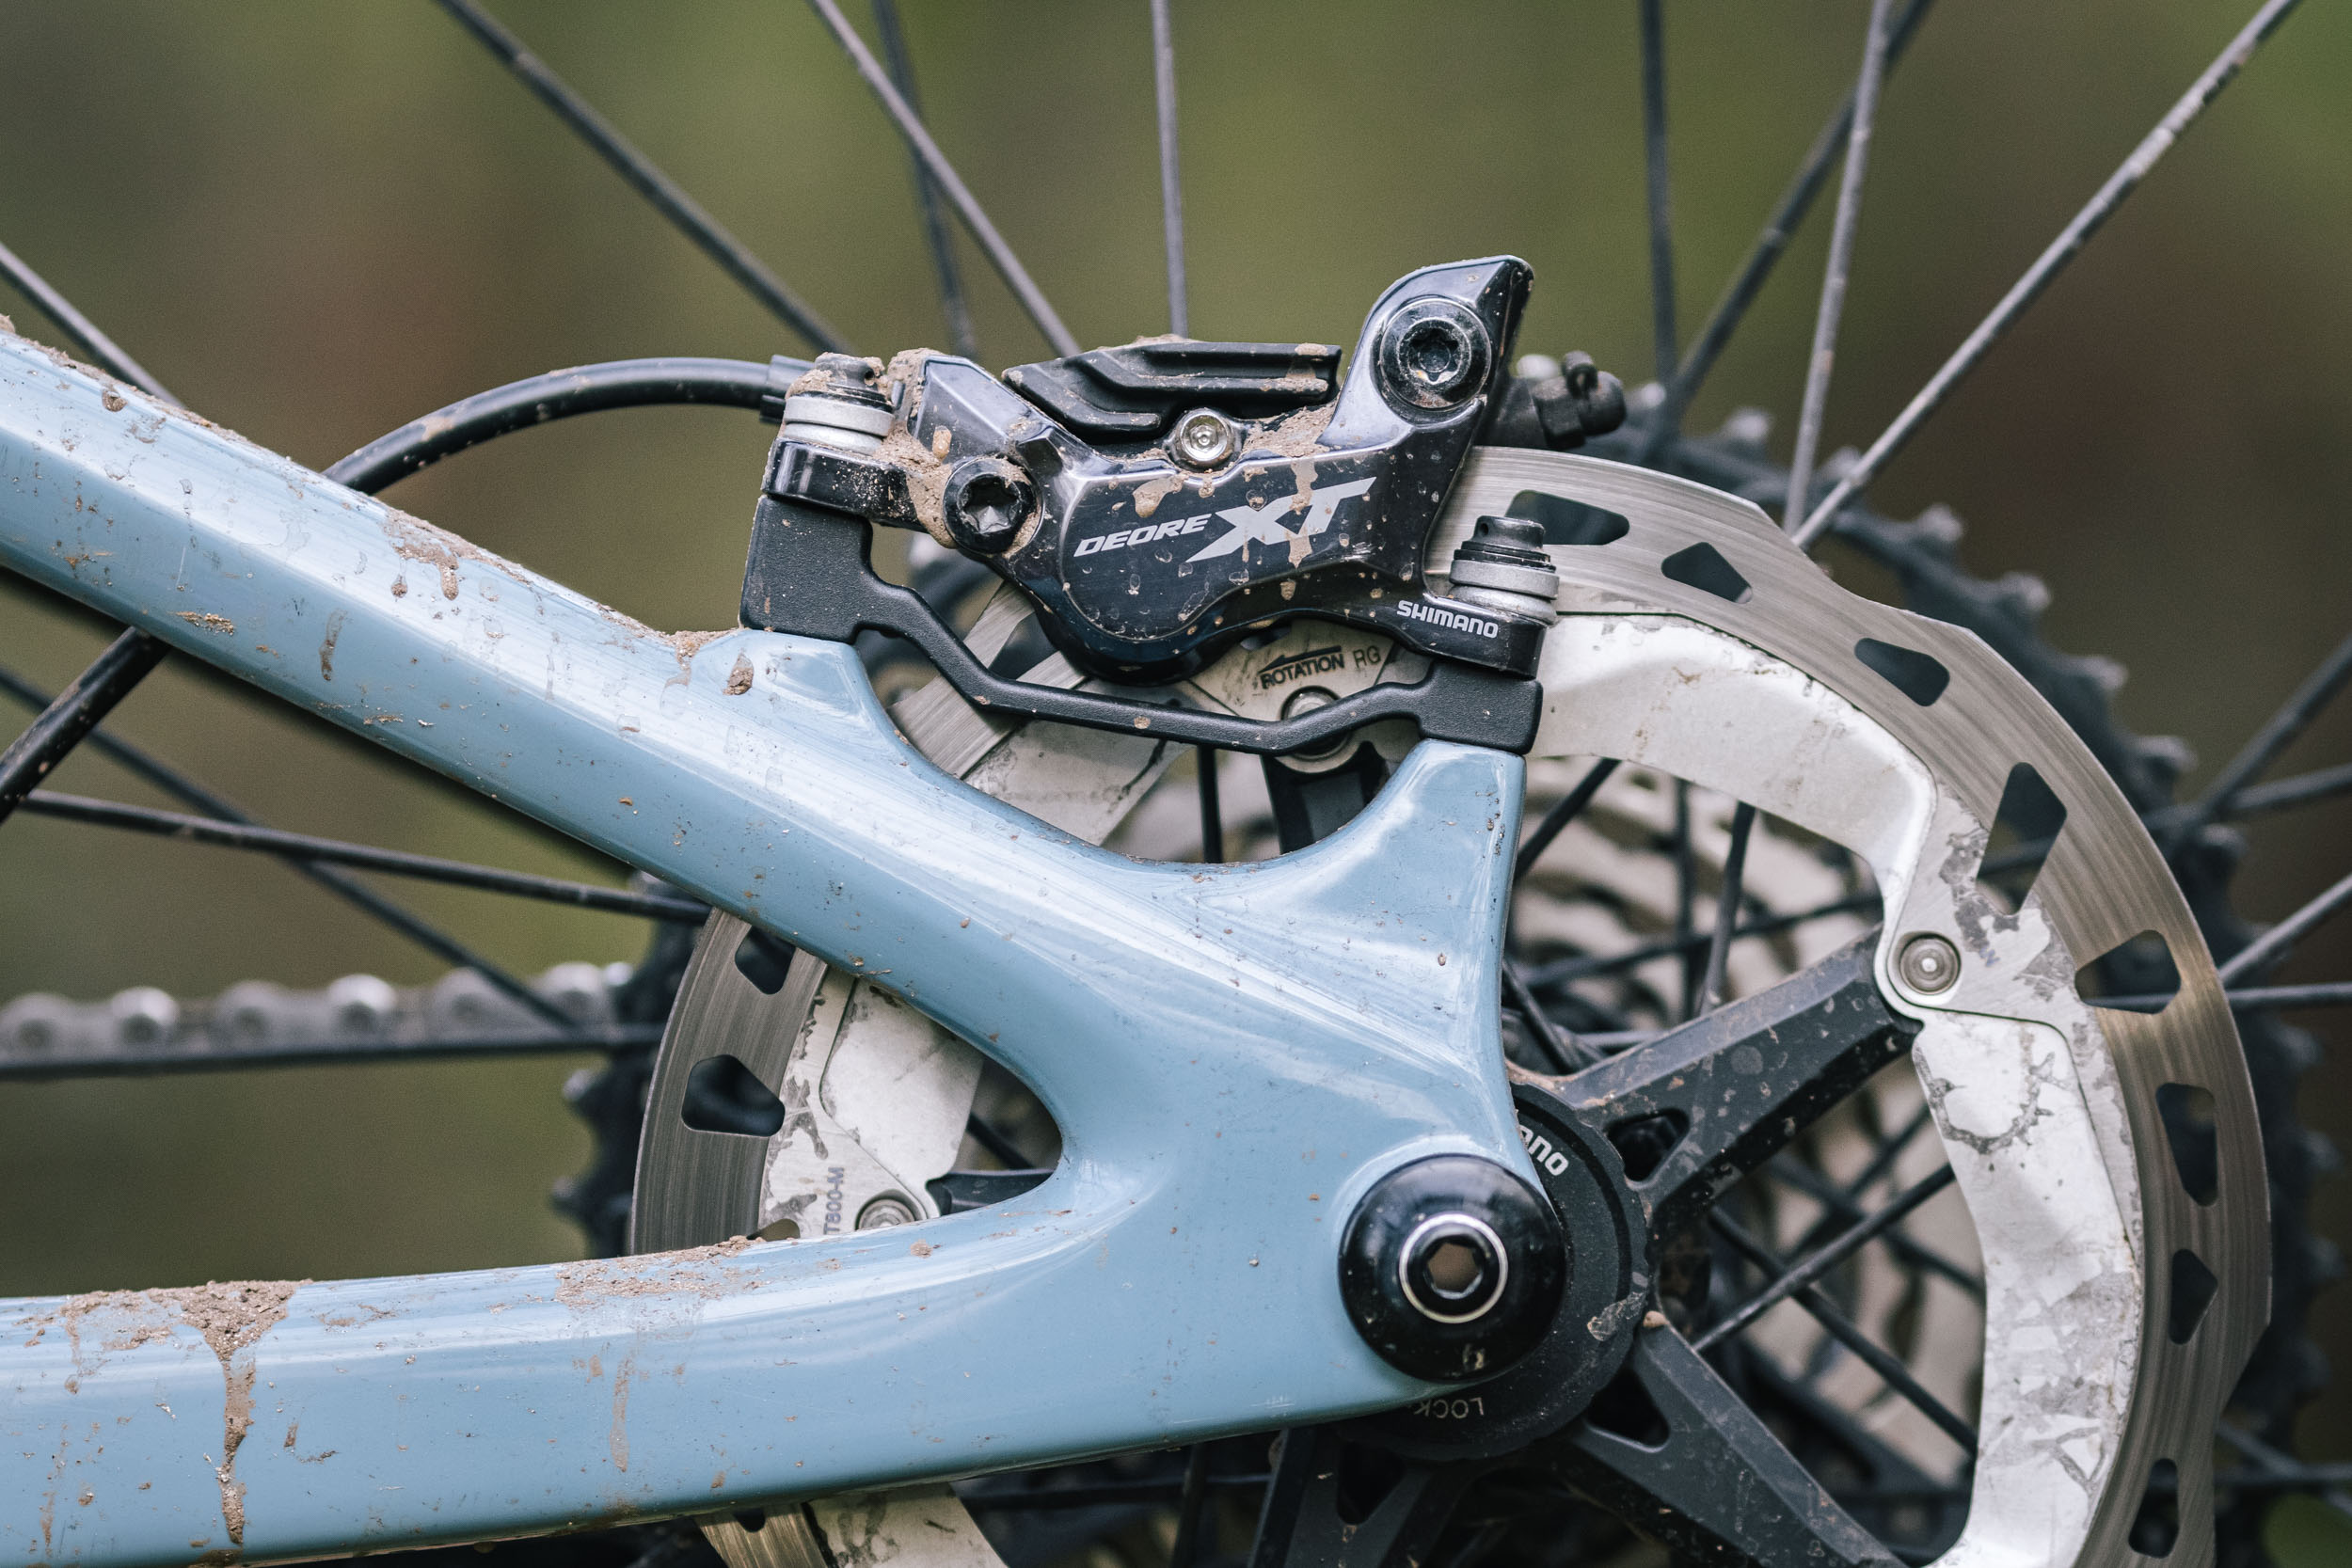
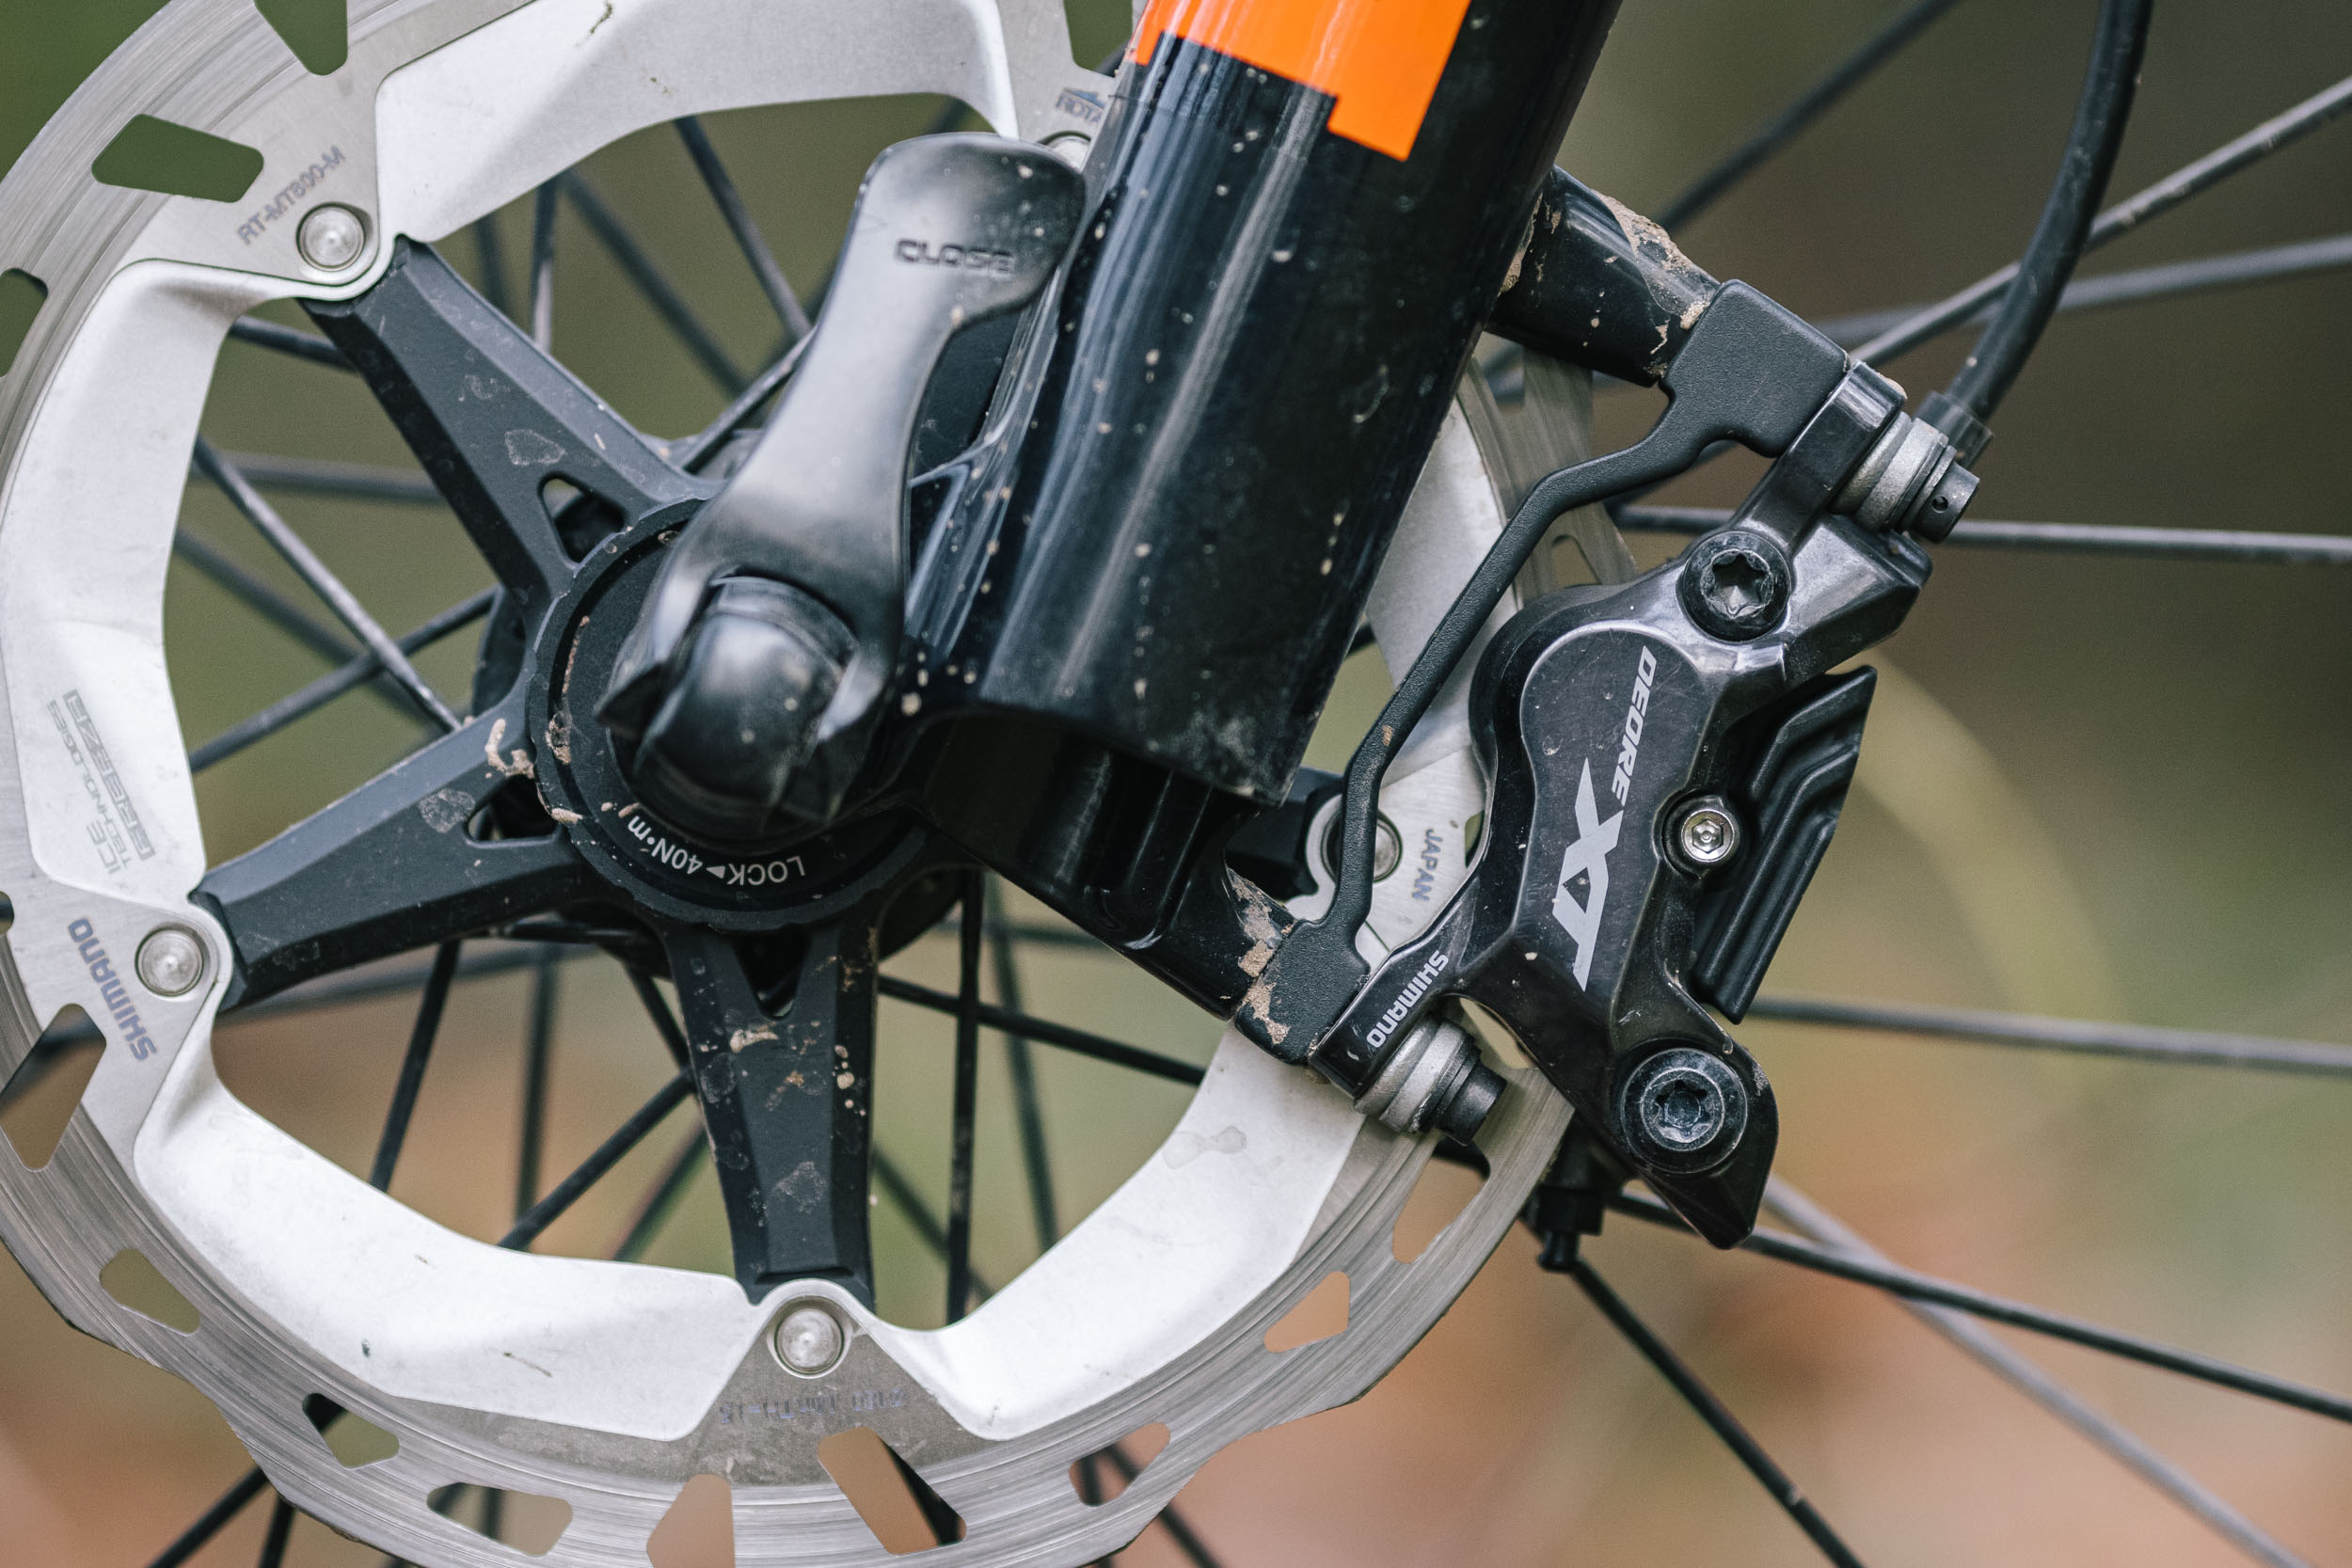
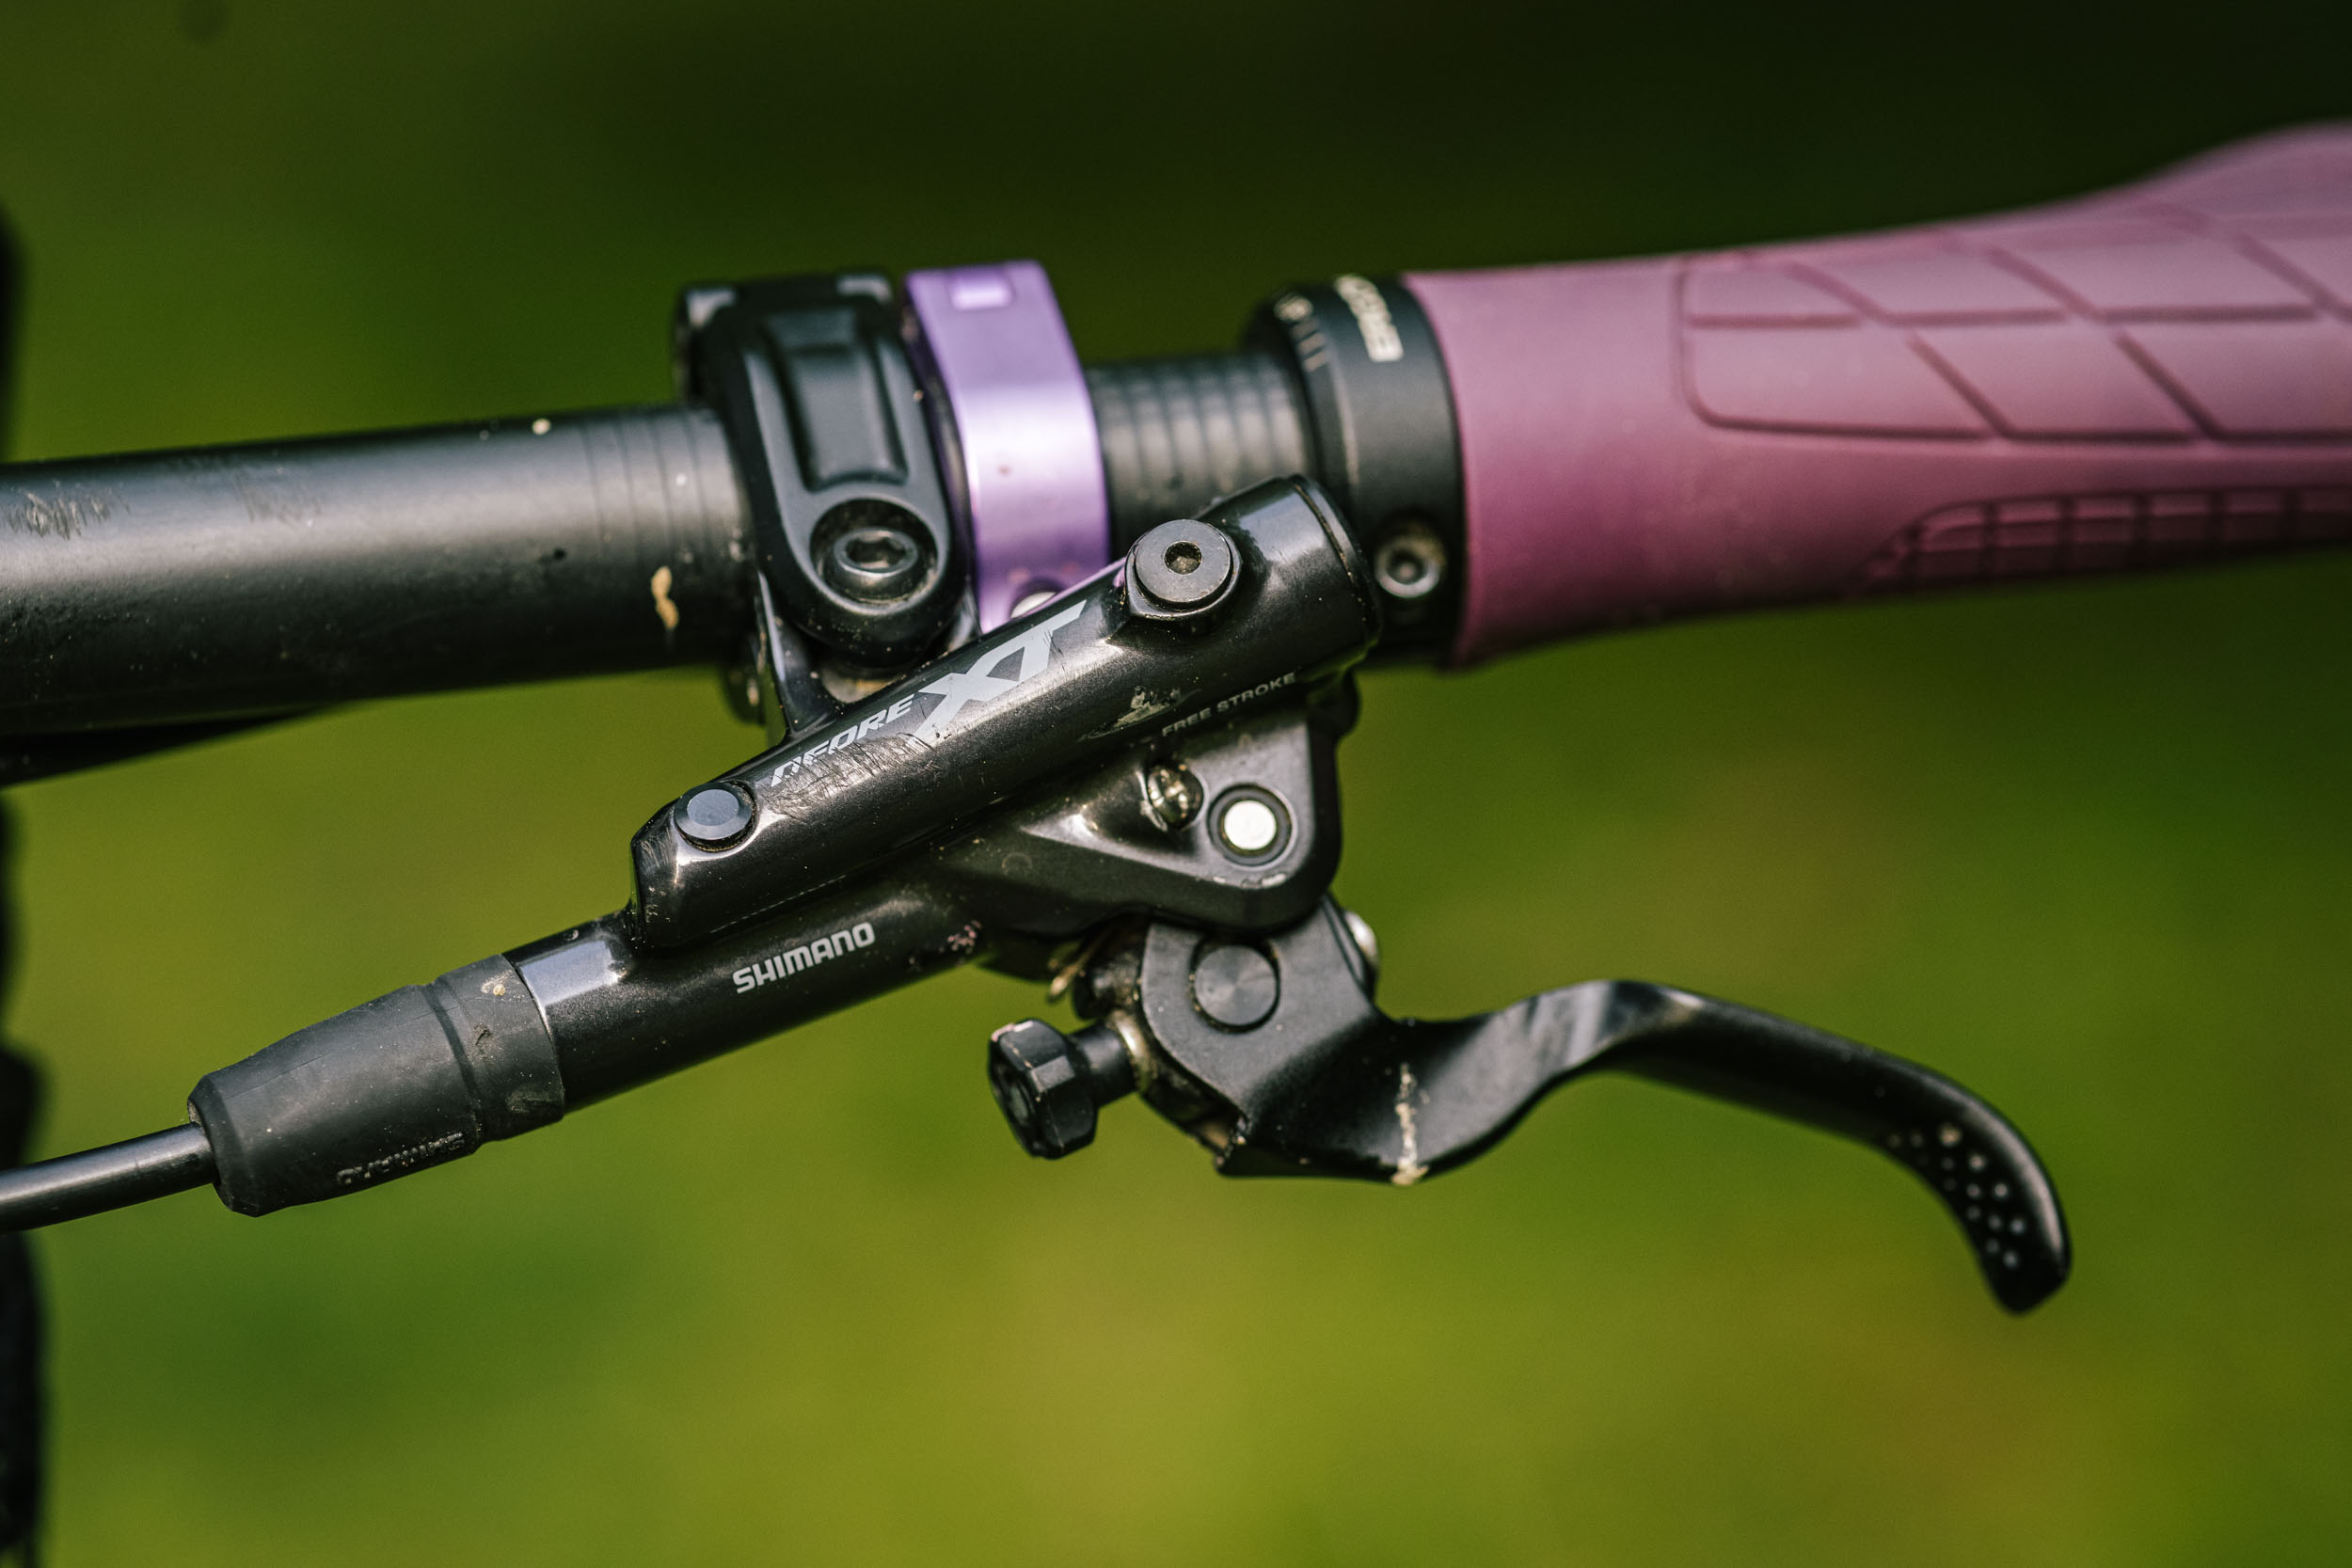
Shimano XT (4-piston)
A few of us here have had an excellent experience with the latest generation of Shimano XT brakes. They’re reliable and have strong stopping power with a great lever feel. For hydros, they’re also a cinch to bleed, as long as you have the Shimano bleed funnel. One downside is that they don’t work particularly well in cold conditions. A few of us have experienced excellent long-term results with SLX and Deore 4-piston models, too, although one set of newer Deores we tested developed leaky calipers after a year of semi-regular use.
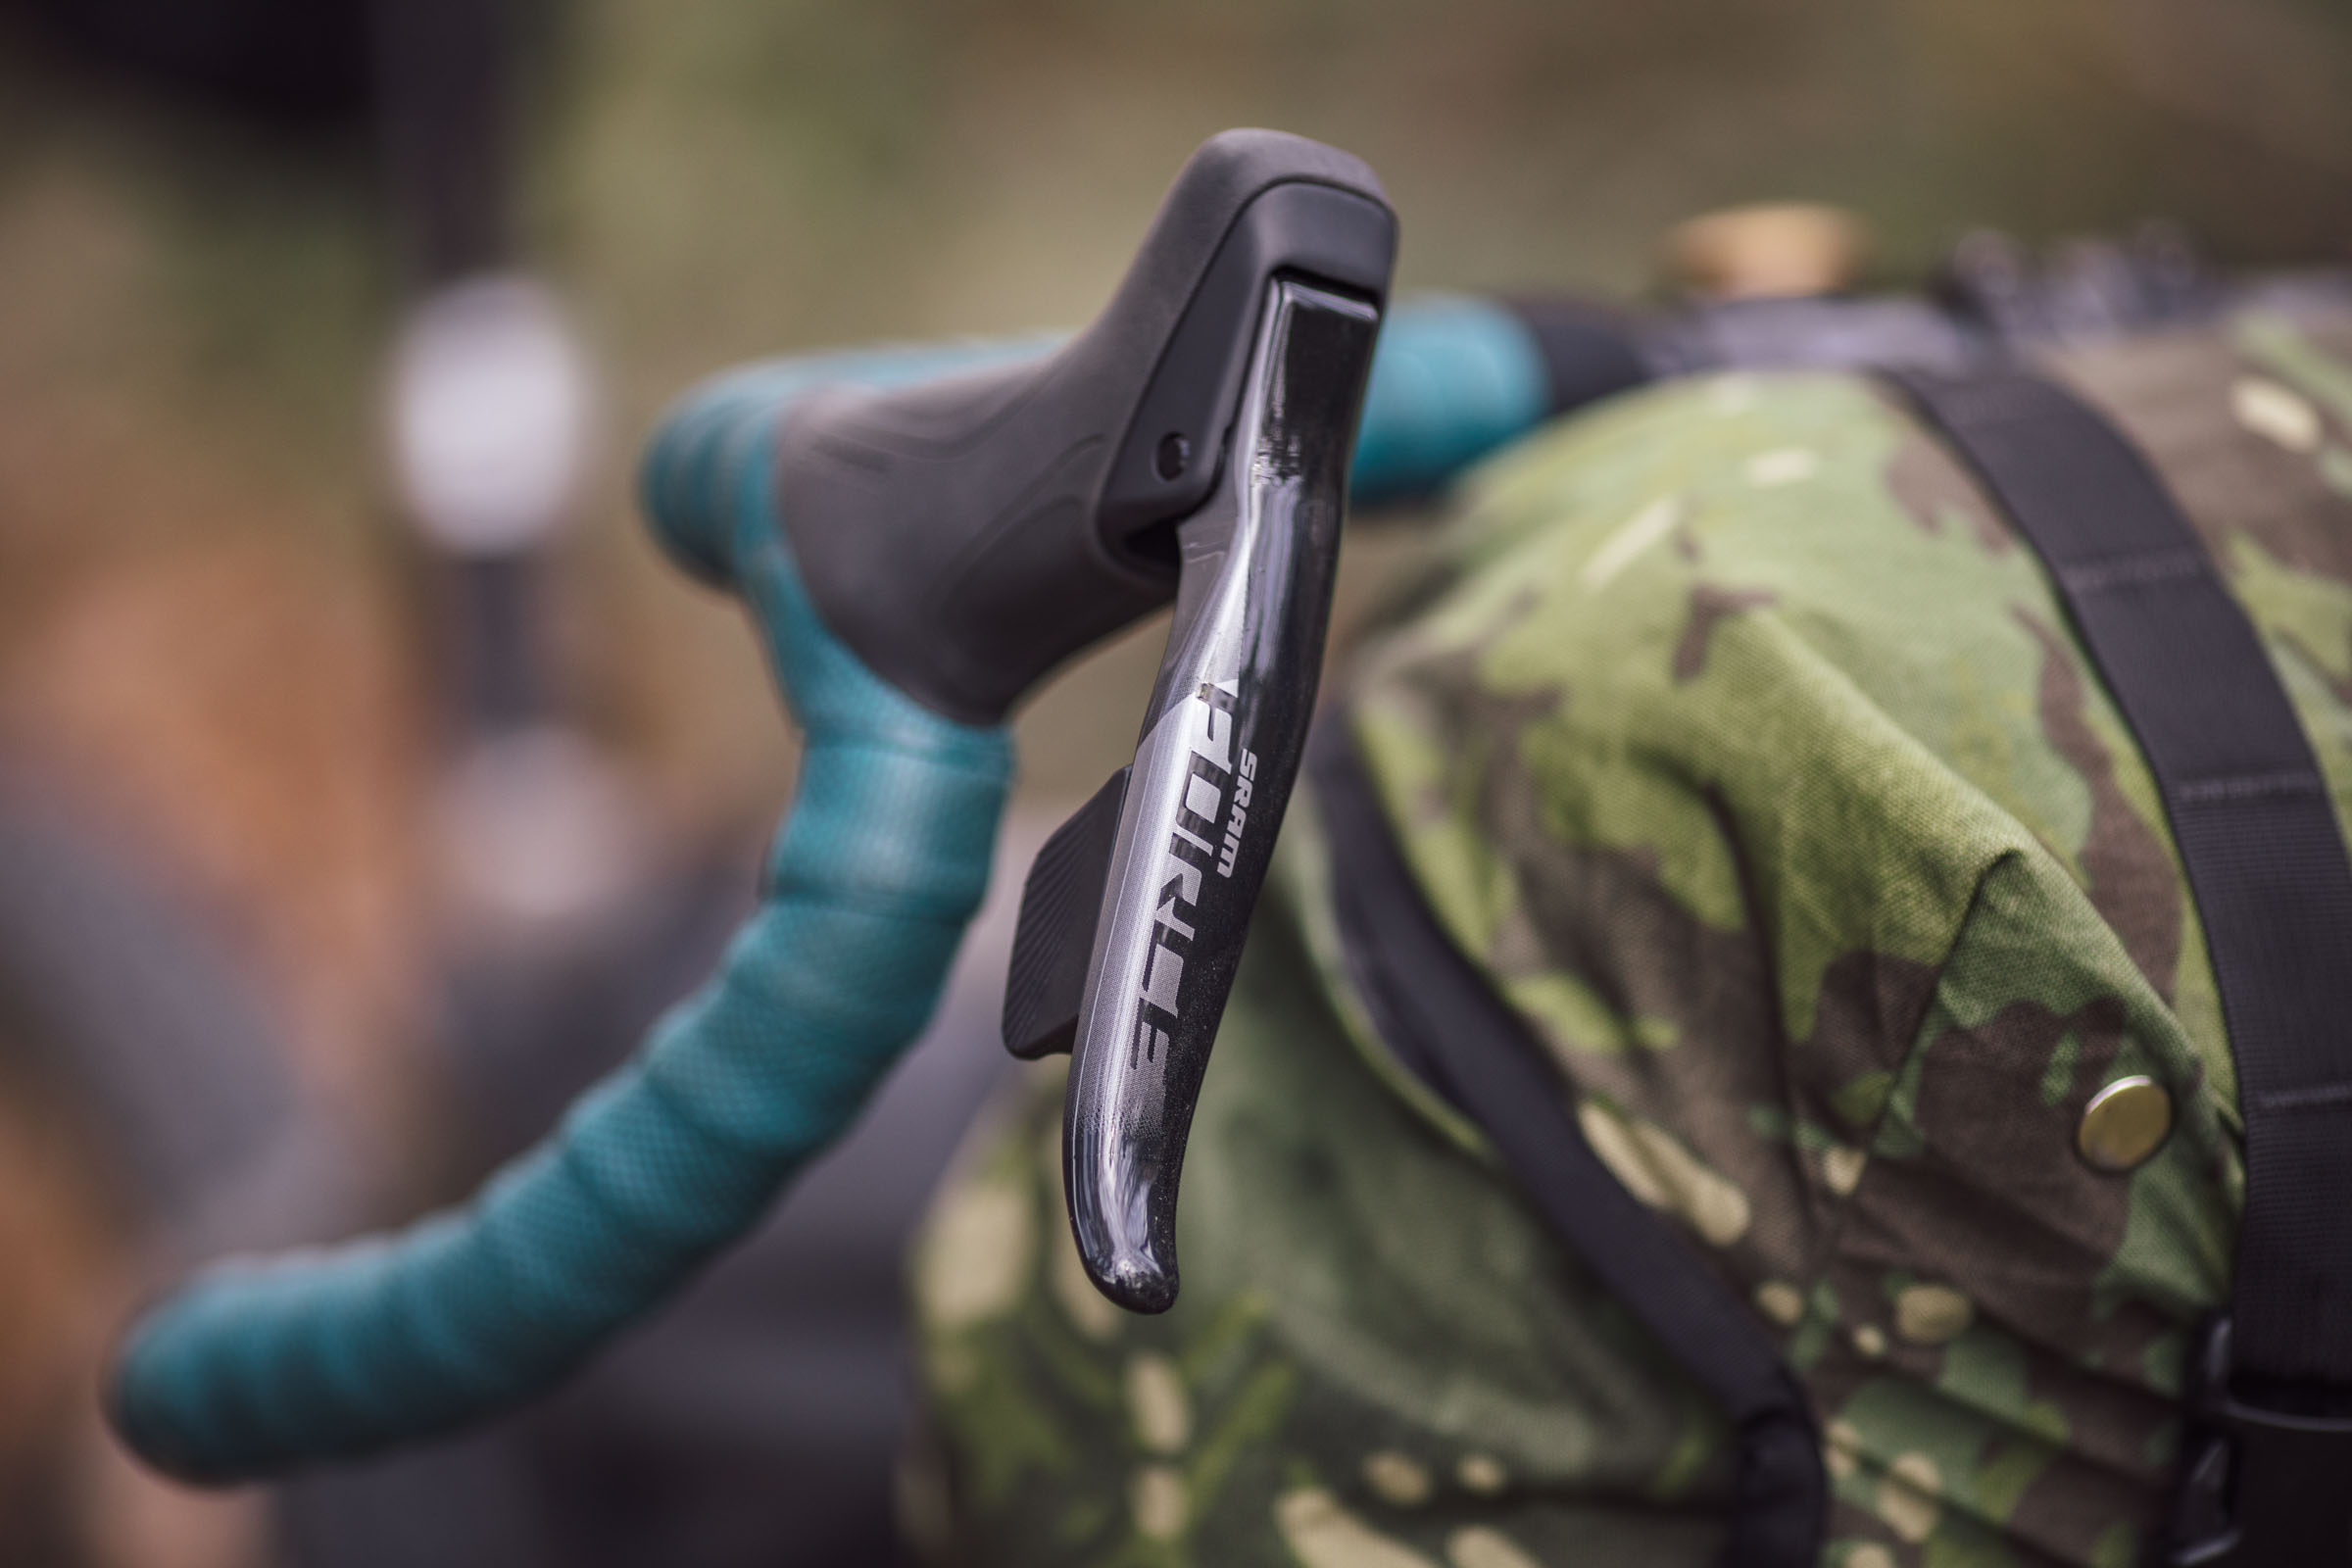
SRAM Force
SRAM Force and Rival are both great performers that have proven to be extremely reliable over the years. While they require syringes to bleed, and they use DOT5.1 fluid, they seem to be practically invincible after thousands of miles of use. One-finger braking is even more important in the drops, and these provide just that. Another option for drop-bar brakes that we’ve been impressed by more recently is Shimano GRX, which of course use mineral oil and a funnel to bleed. We don’t have as much time on them, so we can’t report on long-term durability, but Lucas’s experiences with them on the Curve Kevin of Steel and Bombtrack Hook EXT Ti he reviewed were very positive.
Traveling with Hydros (DOT fluid vs Mineral Oil)
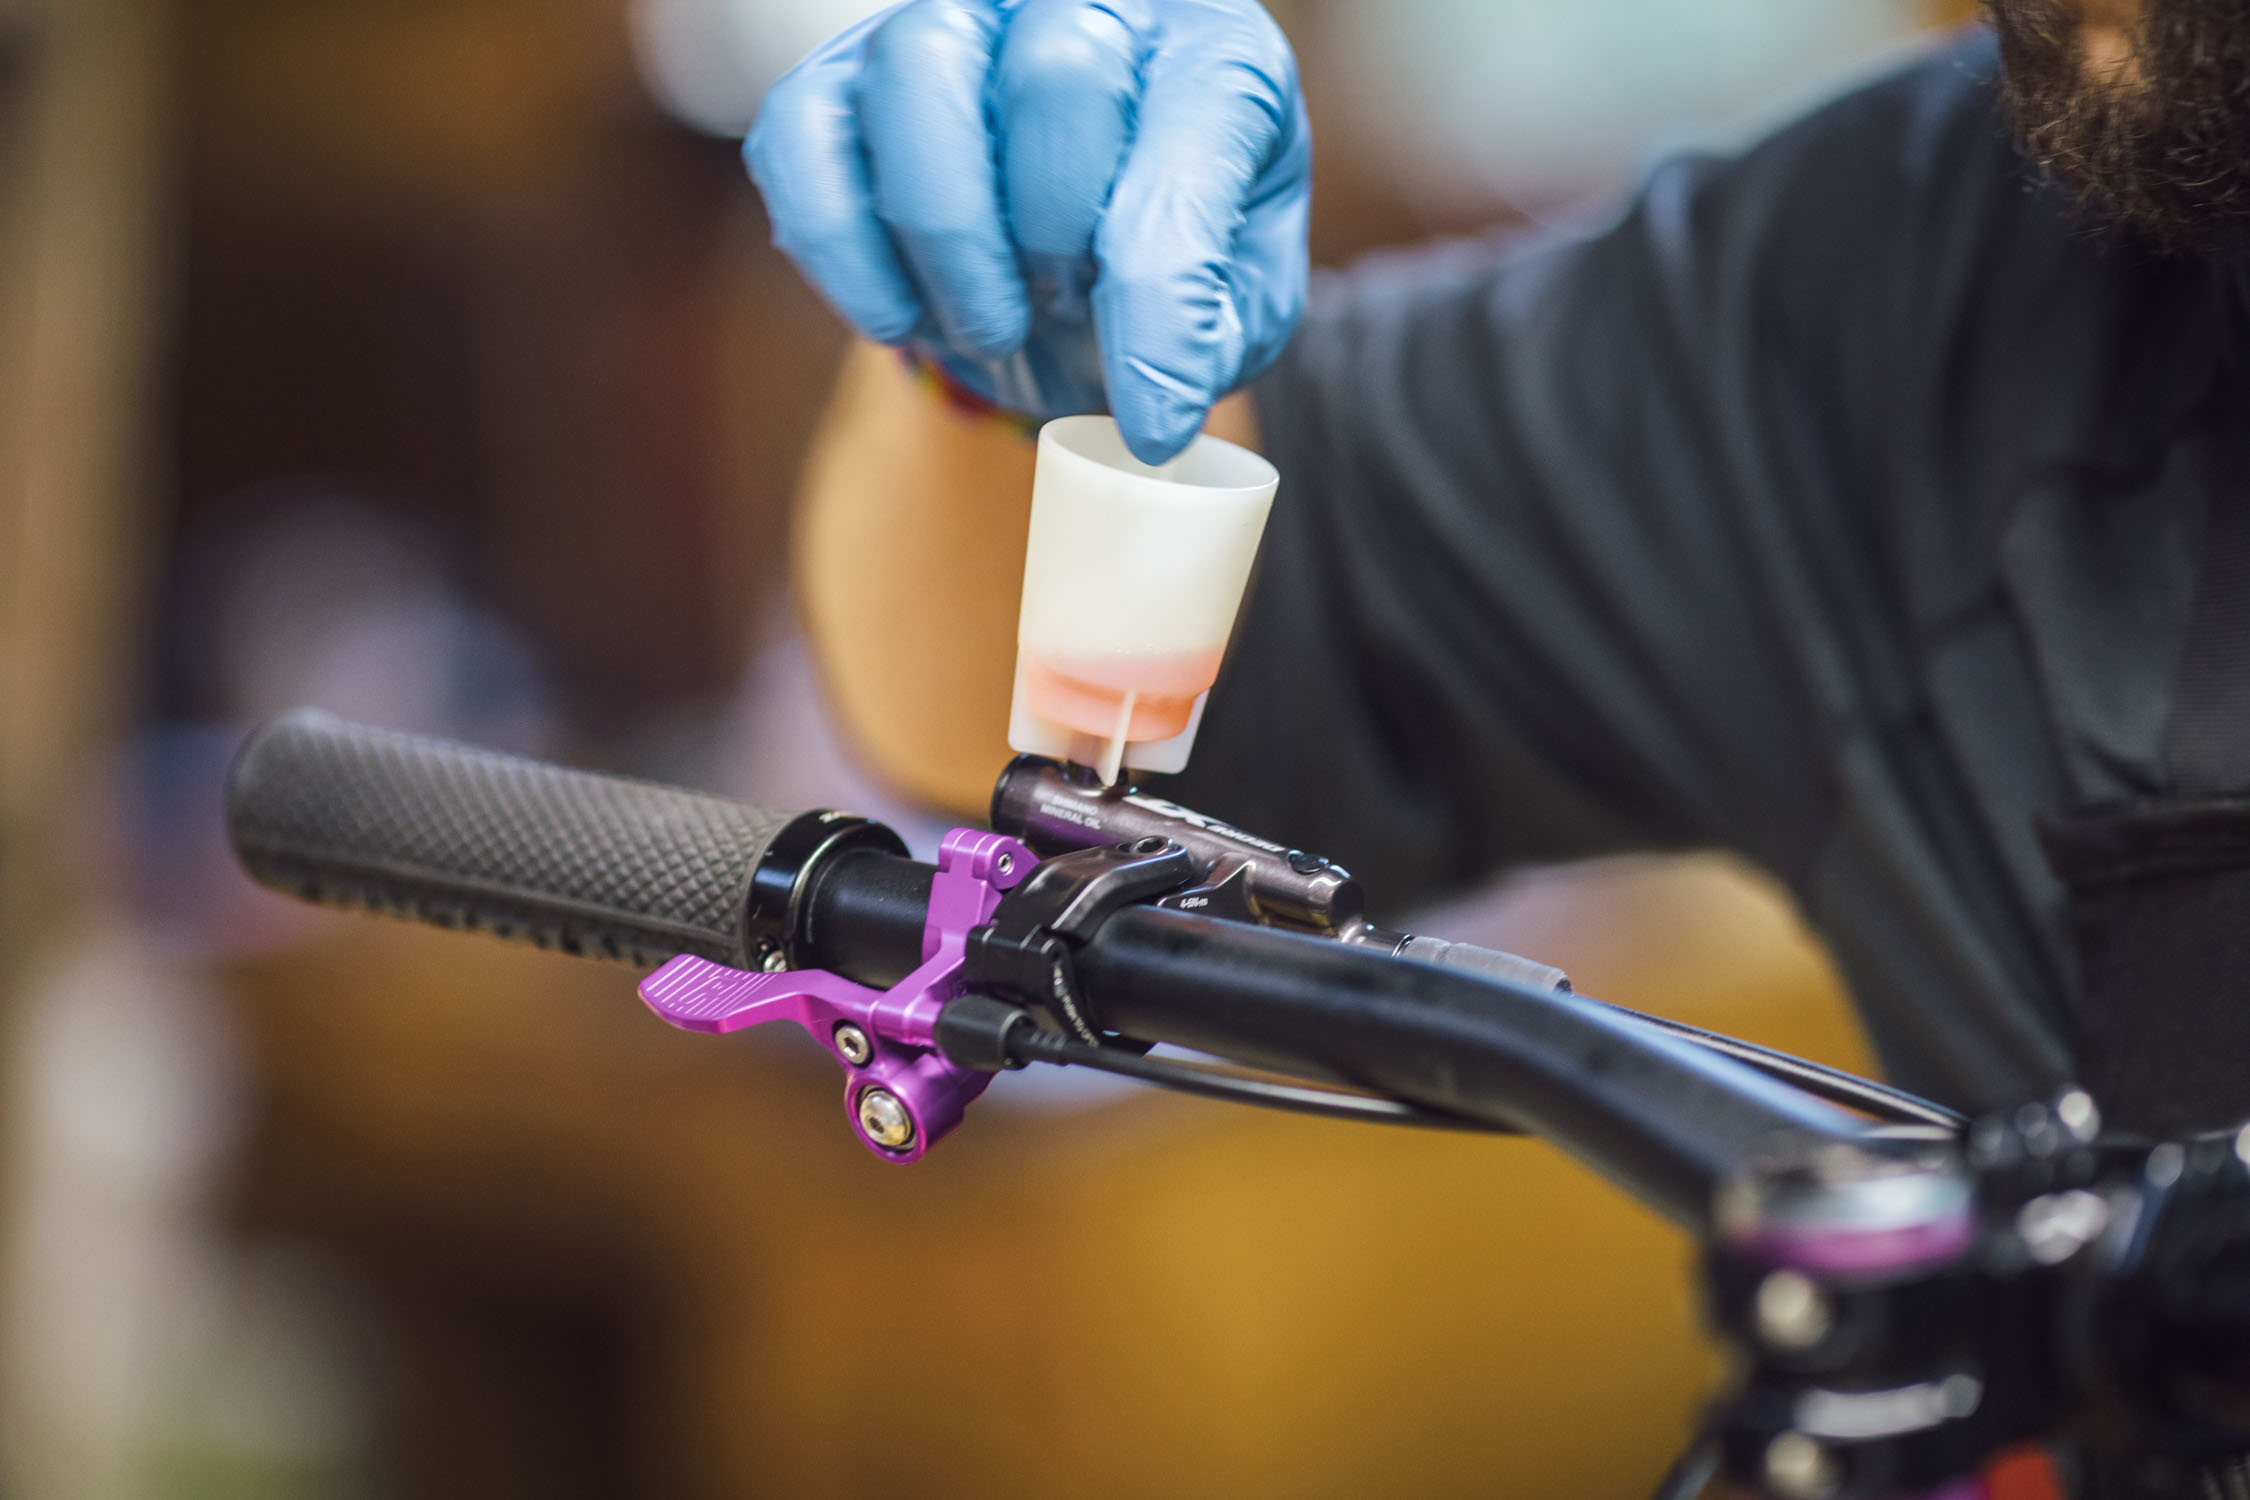
So, what happens if you have a hydraulic brake fail while out on a big trip? Generally, this is a low risk. Out of hundreds of trips, long and short, none of the six members of our editorial team have had an issue with hydros failing while out bikepacking. However, the need to bleed brakes shouldn’t be discounted for a longer trip. Bleeding brakes essentially means replacing the brake fluid to eliminate air or water from the system, or simply as scheduled maintenance to replace dirty oil—some contamination can penetrate the seals at the pistons and all brake manufacturers suggest a regular bleed. For example, Shimano recommends that recreational mountain bikers bleed XT brakes annually; if that were taken literally, one significant 500-mile bikepacking trip would translate to a year of rectrational riding. In my experience, this is a little excessive. The pair of 4-piston XTs I have on my trail bike have upward of 2,250 miles on them and haven’t been bled. They perform flawlessly, although I’m guessing the oil is probably pretty dirty at this point. Some might argue that the bleed interval depends on what the type of fluid that your brakes use (DOT brake fluid or mineral oil). All that said, even if you don’t feel they need it, bleeding your brakes every year (or six months, if you ride a lot) can help reduce the chance of contamination. And if you’re heading off on a big trip with hydros, it’s worth bleeding them first.

The general risk with hydraulics is the fact that brake seals might develop a slow leak, ultimately requiring a brake bleed. This too is a relatively low risk, but it does happen. When it does, air makes its way into the system and compromises the compression forces of the otherwise incompressible brake fluid, resulting in a spongy or completely non-working lever. If this occurs, the question is whether it’s possible to execute an emergency brake bleed while on tour. If you’re in a country or locale with modern bike shops, that’s one thing, but in developing nations or areas far removed from such amenities, one might have to improvise. So, there are two factors to consider when considering the serviceability of hydraulic brakes:
Type of Brake Fluid
There are two main types of brake fluid used in bicycle hydraulic bicycle brakes: DOT fluid and mineral oil. Almost all automobiles use DOT fluid, but usually DOT3. DOT3 isn’t the same as DOT5.1, which is what’s used in SRAM/Avid and Hope brakes. However, DOT3, DOT4, and DOT 5.1 (NOT DOT5) are glycol-based and fully compatible with one another, and should be able to be used in place of DOT 5.1 without affecting the brakes’ performance. In short, if a brake were to fail in a remote location and DOT5.1 wasn’t available, DOT3 could come to the rescue. Note that this hasn’t been tested by any of us. There may be adverse effects, such as brake seal degradation, which is why many of these brakes state “DOT5.1 fluid only.”
Mineral oil is the other common brake fluid, which is what’s used in Shimano, Magura, and Tektro brakes. A lot of people prefer mineral oil over DOT because it’s non-toxic and won’t harm your skin or your bike if it spills. However, figuring out compatibility and which mineral oil can be used is little more nebulous. Shimano and Magura both sell their own mineral oil-based fluids. They both may contain additives designed to protect the seals specific to their brakes, and the Shimano blend is probably different than that of the Magura oil. You can also get 100% pure mineral oil in most pharmacies, and baby oil is mineral oil-based, but may contain fragrances or other additives. Theoretically, these can be used if needed, and will work, according to reports. However, it’s unclear if the lack of seal protectants have any adverse effects on reliability.
Bleed Requirements
There’s a learning curve when it comes to bleeding brakes. Some are much easier than others, but most require some specialty tools. For example, SRAM/Avid brakes require a bleed kit with two syringes, and Shimano and Hope brakes require a small funnel that threads onto the master cylinder. Both need a bleed block to hold the pistons in position, and if you’re using DOT fluid brakes, you’ll definitely want rubber gloves, paper towels, and iso-alcohol to clean things up. On a longer trip, you could carry a funnel or syringes if you’re worried about it—or just rely on bike shops. While I wouldn’t bother carrying these tools on any trip, bleeding Shimano brakes would probably be the easiest to prepare for. Hope Tech3 E4s are reportedly just as easy.
Cable-actuated Hydraulics?
The love-child of hydros and mechanical disc brakes is also worth mentioning here. These hybrid brakes offer a closed hydraulic system that is completely contained within the caliper, which is actuated by a cable-pull lever. It’s kind of the best of both worlds. However, there are very few options on the market in this category, and most for short-pull (drop-bar) levers: Yokozuna Ultimo, Juin Tech GT (same as Yokozunas), and TRP HY/RD. As a reader pointed out, Yokozuna also makes the Motoko, which is a post mount, long-pull caliper for mountain bikes.
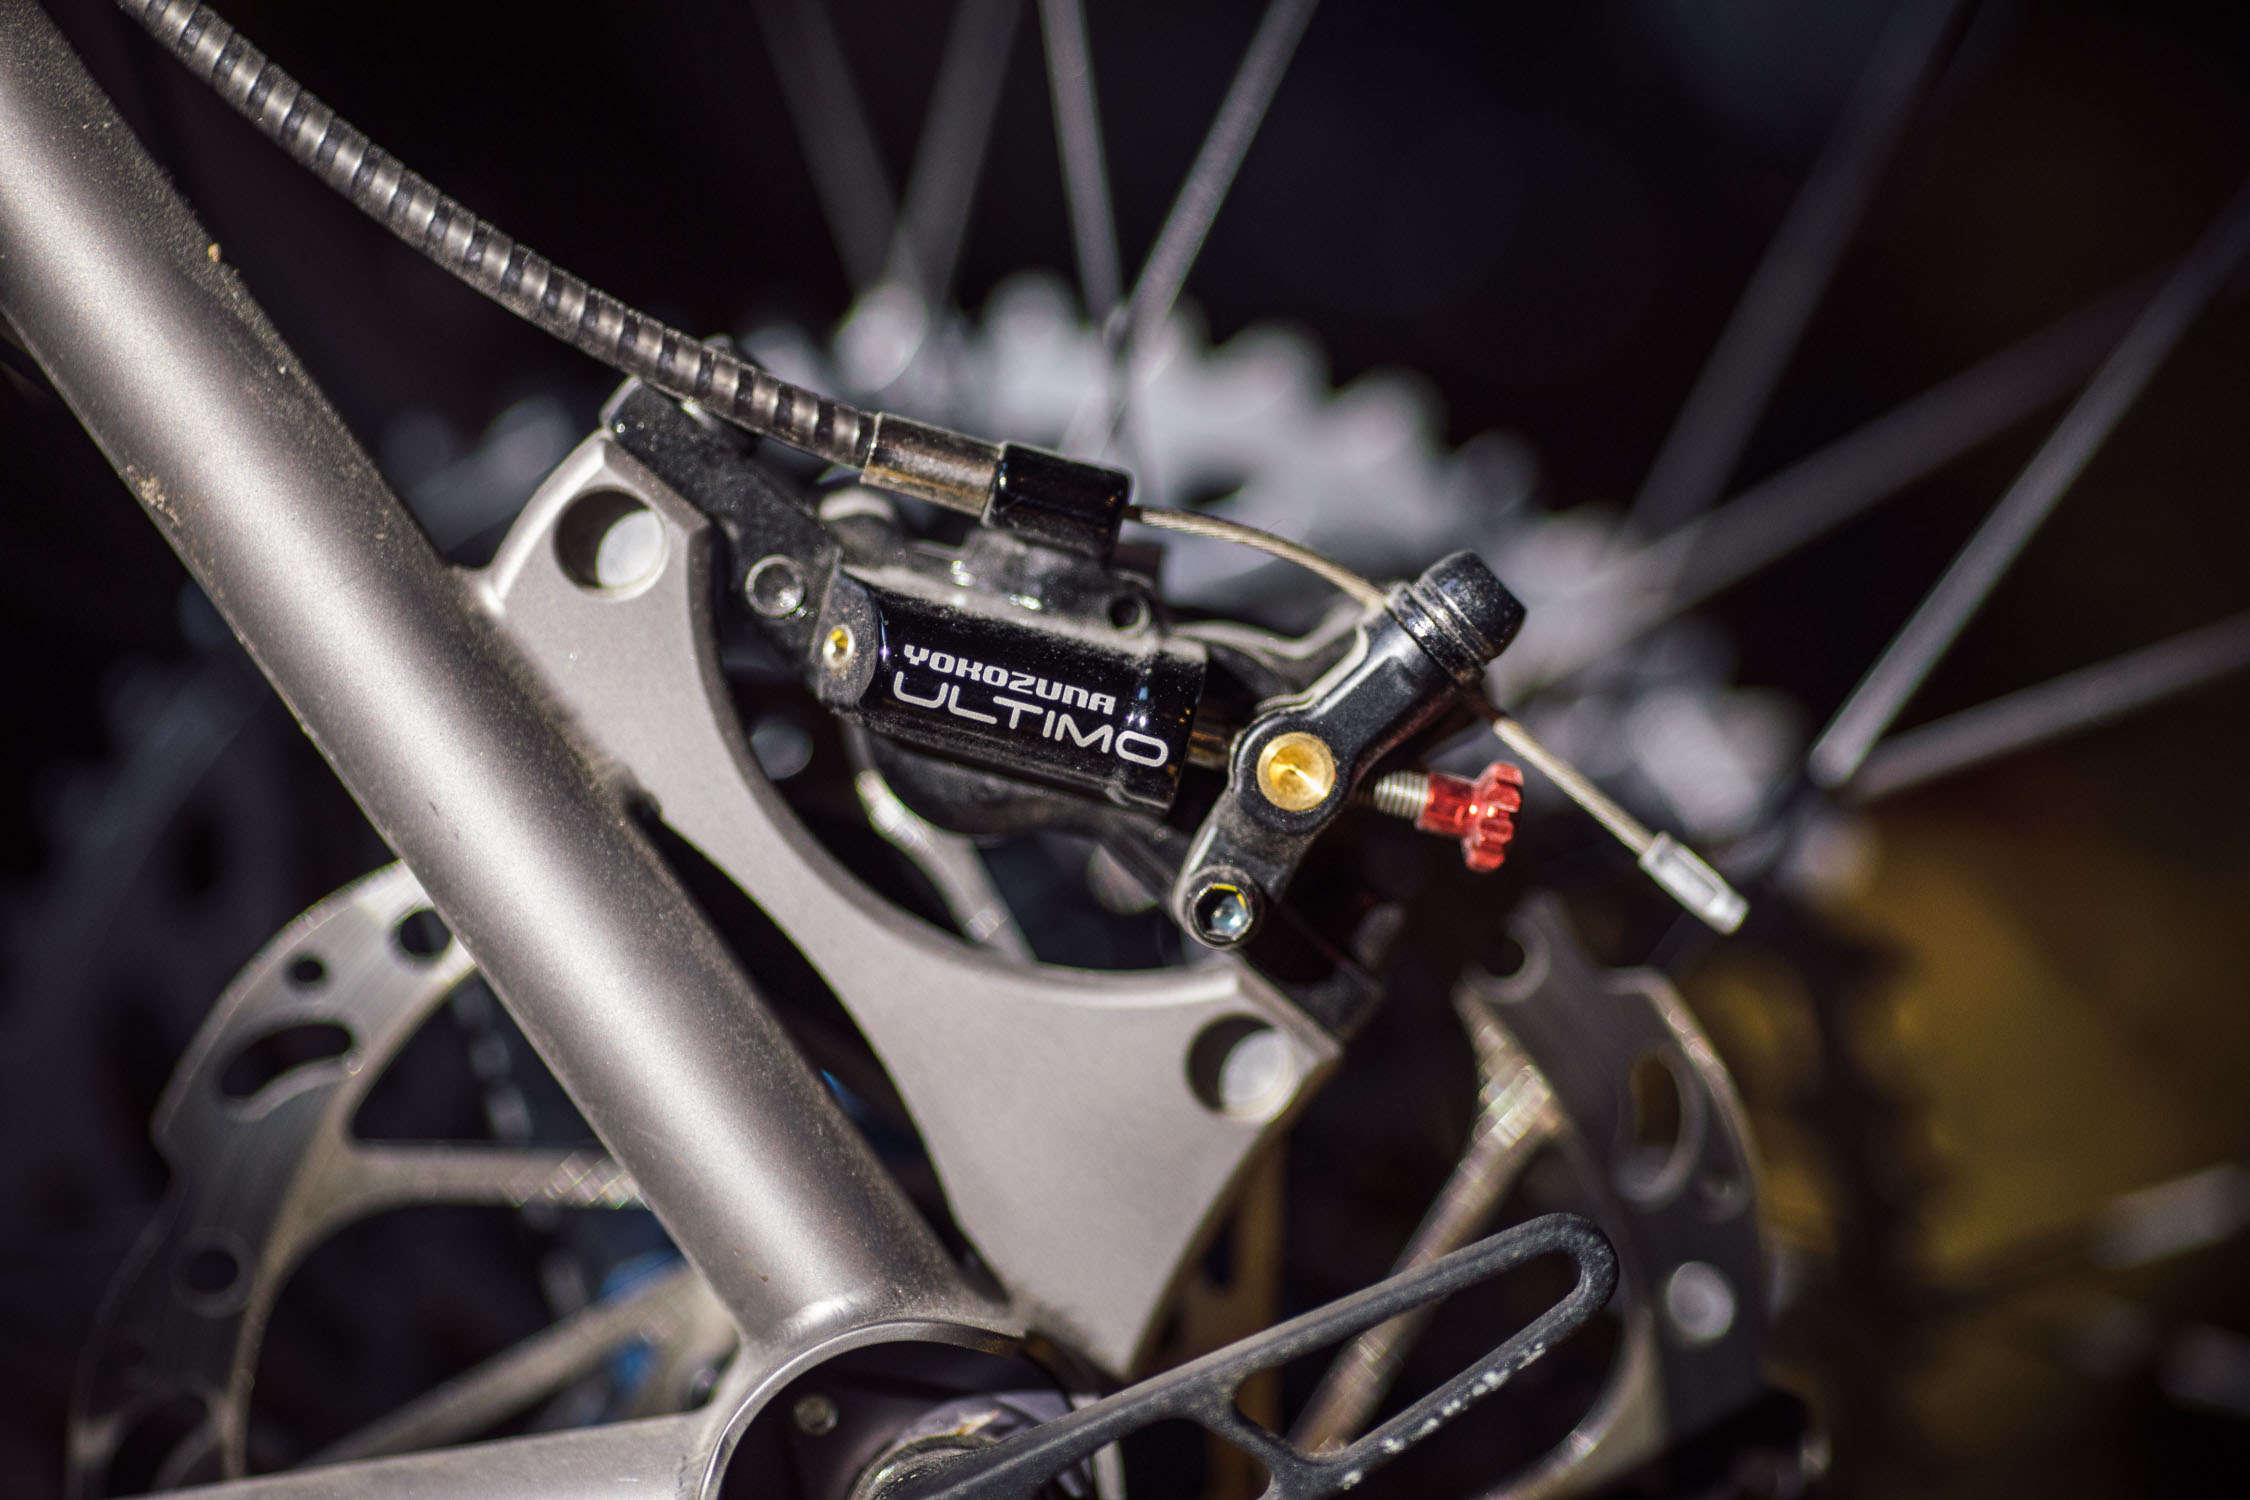
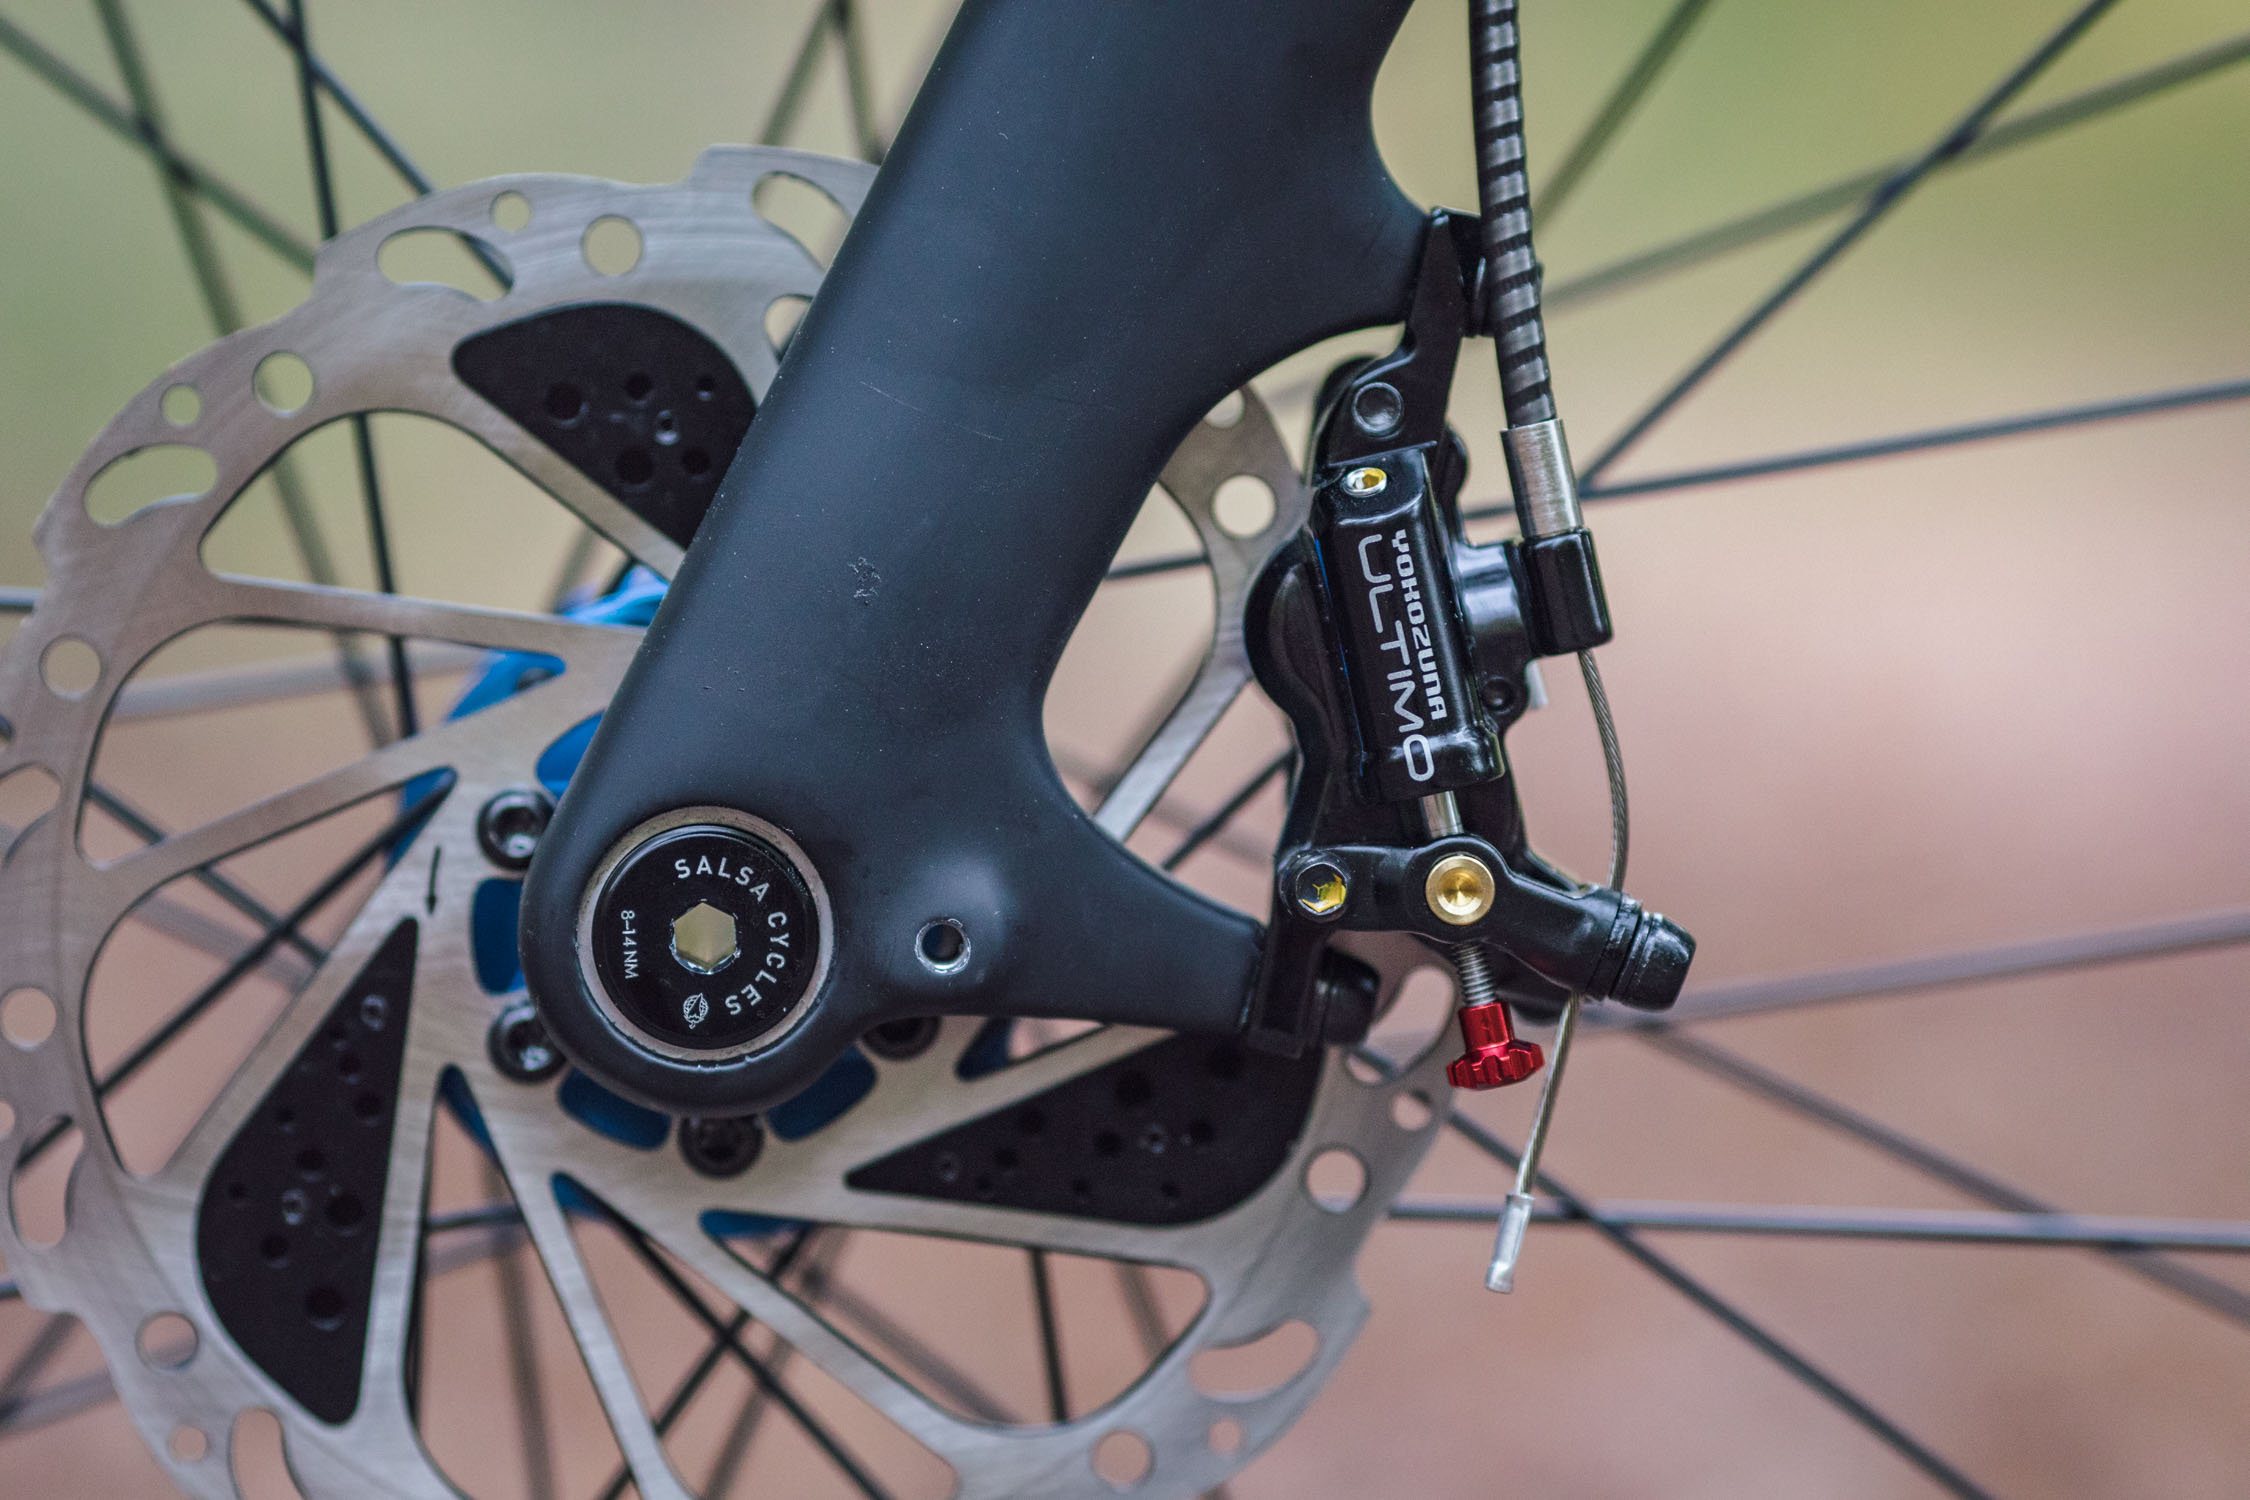
The only one we’ve tried so far is the Yokozuna Ultimo. We were certainly impressed by them, but haven’t put in enough mileage in challenging conditions to give them a fair long-term durability test. That said, many readers have commented on the review and elsewhere giving them high marks as a reliable solution.
Brake Pads
The hydraulics vs. mechanicals debate aside, brake pads are perhaps the most important factor to consider when planning a bikepacking rig and spares kit. Brake pads come in all shapes and sizes. Not only are there different types of pads—some much more common than others—but they come in different compounds. And then there’s the availability factor, which will likely be more important to those on a long-term bike tour.
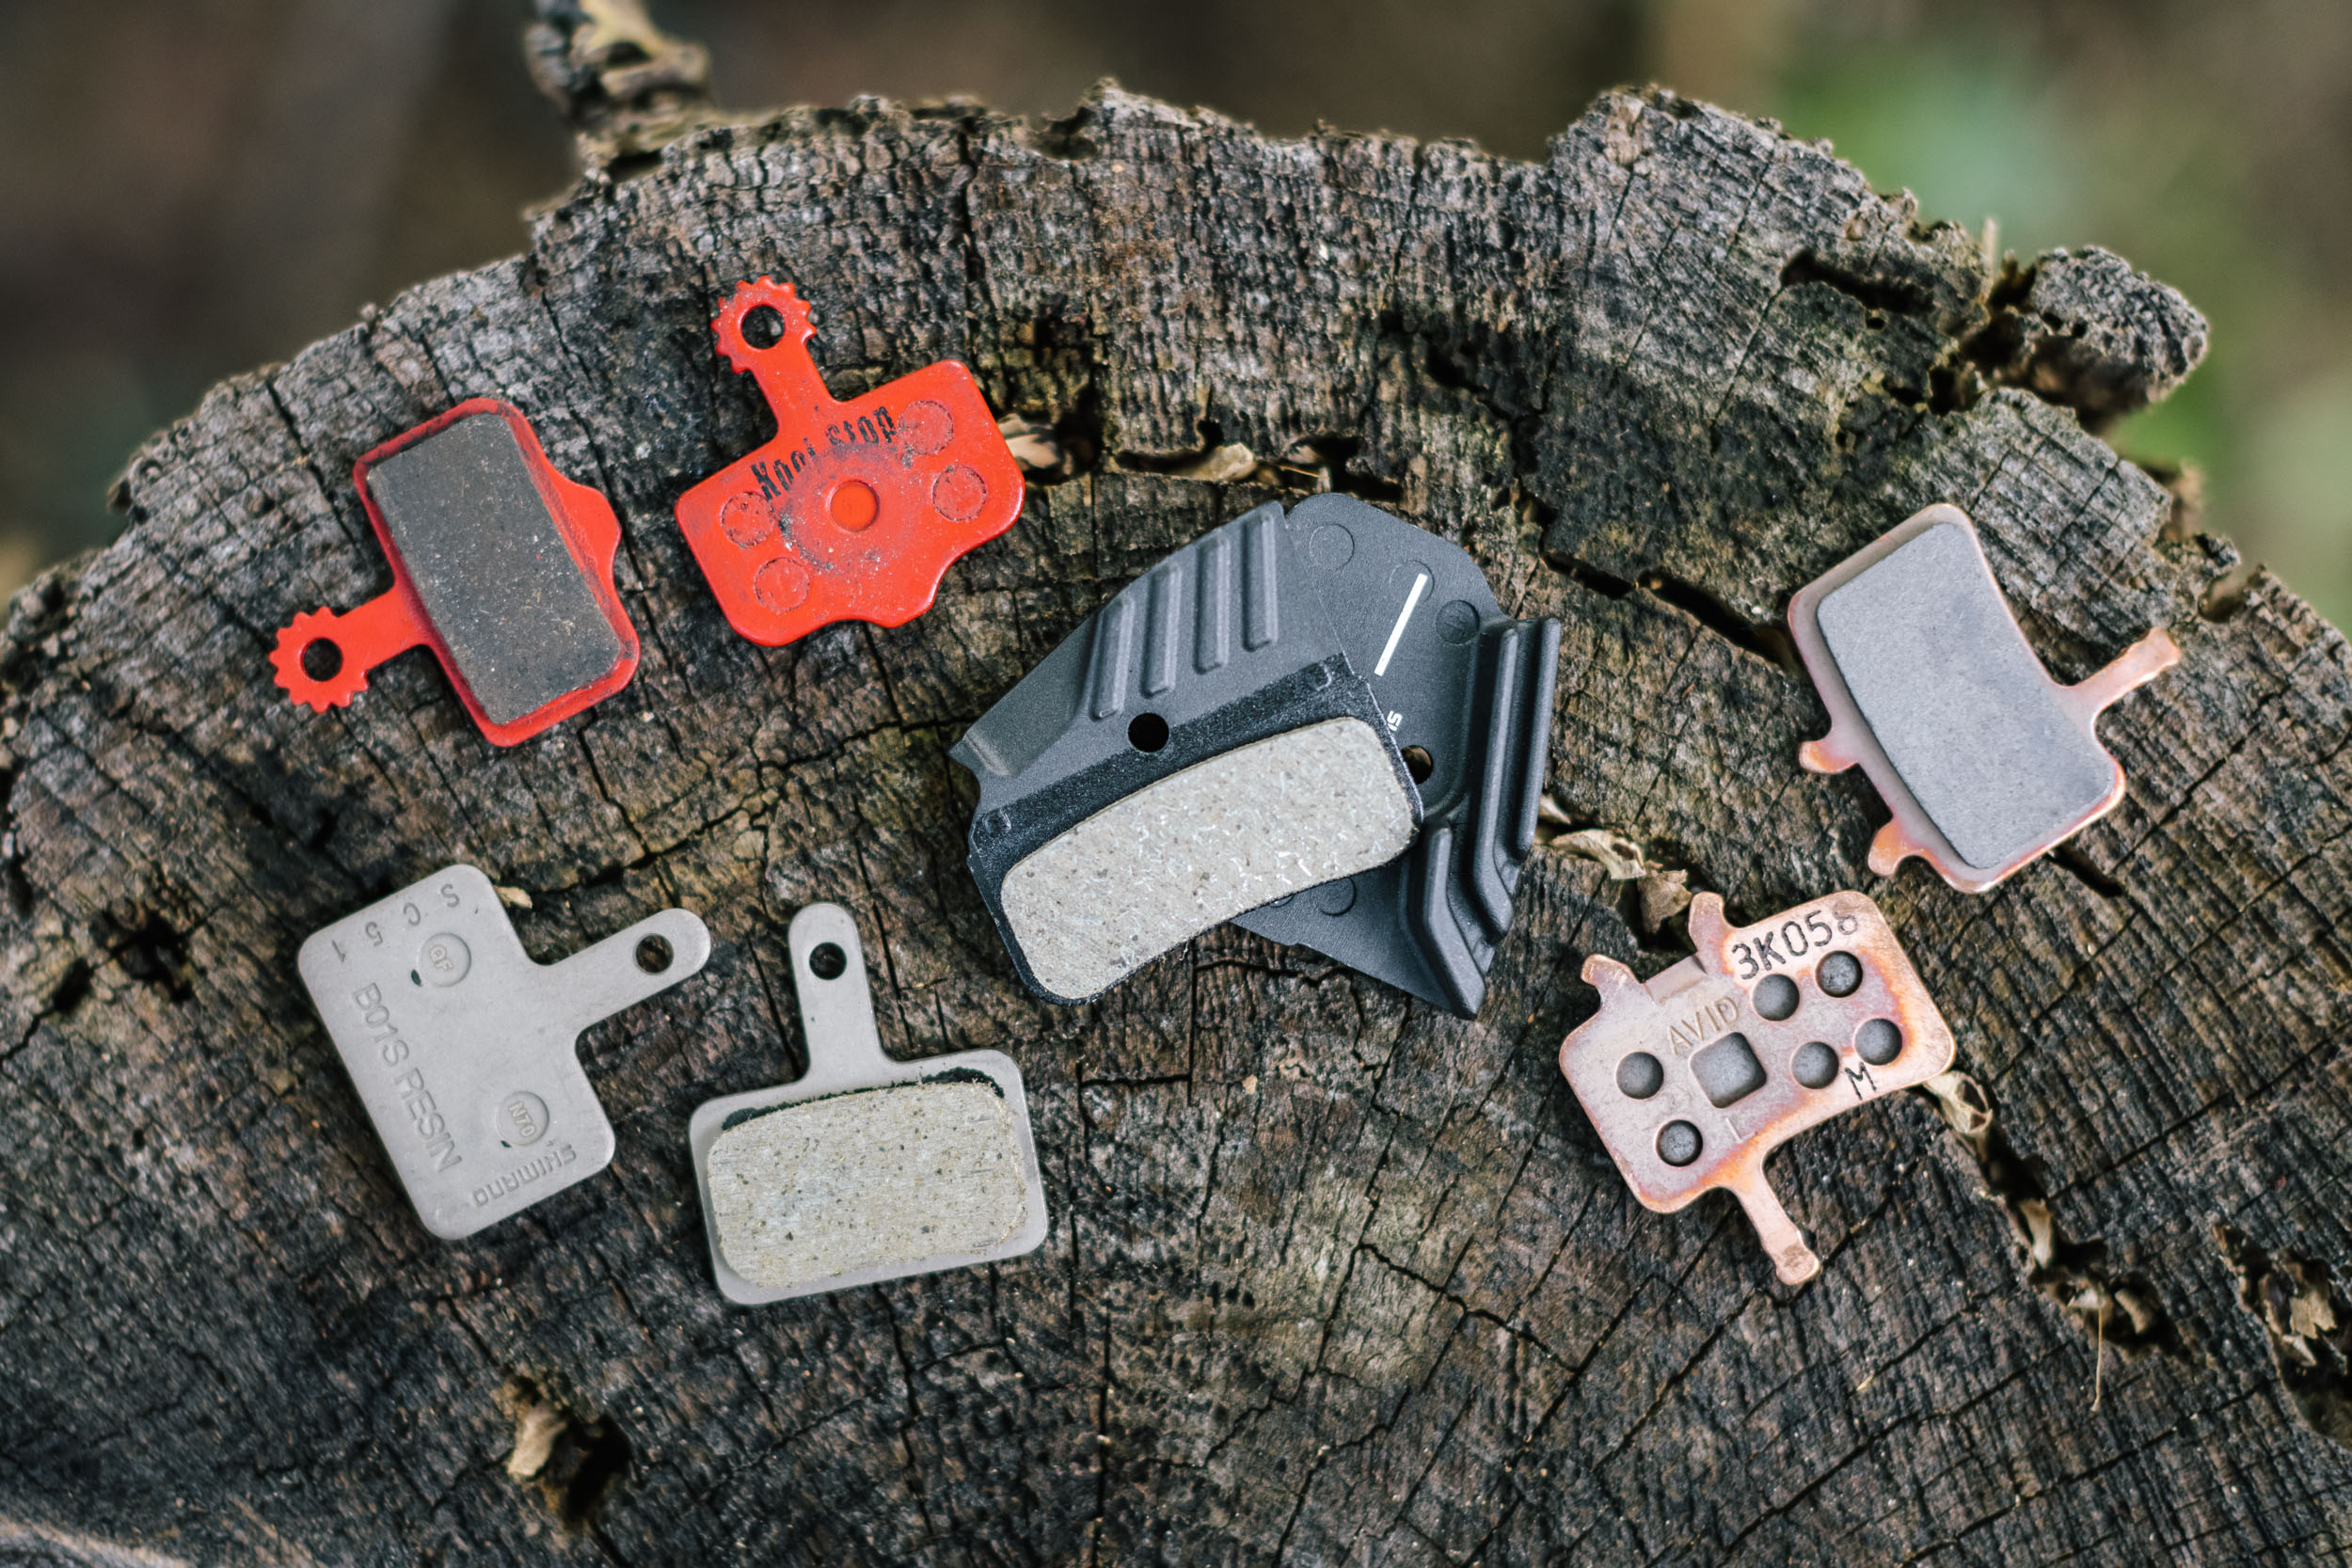
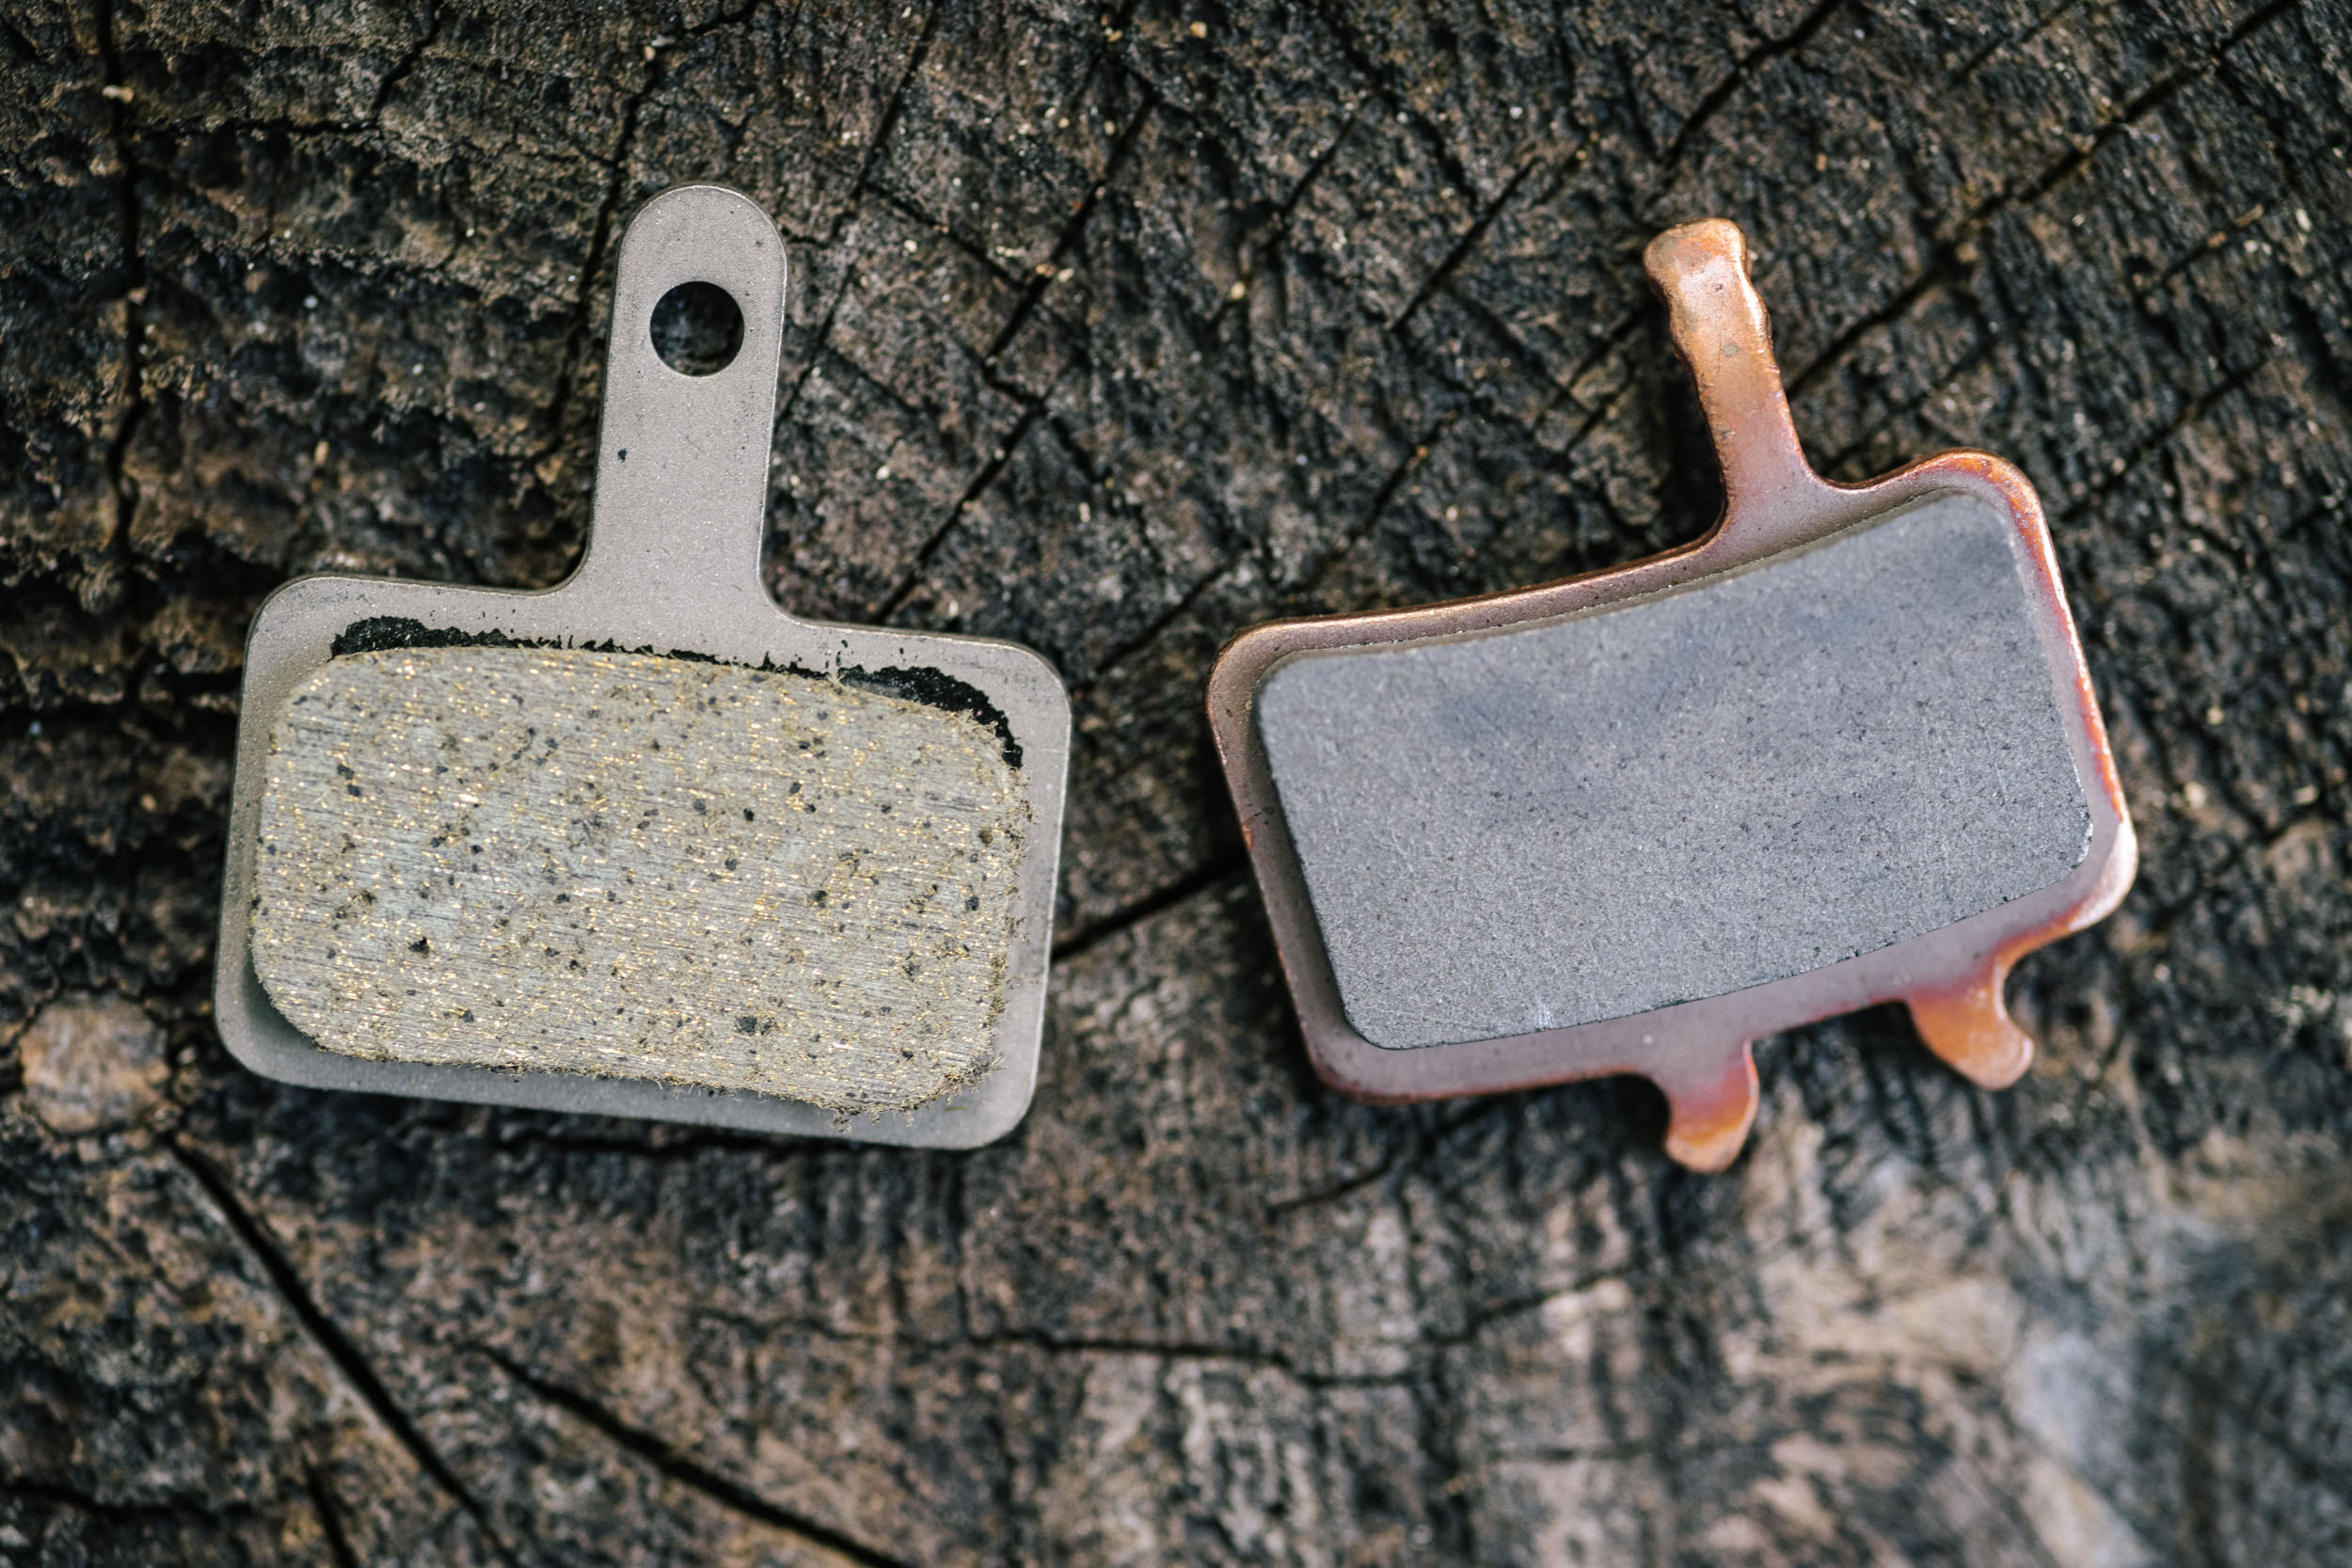
Brake Pad Material
Brake pads come in two main types of compounds. Resin brake pads (also referred to as organic) are made from pressed fibers held together by resin. They’re the softer of the two and have a more modulated/feathered feel (vs. on-off) which makes them a little quieter. They also subject the rotors to less wear and tear. Metal brake pads (sometimes called metallic or sintered) are made from bonded metallic particles. Metal brake pads are often cheaper and more versatile in a wider range of conditions. They also last nearly twice as long as resin pads. Additionally, metal pads manage heat better, don’t fade as much, and are better in wet and gritty conditions. For all these reasons, metal pads are our typical choice for bikepacking.
Brake Pad Availability
As a general rule, we recommend carrying all the spare brake pads you’ll need for any given bikepacking trip. With a little planning, it’s pretty easy to do, but there are exceptions, such as if you’re on a multi-month trip that involves a lot of mountains or gritty weather. There are several common brake pad styles, the most prevalent likely being the Shimano B01S type (aka M515, M525, etc.), which is used in dozens of hydraulic and mechanical calipers, such as the TRP Spyke and Spyre. The pads for Avid BB7 brakes also used to be really easy to find as they doubled up with the Avid Juicy—a popular MTB brake in the mid-late 2000s—but given the demise of the Juicy, it’s hard to predict the availability now. The Avid Elixir compatible pad used in the Klamper is also fairly common.
Other considerations
Here are a couple more things to consider when considering brakes for bikepacking…
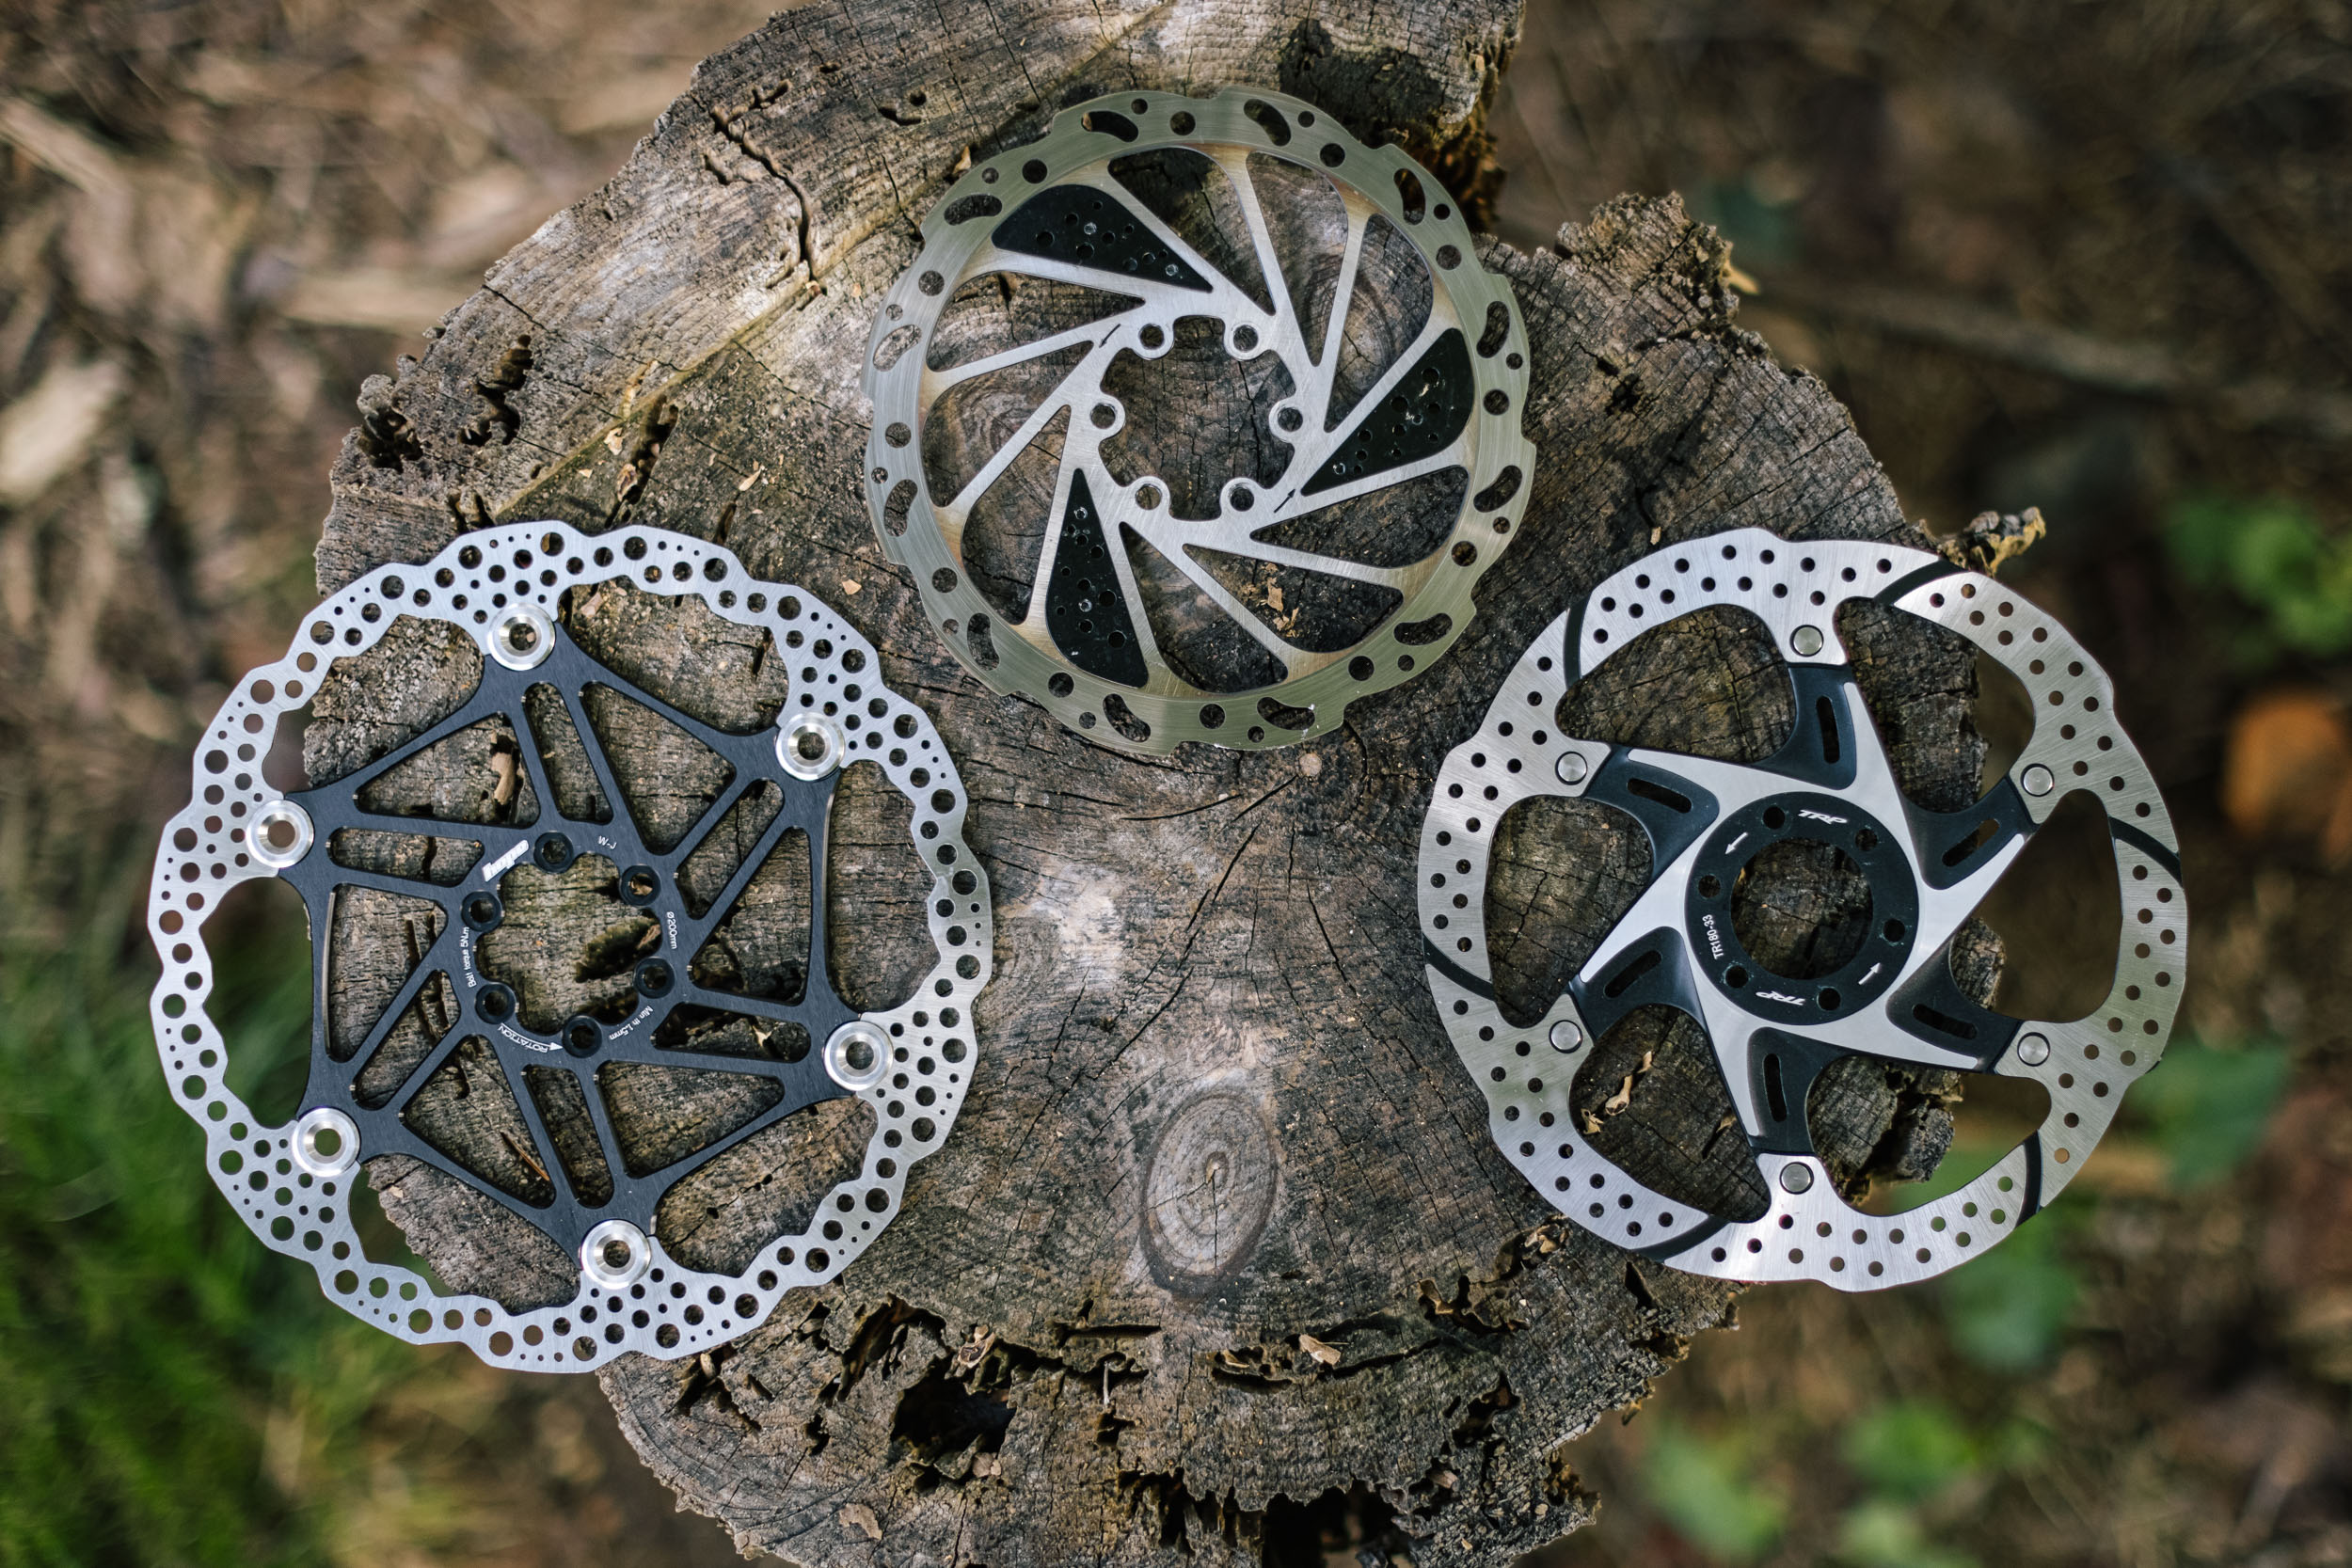
Rotor Sizing
Brake rotors come in three main diameters: 160, 180, and 203mm. Generally speaking, the larger the rotors, the more stopping power. Considering there’s a lot more to stop with a loaded bikepacking rig, we recommend the larger sizes if your bike allows. Additionally, a larger rotor offers more braking surface to dissipate heat. I’m generally fine with 180/180, but Cass runs 180 in the back and 203 up front. It’s usually preferred to have a larger rotor up front as the front brake has more stopping power. The one caveat is that larger rotors are more likely to get bent or warp.
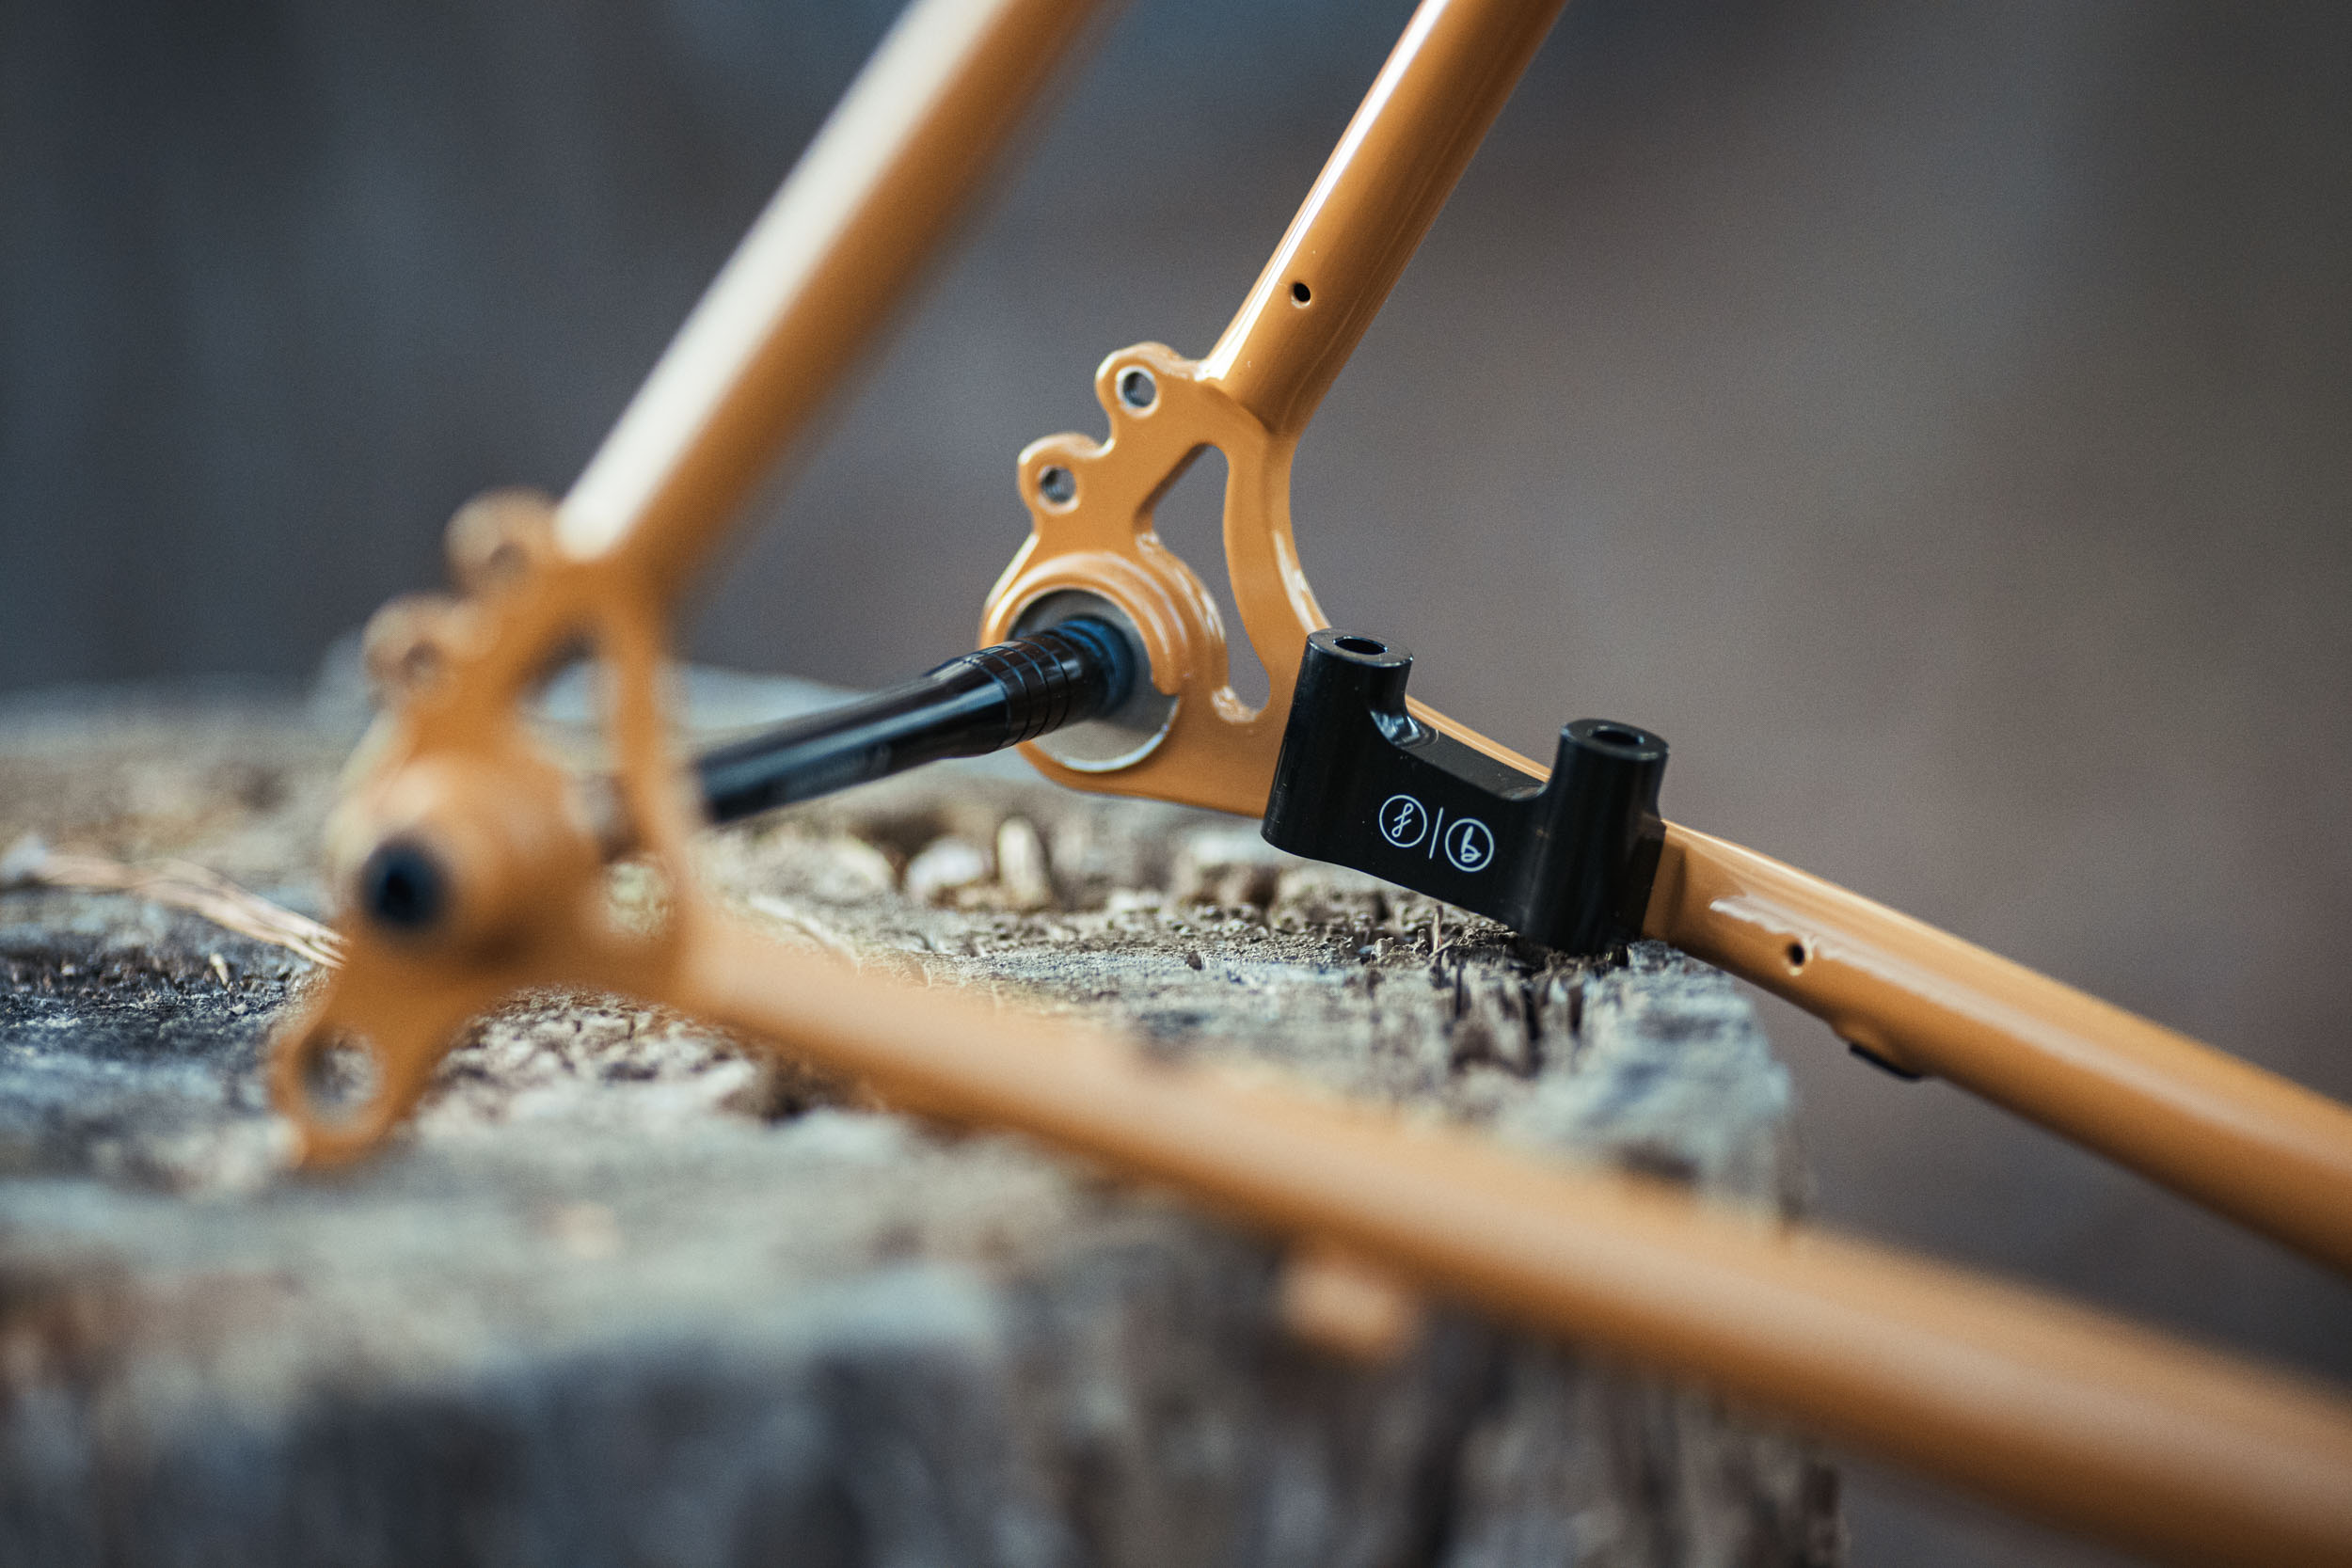
Mount Type
One other thing to consider is the type of brake mounts on your bike. The two most common these days are post mount and flat mount. Post mount is the standard used on most modern mountain bikes and allows different size rotors to be used via adapters. Flat mount is a newer standard found on drop bar bikes. Flat mount calipers offer a compact design and a cleaner look. Several brakes are offered in both standards, but some aren’t. One stumbling block you might run into when mixing standards is the idea of putting flat bars on a drop-bar bike with flat mount brake mounts. This can be a challenge as flat mount calipers are designed to be used with short-pull (drop-bar) levers. So, you’ll need a specialized short-pull lever, like PAUL’s Canti Levers, in order to work with short-pull flat mount calipers. Hydros are pretty much out of the question in that situation.
Mechanical vs. Hydraulic Brakes (conclusion)
I’m honestly a little torn when it comes to picking an overall favorite type of brakes for bikepacking. My qualm with hydraulics isn’t reliability; I’ve used them on several big trips, including the three-week Tian Shan Traverse and the four-week Altravesur. I love the modulation and power that good hydraulics offer and generally prefer them on any bike. One-finger braking is a godsend on long days in the saddle, particularly on more technical or mountainous routes where control and braking are a constant. My biggest peeve with hydros is how difficult they are to move from bike to bike, particularly with modern frames that have thru-routing. I switch things up a lot, and for that reason, I’ve often opted for mechanical brakes on test builds.
But if you’re weighing out the two options, I believe the choice has a lot to do with how long your trip is. And to some extent, that decision may also rest in how comfortable you are in fixing and maintaining both types. Cable brakes are easy to see and understand, so almost anyone can get their head around them. Hydros require more knowledge and pre-trip experience with how they work. I think hydros are super reliable most of the time, but if one does fail for one reason or another, it’s difficult to do much about it, compared with carrying a spare steel cable.
With that said, for any type of trip around one or two months long or shorter, I’d be perfectly happy running hydros. But for a big six-month tour, I’d still choose mechanical disc brakes. The reliability factor is crucial, and the simplicity of a good maintenance-free mechanical brake system is pretty failsafe. Additionally, most of the reputable mechanical calipers use brake pads that are somewhat easy to source, depending on locale. I’d say my top pick for a trip of that magnitude would be PAUL Klampers. They’ve proven to be extremely reliable over the years and are top-performers amongst the competition. But, I’d also consider TRP Spykes, depending on the location; as mentioned, the Shimano B01S type brake pads might be a little more common.
My favorite hydraulic brakes for trail riding and bikepacking would also be a toss-up between the Hope Tech3 E4s—which have proven to be extremely reliable and offer some of the best power and braking modulation I’ve tried to date—and the venerable 4-piston Shimano XT.
Survey Says
In a survey last week, we asked you what your preferred brakes are for bikepacking. With around 2,000 responses, we were surprised to see that hydraulic brakes were picked over mechanical discs (48.2 to 42.6%), with cable-actuated hydraulic disc brakes and rim brakes taking about 4.8 and 4.1% of the vote.

For the mechanical disc-specific top pick, things were all over the place, although TRP Spyke/Spyres were the clear winner. There were also a lot of folks who wrote in with either Yokozuna Ultimo or Juin Tech GTs, the clear-cut cable-actuated hydraulic option.
The Best Brakes for Bikepacking? (video)
In this video, Neil dives deep into the world of brakes and how bikepacking affects brake performance. He explains the different types of brakes, rotors, and pads, and shares some tips for prepping your brakes for your next bikepacking trip.
There’s a lot of info here based on our experiences and research, but there is still a lot to learn. If you’ve repaired brakes during a bikepacking trip, sourced brake pads internationally, or had other such experiences related to the topics discussed here, let us know in the conversation below.
Please keep the conversation civil, constructive, and inclusive, or your comment will be removed.