


Durston X-Dome 1+ Review: The Best 1-Person Tent Available?


In our latest tent review, Neil takes a detailed look at Durston’s new X-Dome 1+. Despite some initial skepticism, he came away thinking that this freestanding shelter might be the best one-person tent available. In our Durston X-Dome 1+ review, he covers everything from setup and materials to packed weights and the standout features that distinguish it from the competition. Find it here…
PUBLISHED Jul 17, 2025
We’ve tested a lot of interesting and innovative tents here at BIKEPACKING.com and on our YouTube Channel over the last few years, and there is always one comment that I regularly see, “Try setting that tent up in the rain.” I hear you, and well, the new Durston X-Dome 1+ is here for you. I’ve been testing it for several months for this review. You can watch below and then scroll down for details and photos.
Over the years, I’d heard a lot about Durston, but this is the first product I’ve tried from the brand. Durston has a cult following in the backpacking world, with plenty of ultralight and thru-hikers swearing by their tents. It’s a small operation—just Dan Durston and his wife, T—based out of Alberta, Canada. Before starting the company, Dan logged some serious trail miles, including a thru-hike of the 2,600-mile Pacific Crest Trail in 2014. In 2017, he and T became the first to yo-yo Canada’s Great Divide Trail, and Dan later helped map out the high route extension of the Continental Divide/Great Divide Trail through the Canadian Rockies. That time on the trail gave Dan a strong sense of what works and what doesn’t, leading to tent designs focused on real-world usability.
Durston’s breakout hit was the X-Mid 1, released in 2018, which quickly gained a loyal following among backpackers and bikepackers. That was followed by the X-Mid 2 and eventually the Pro series, made with Dyneema Composite Fabric (DCF). The current top-tier models are the X-Mid Pro 1 and the X-Mid Pro 2, which Miles and Emily reviewed in summer 2023. Their glowing remarks earned it a Gear of the Year nomination—and an eventual win—in our camping gear category. Durston’s latest offering is a freestanding tent that introduces what I like to call an inside-out design, with external pole placement—a detail I’ll dig into more shortly.
Durston X-Dome 1+ Specs
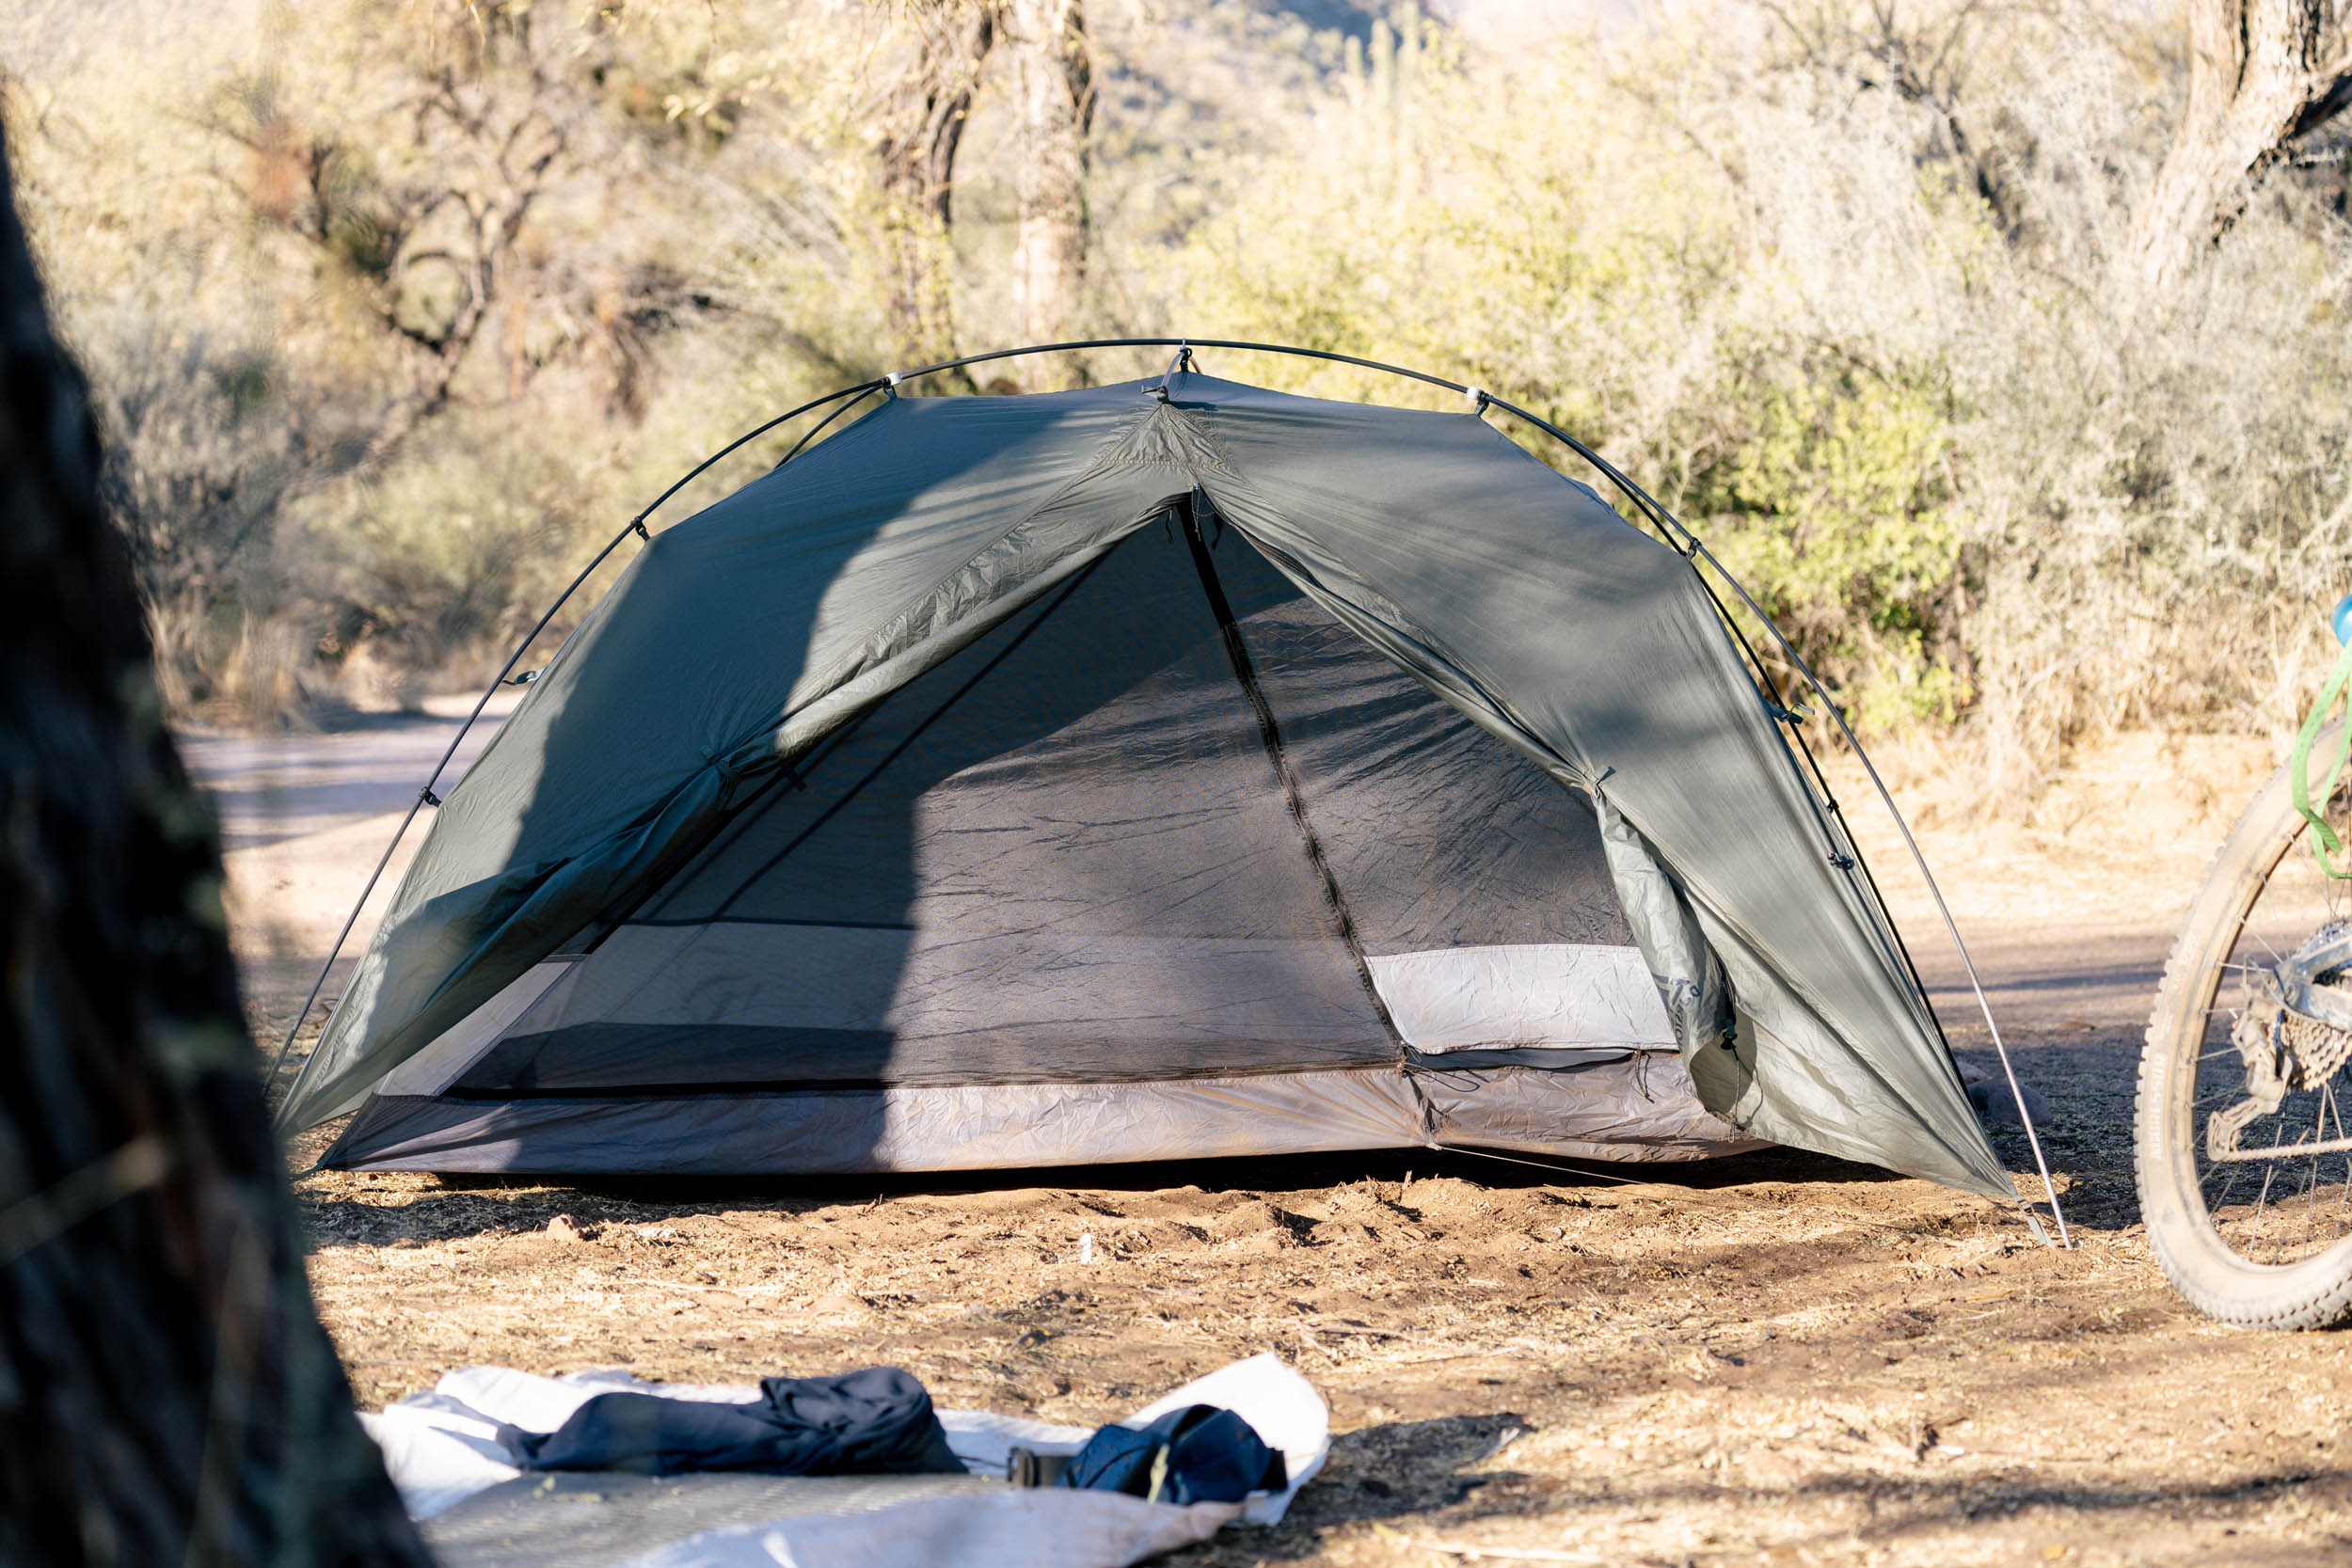
The freestanding X-Dome comes in both 1+ and 2-person versions. I’ve been testing the 1+, which I’ll focus on here. The two-person design is quite similar but slightly larger, with two doors and vestibules.


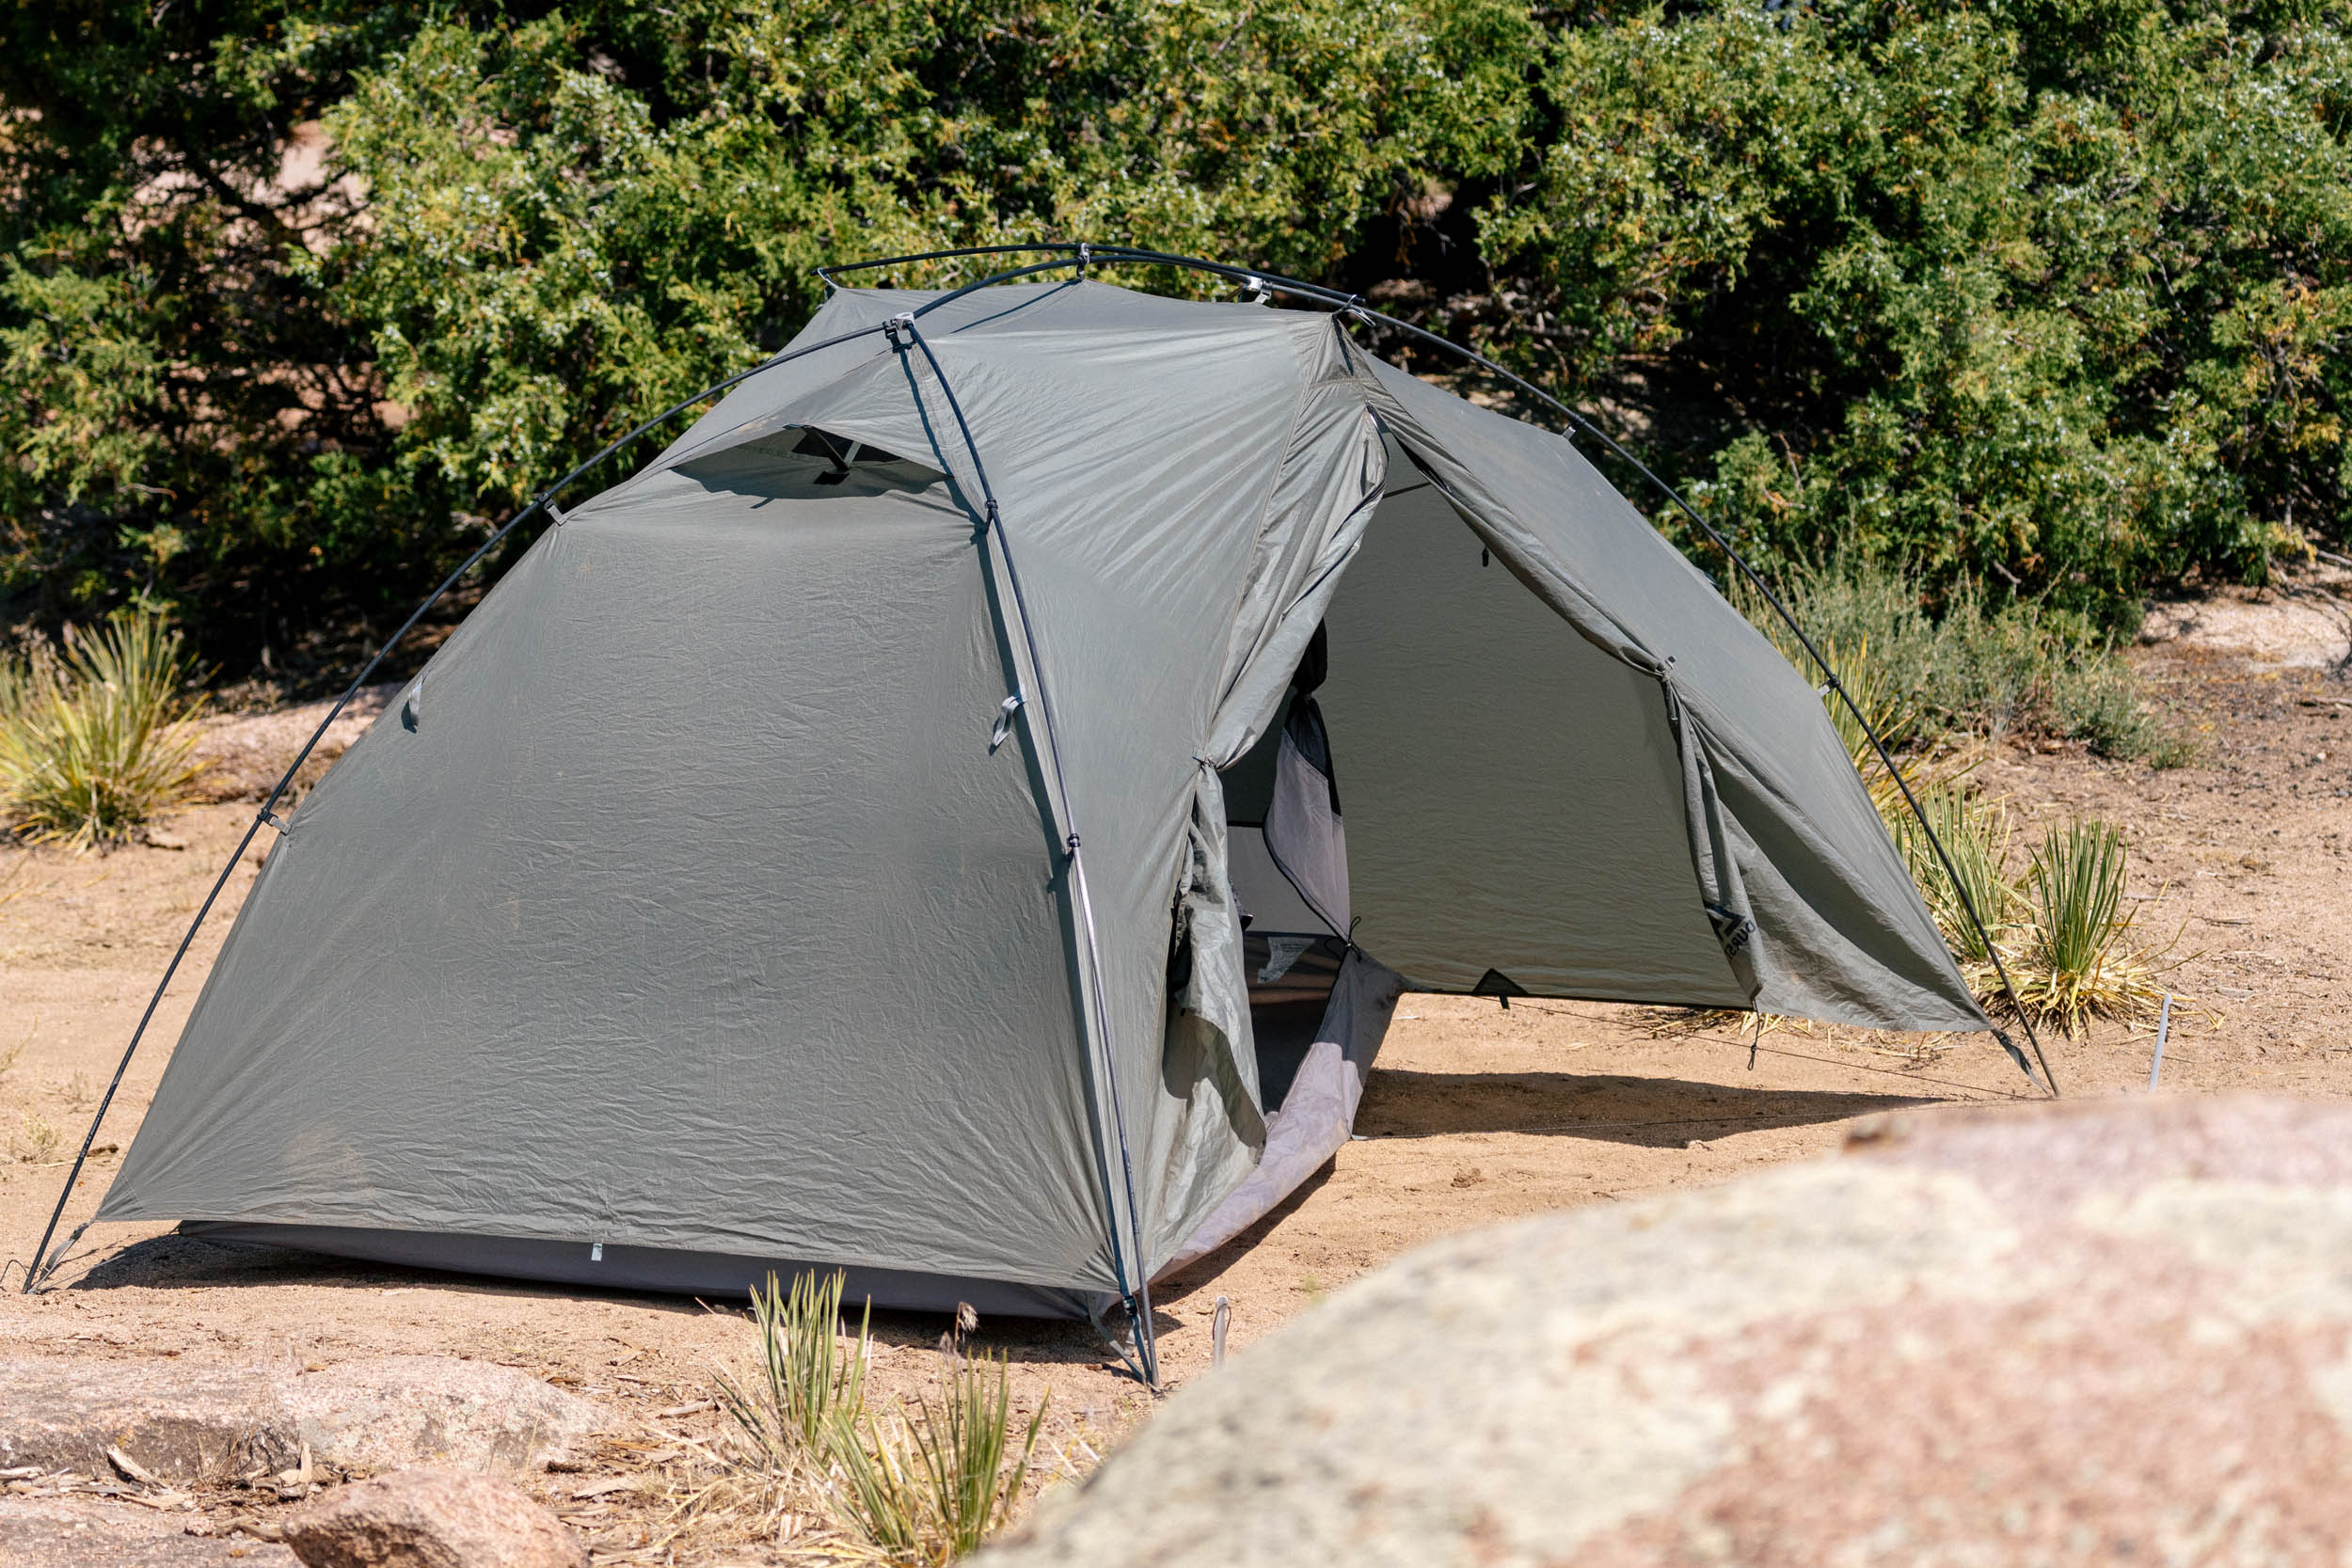
The 1+ has a footprint of 56.5 by 88 inches (about 1.45 by 2.25 meters). It uses a parallelogram shape—similar to Durston’s X-Mid tents—but it stretches farther into the back vestibule, making the most of the space. Inside, the living area ranges from 29 inches wide at the narrowest point to a generous 50 inches (0.75 to 1.3 meters) at the widest, which is typically where I place my head. If 29 inches sounds narrow, keep in mind that many one-person tents have just 28 inches at their slimmest. The straight length is 85 inches (2.15 m), or 90 inches (2.3 m) corner to corner if you sleep diagonally. Peak interior height is 42 inches (1.08 m), and you can also pitch the fly alone for a lighter, roomier setup, gaining an extra three inches of headroom (45 inches or 1.15 m). What’s especially nice is that the height is well-distributed. Rather than a single high point in the middle, it spreads out across the ceiling. Not many tents do this well, except maybe the Slingfin Portal 1, and even then, the X-Dome sneaks out an extra inch with the inner installed. It’s clearly built with taller users in mind.

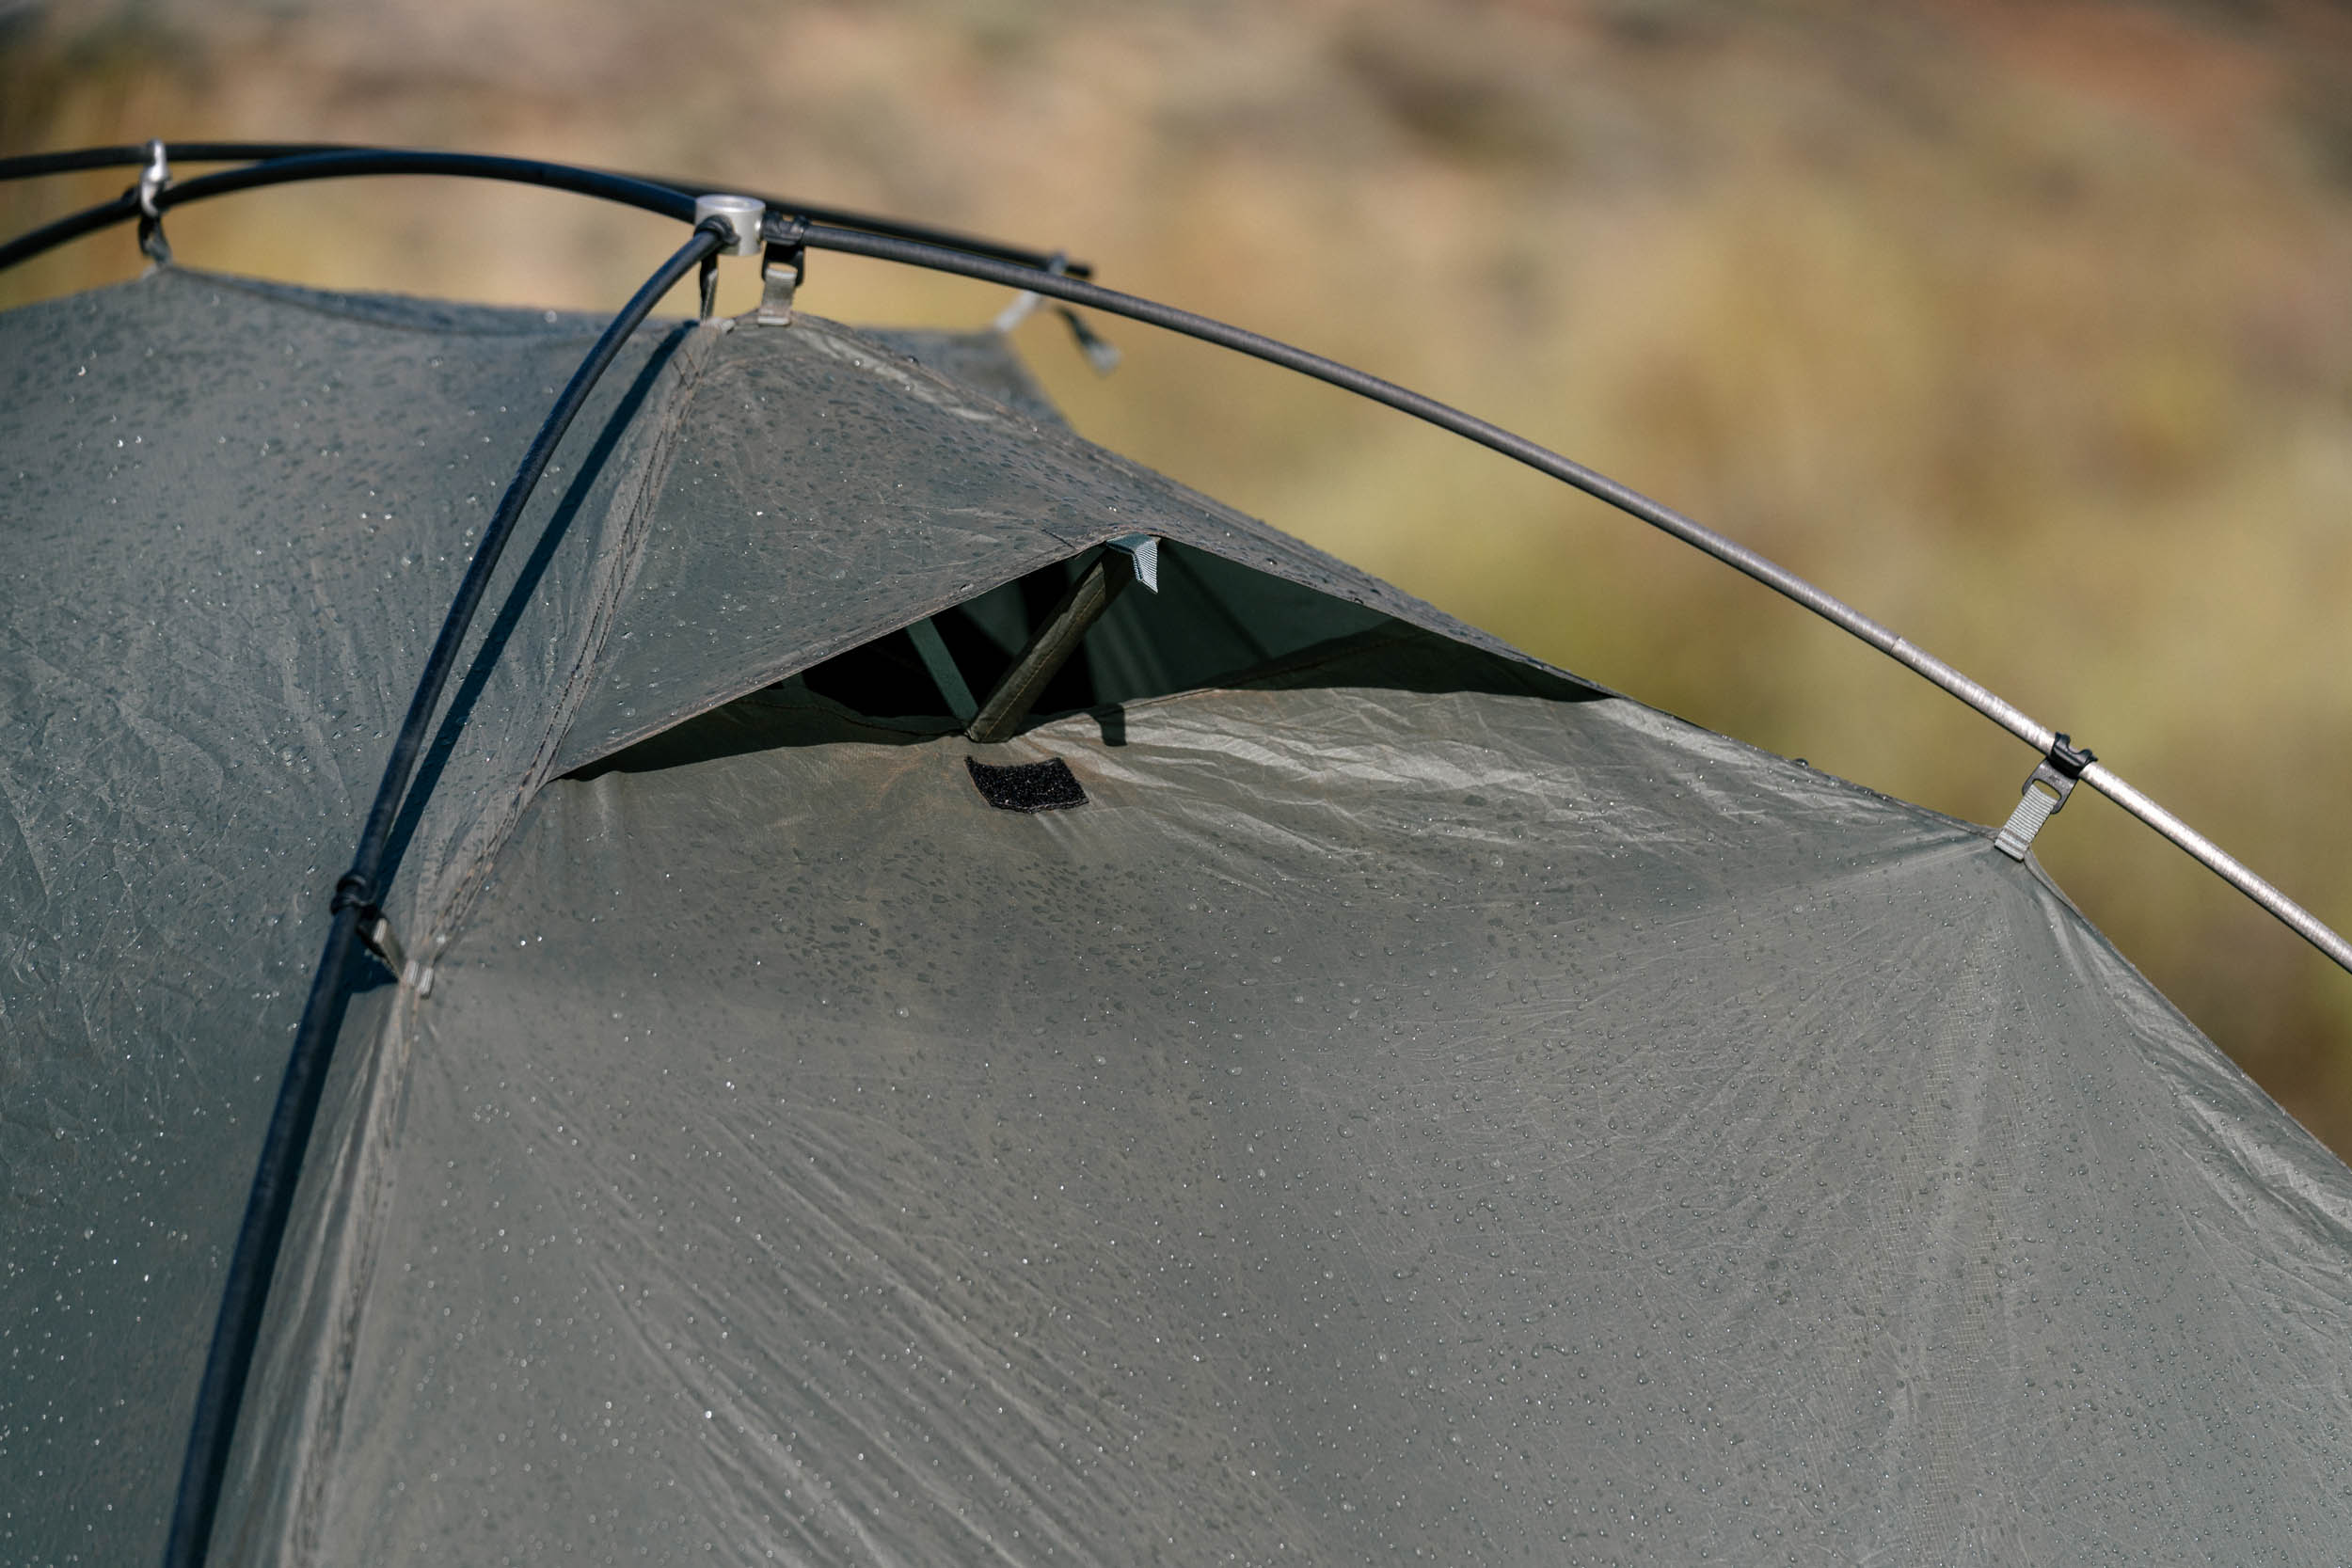
Durston achieved this with a variable radius pole set that curves the end walls more steeply, creating more usable interior volume. A top crossbar further extends the peak height across a wider section of the ceiling. At a claimed weight of 2 pounds and 4.5 ounces (1,035 grams), it offers an impressive amount of livable space for the weight.
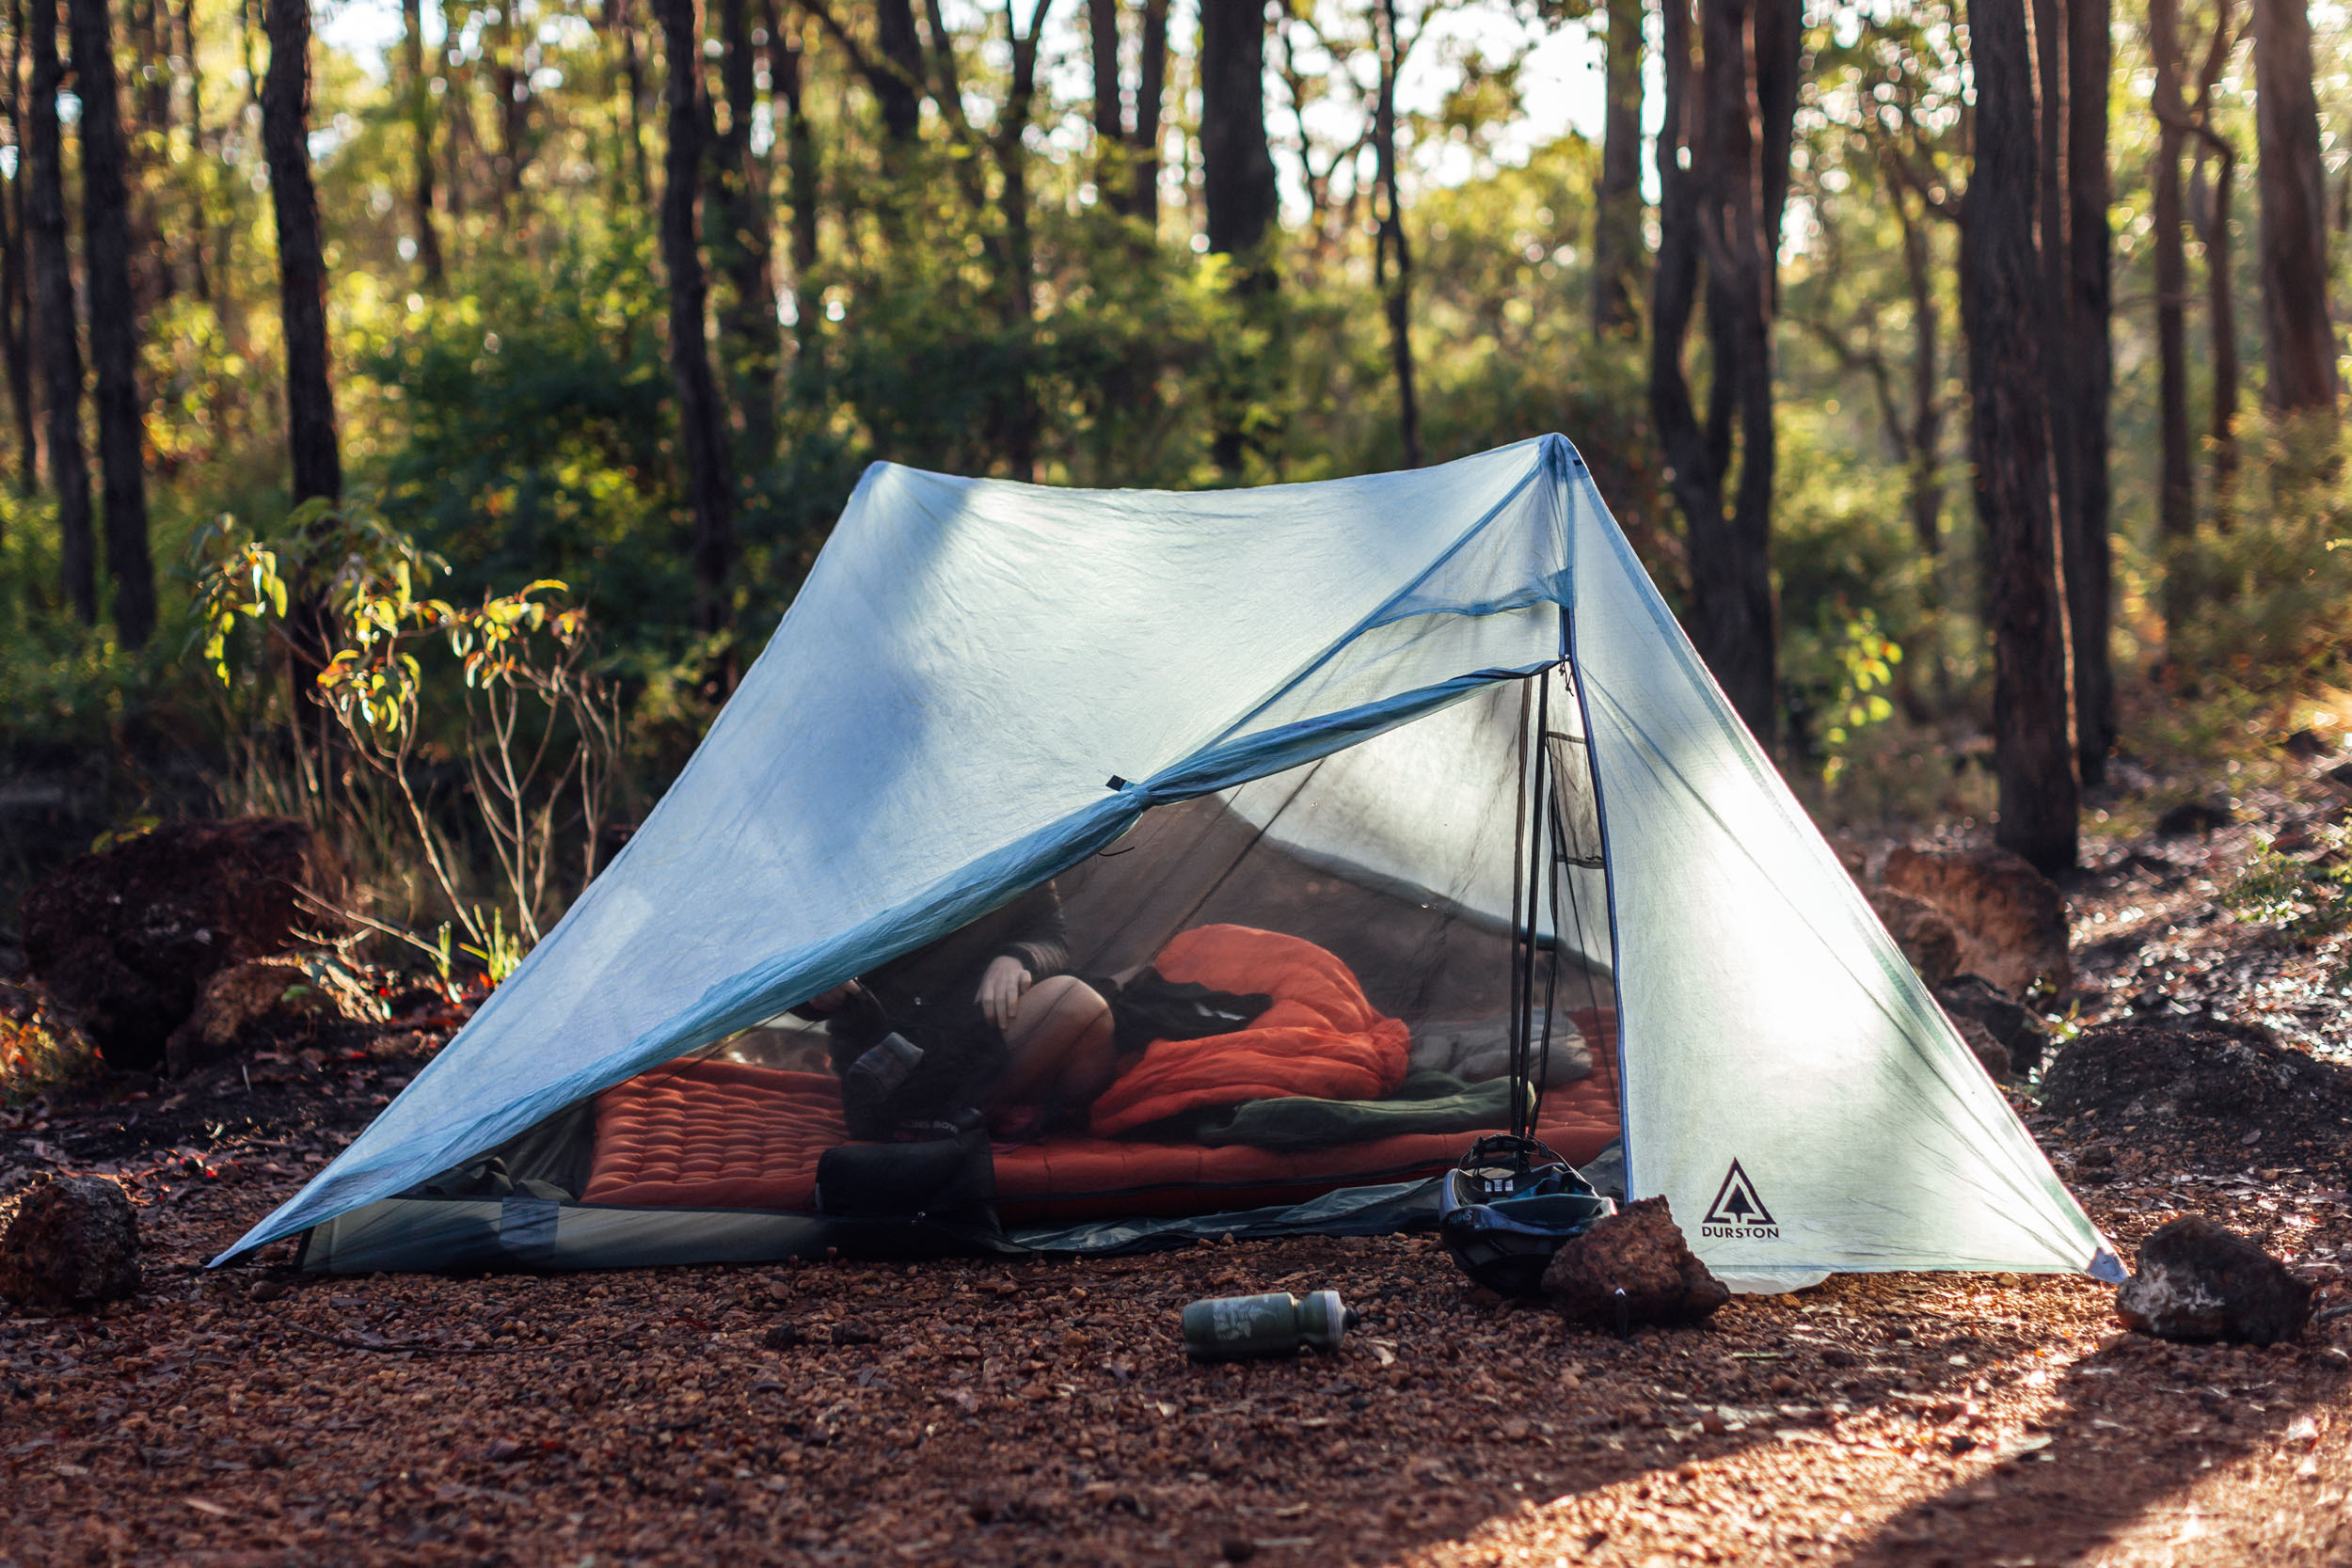
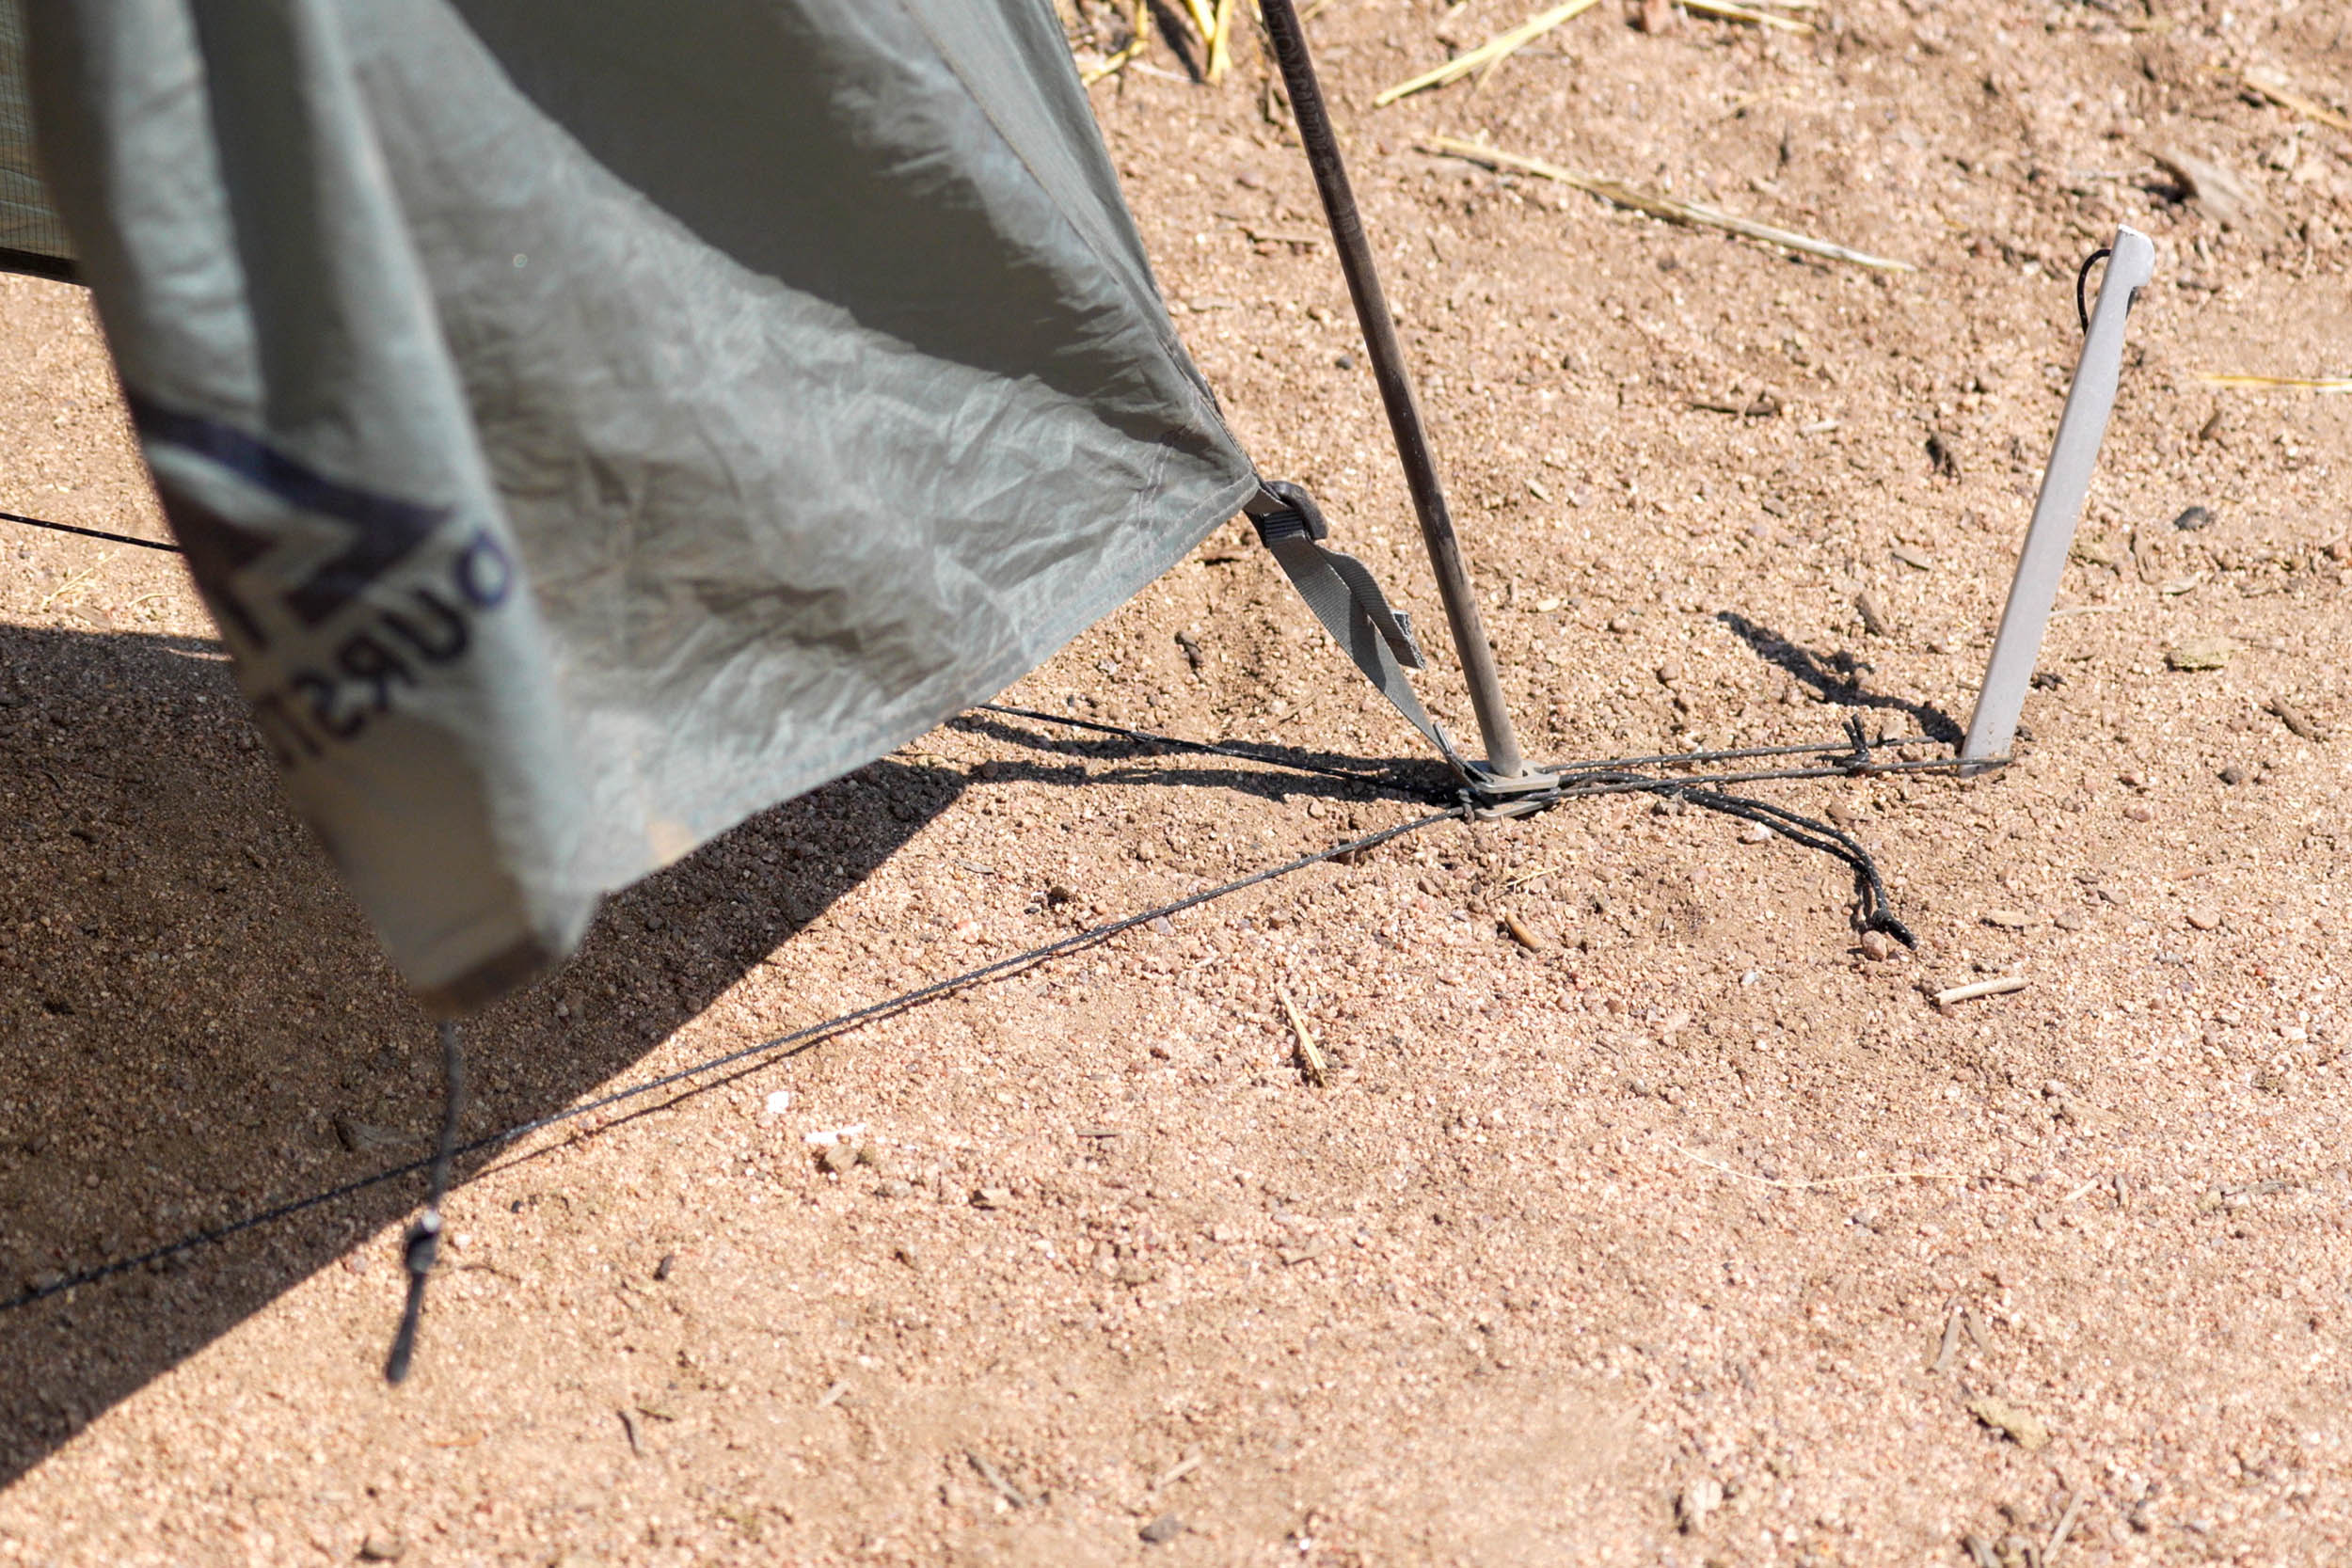
Let’s talk vestibules. The X-Dome 1+ offers 9.2 square feet of vestibule space, tucked to the side so you don’t have to crawl over your gear to get in or out. The fly even has a separate little stake-out door that can be opened on its own for quick access or combined with the main door to really open things up and let air flow through. Durston pulled this off by trimming the inner to create that side vestibule space while keeping the pitch taut with two longer guy-out cords at the front-right pole anchor. Every time I set up this tent, I like it more.


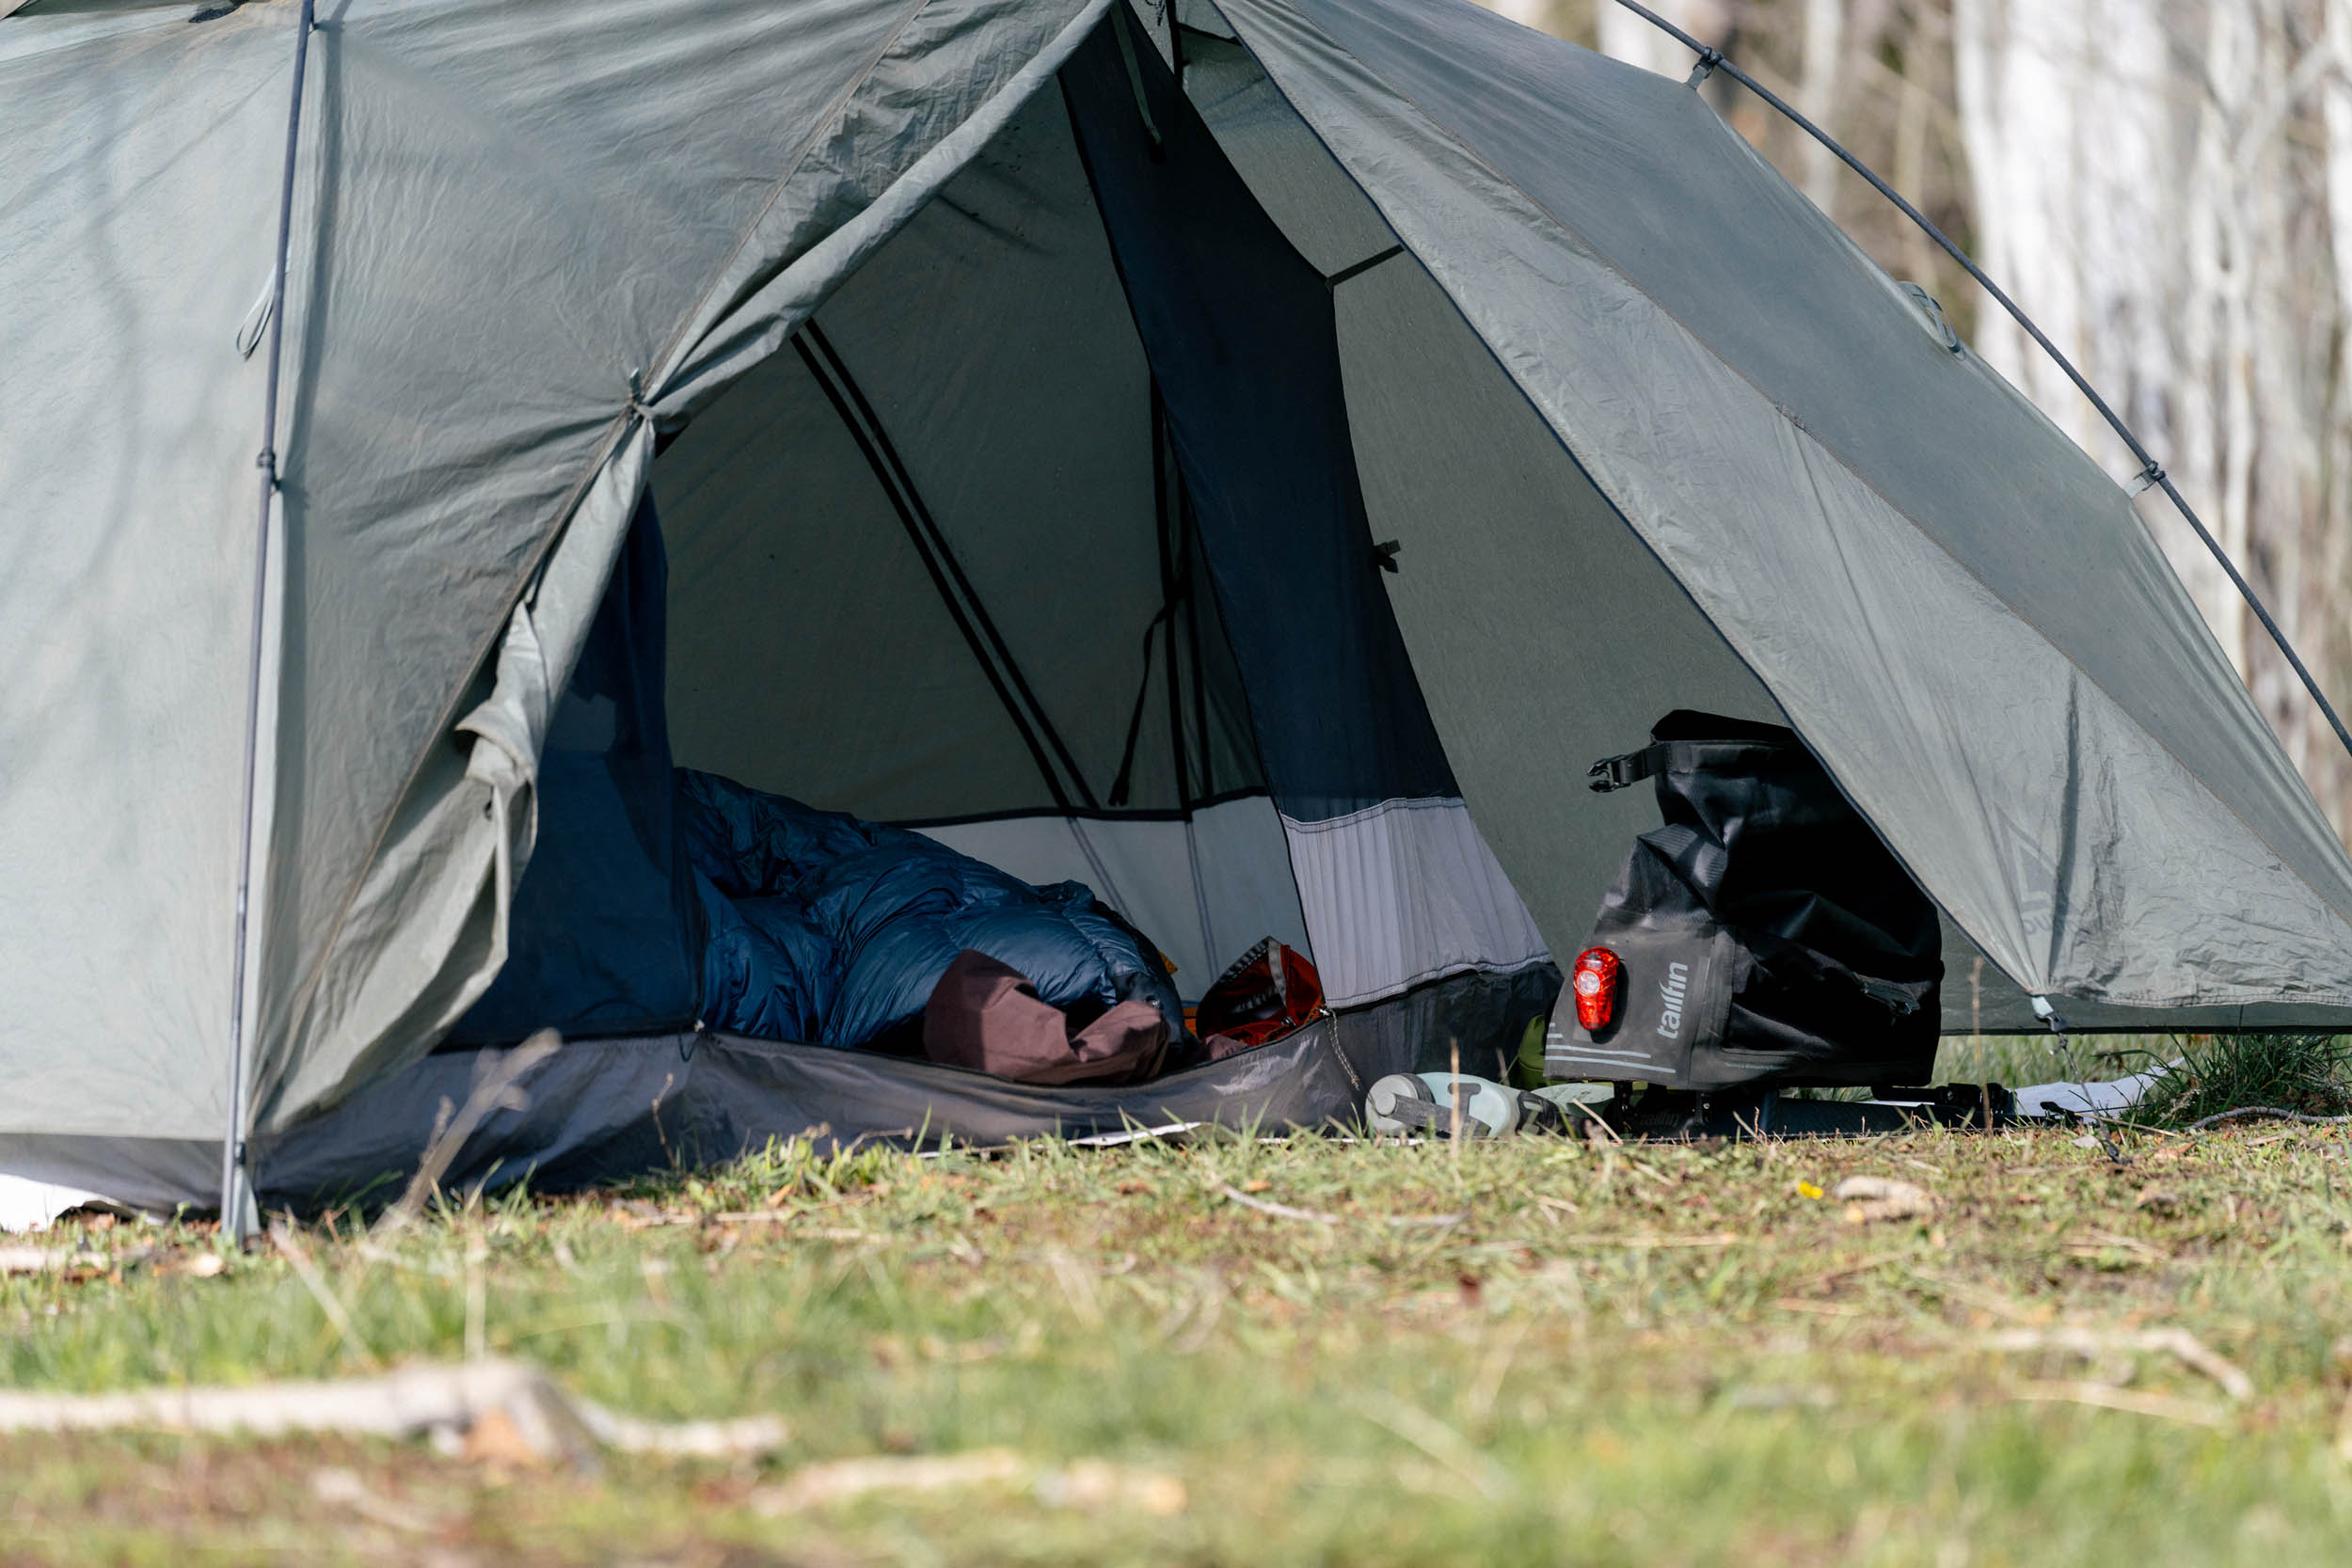
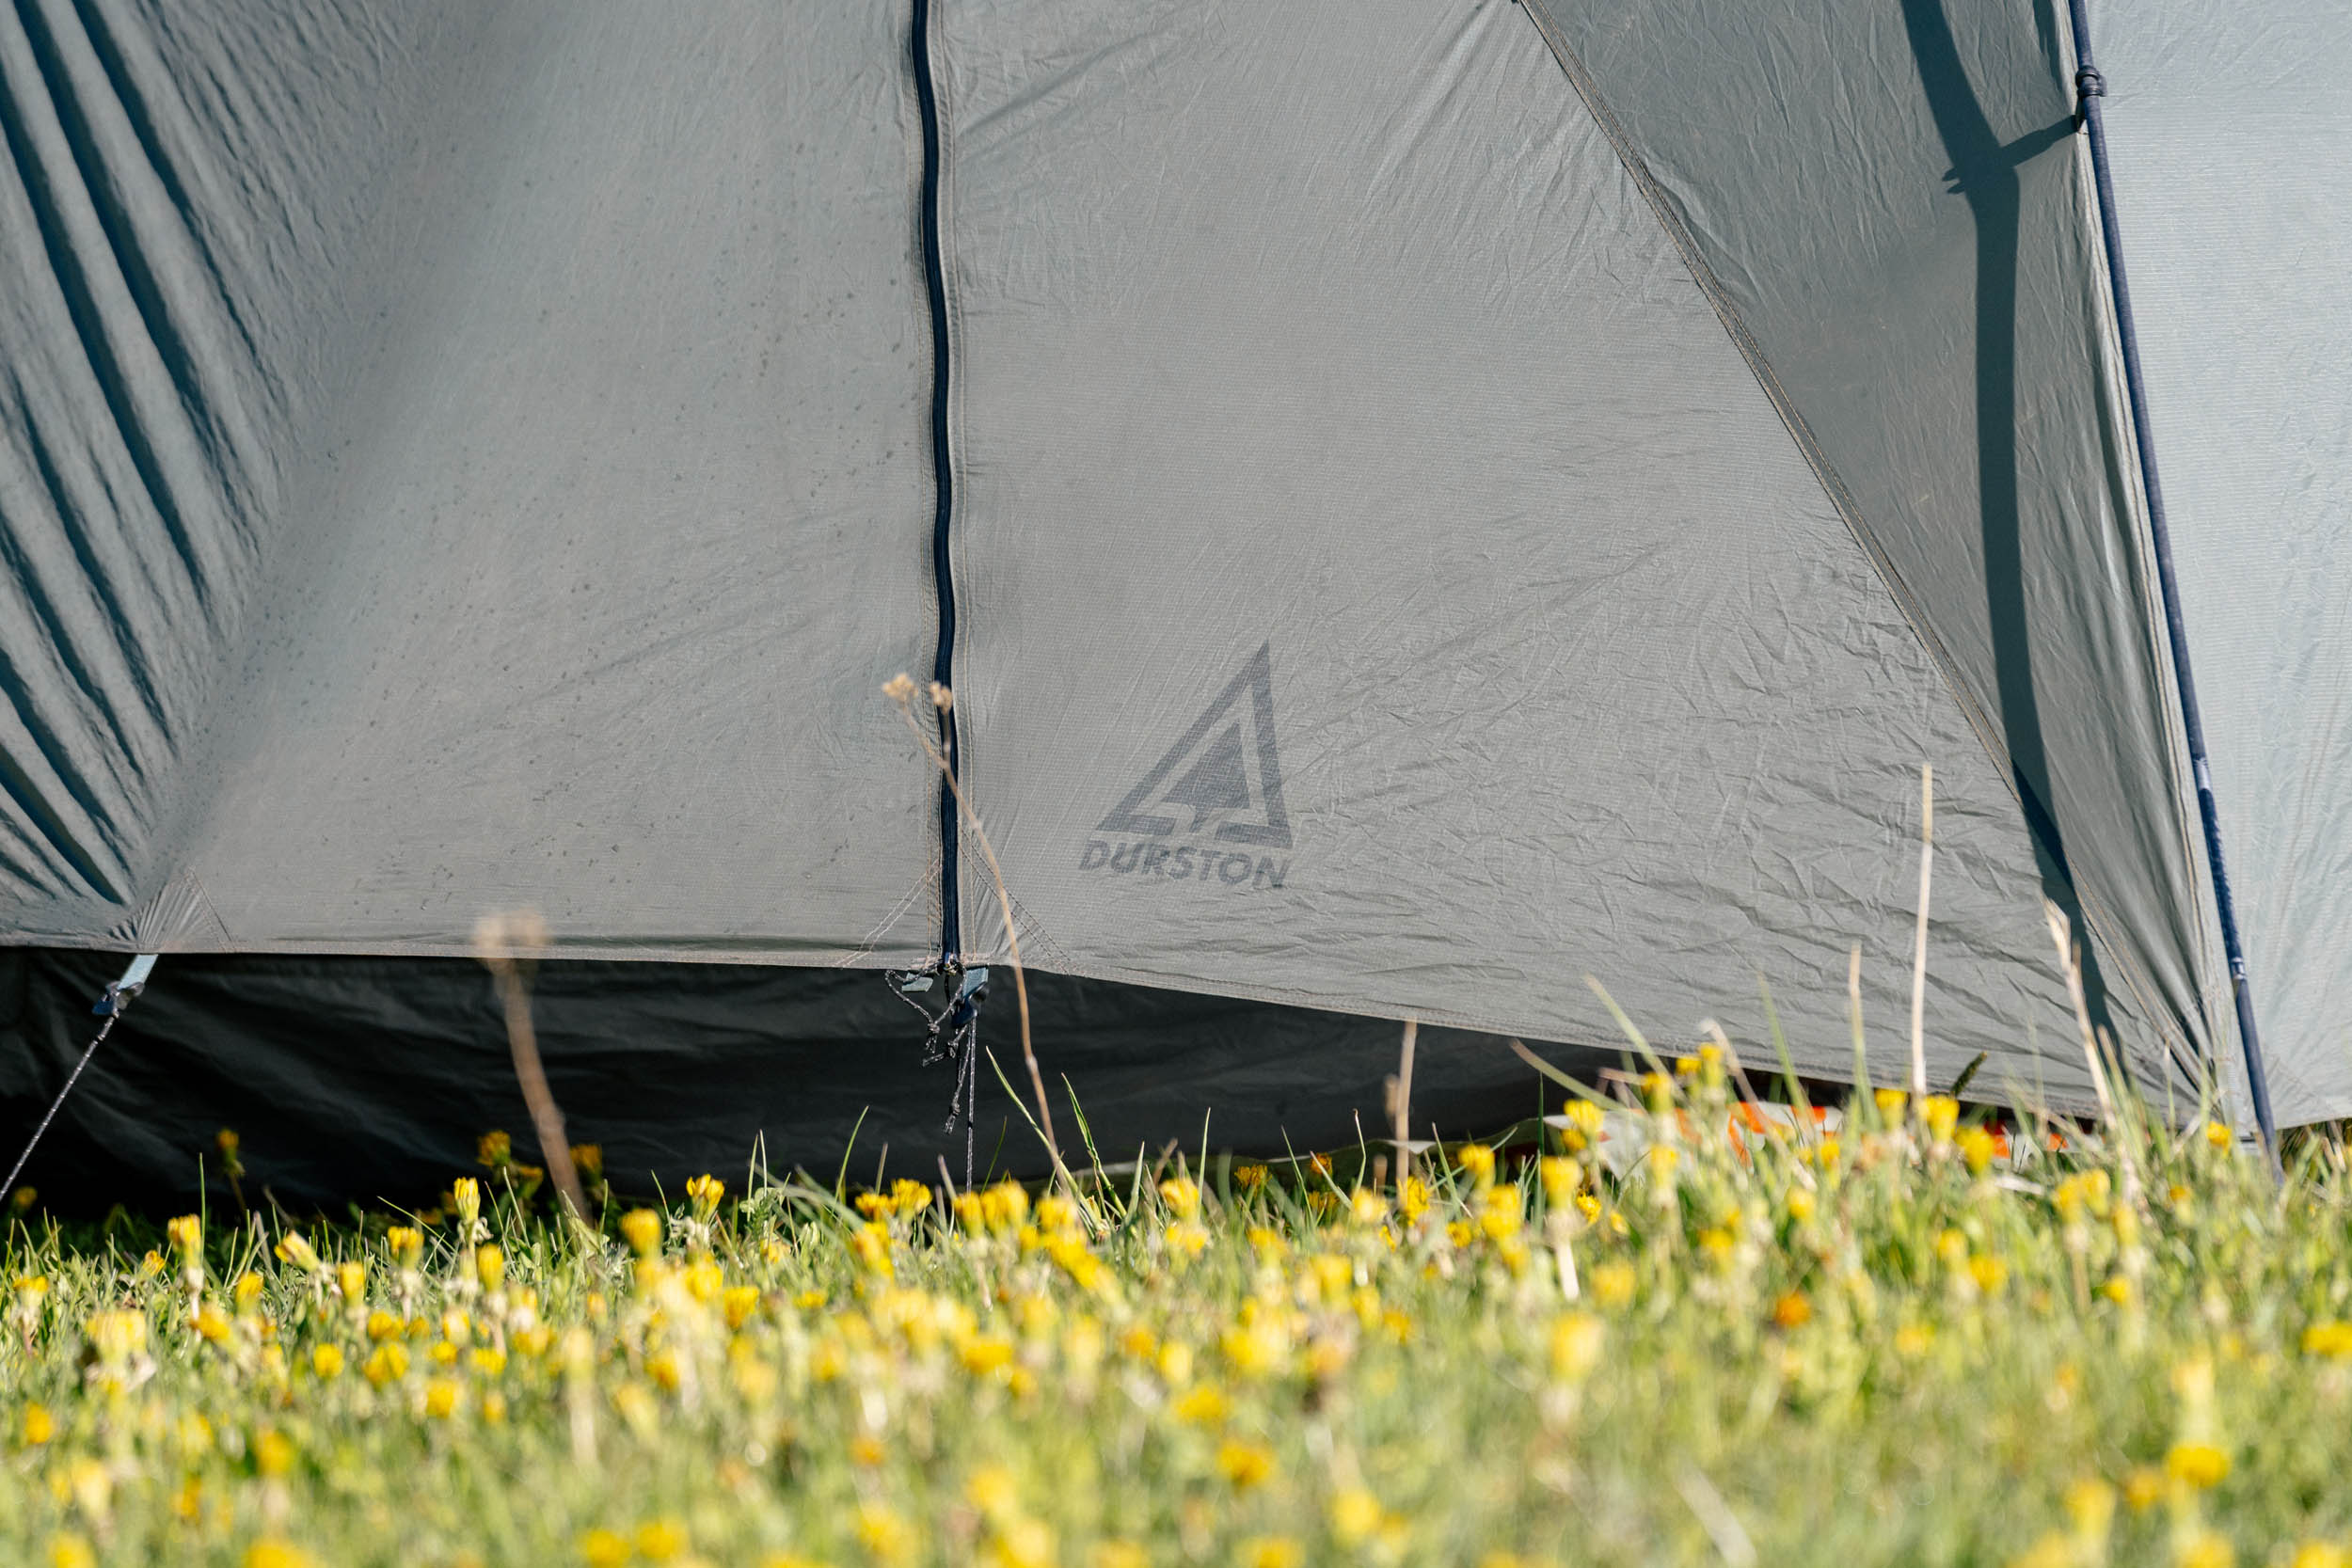
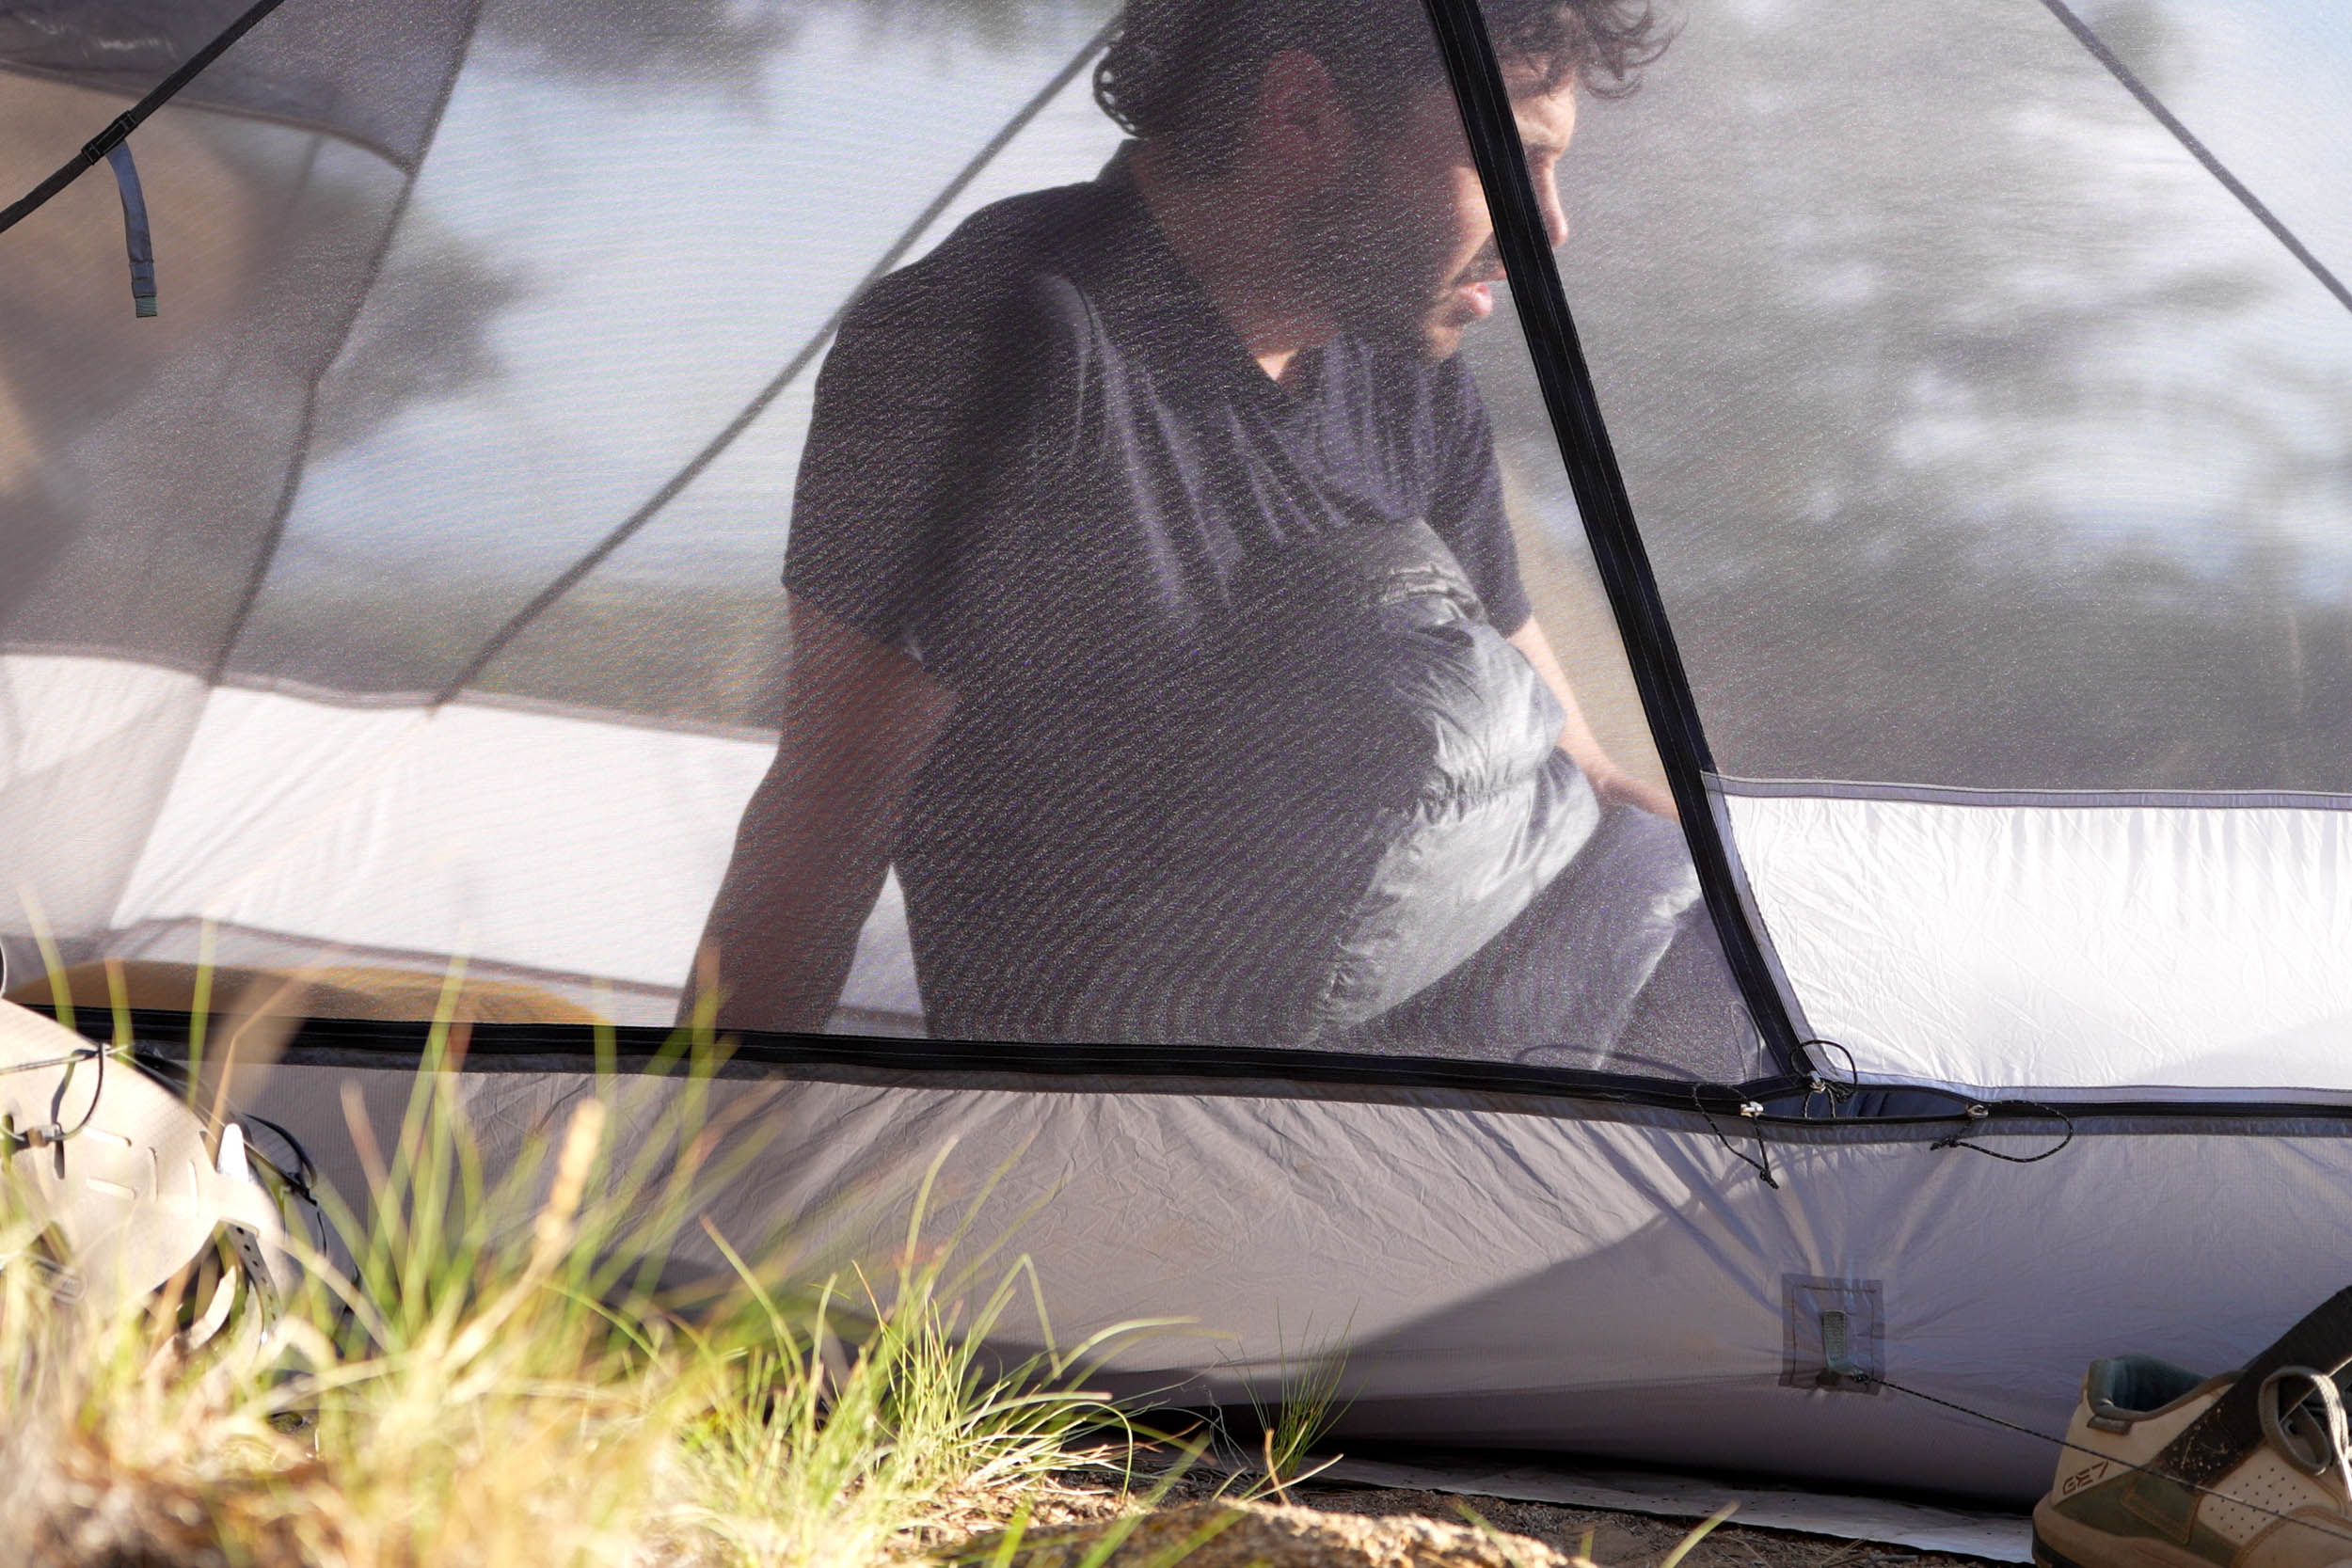
The inner tent is mostly mesh on top with a semi-bathtub floor made from 15D SilPoly. There’s also a solid inner version that swaps most of the mesh for 20D SilPoly if you’re after more warmth or protection. The door design is also well thought out, with a full-length bottom zipper and two pulls that meet at an angled zipper running upward. This provides a split entry: the larger side opens into the main living area, and the smaller side gives access to the vestibule. There are just two interior pockets, but the ample interior space makes up for it. I don’t store heavy items in tent pockets anyway, though I wouldn’t mind a small ceiling pocket for a lantern.


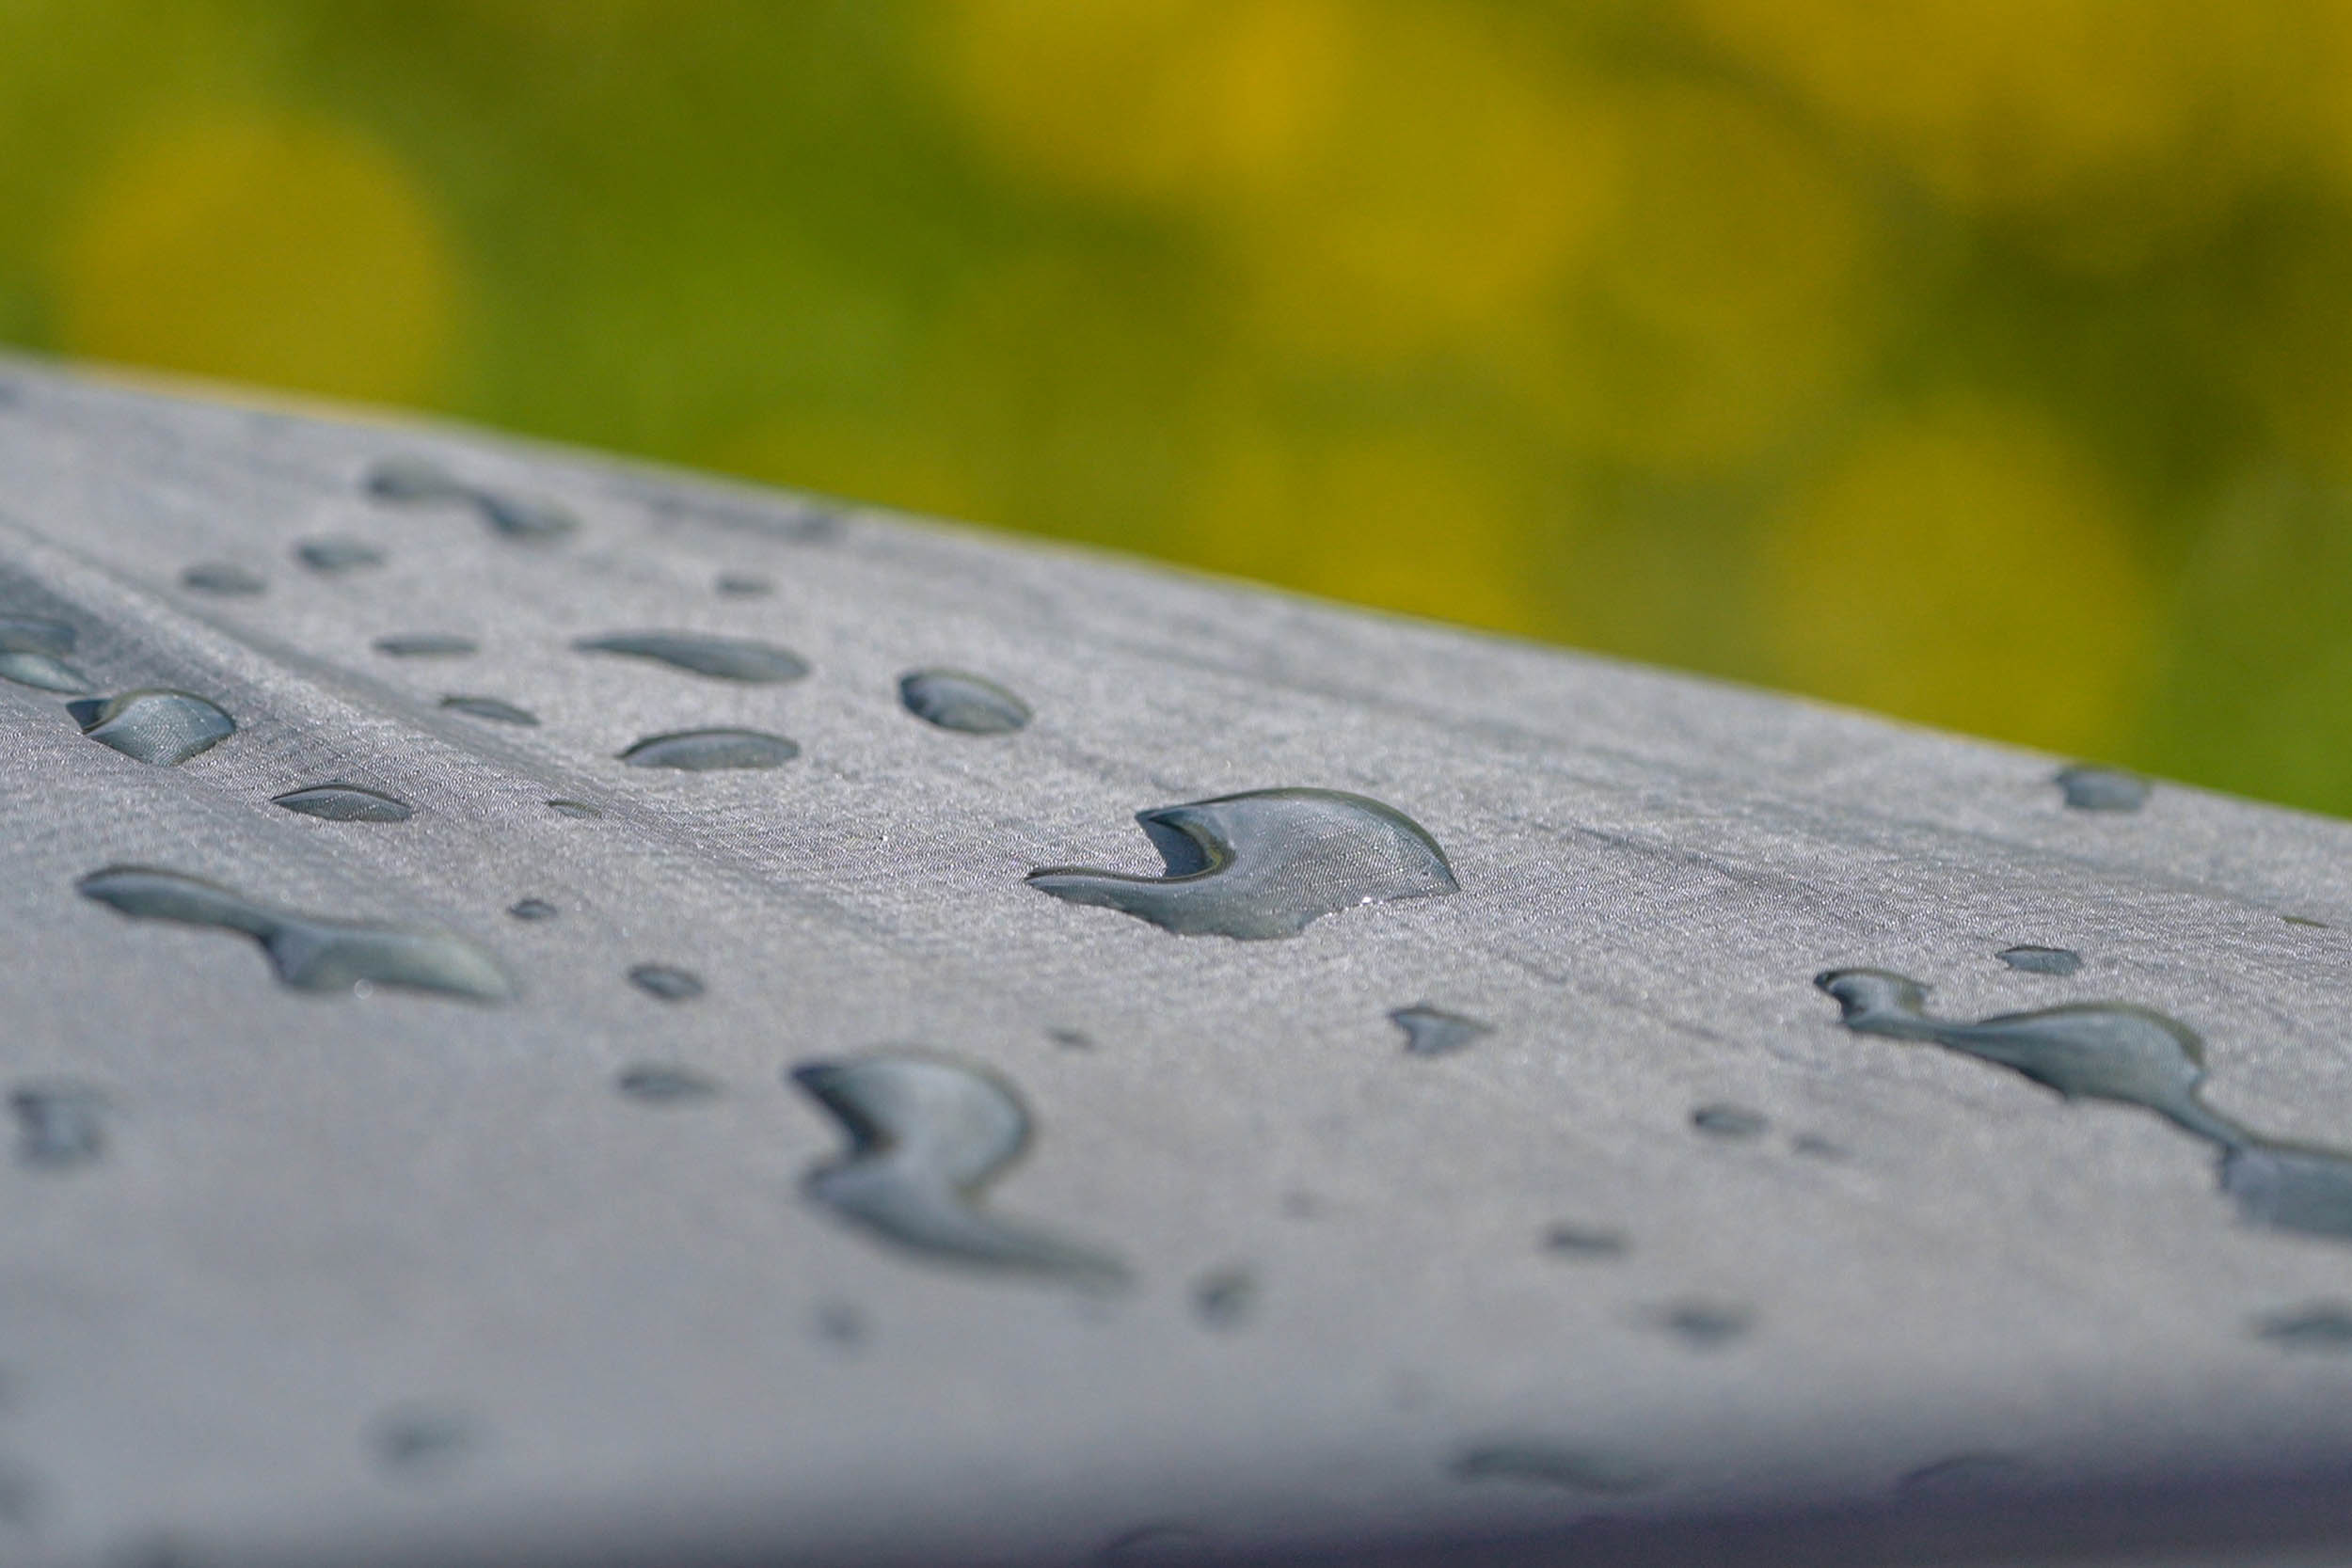
The fly is made from 15D high-tenacity SilPoly, which Durston says is lighter than most 20D versions without compromising durability. There’s always some debate between SilNylon and SilPoly, but fabric tech has come so far that the differences often come down to how hard and often you use your gear. Durston favors SilPoly for its strength-to-weight ratio, low stretch, and fast drying. I tend to agree. For what it’s worth, my SilNylon Slingfin tent held up great, but the Mountain Hardwear Nimbus had major stretch issues when wet; not all similar fabrics behave the same.


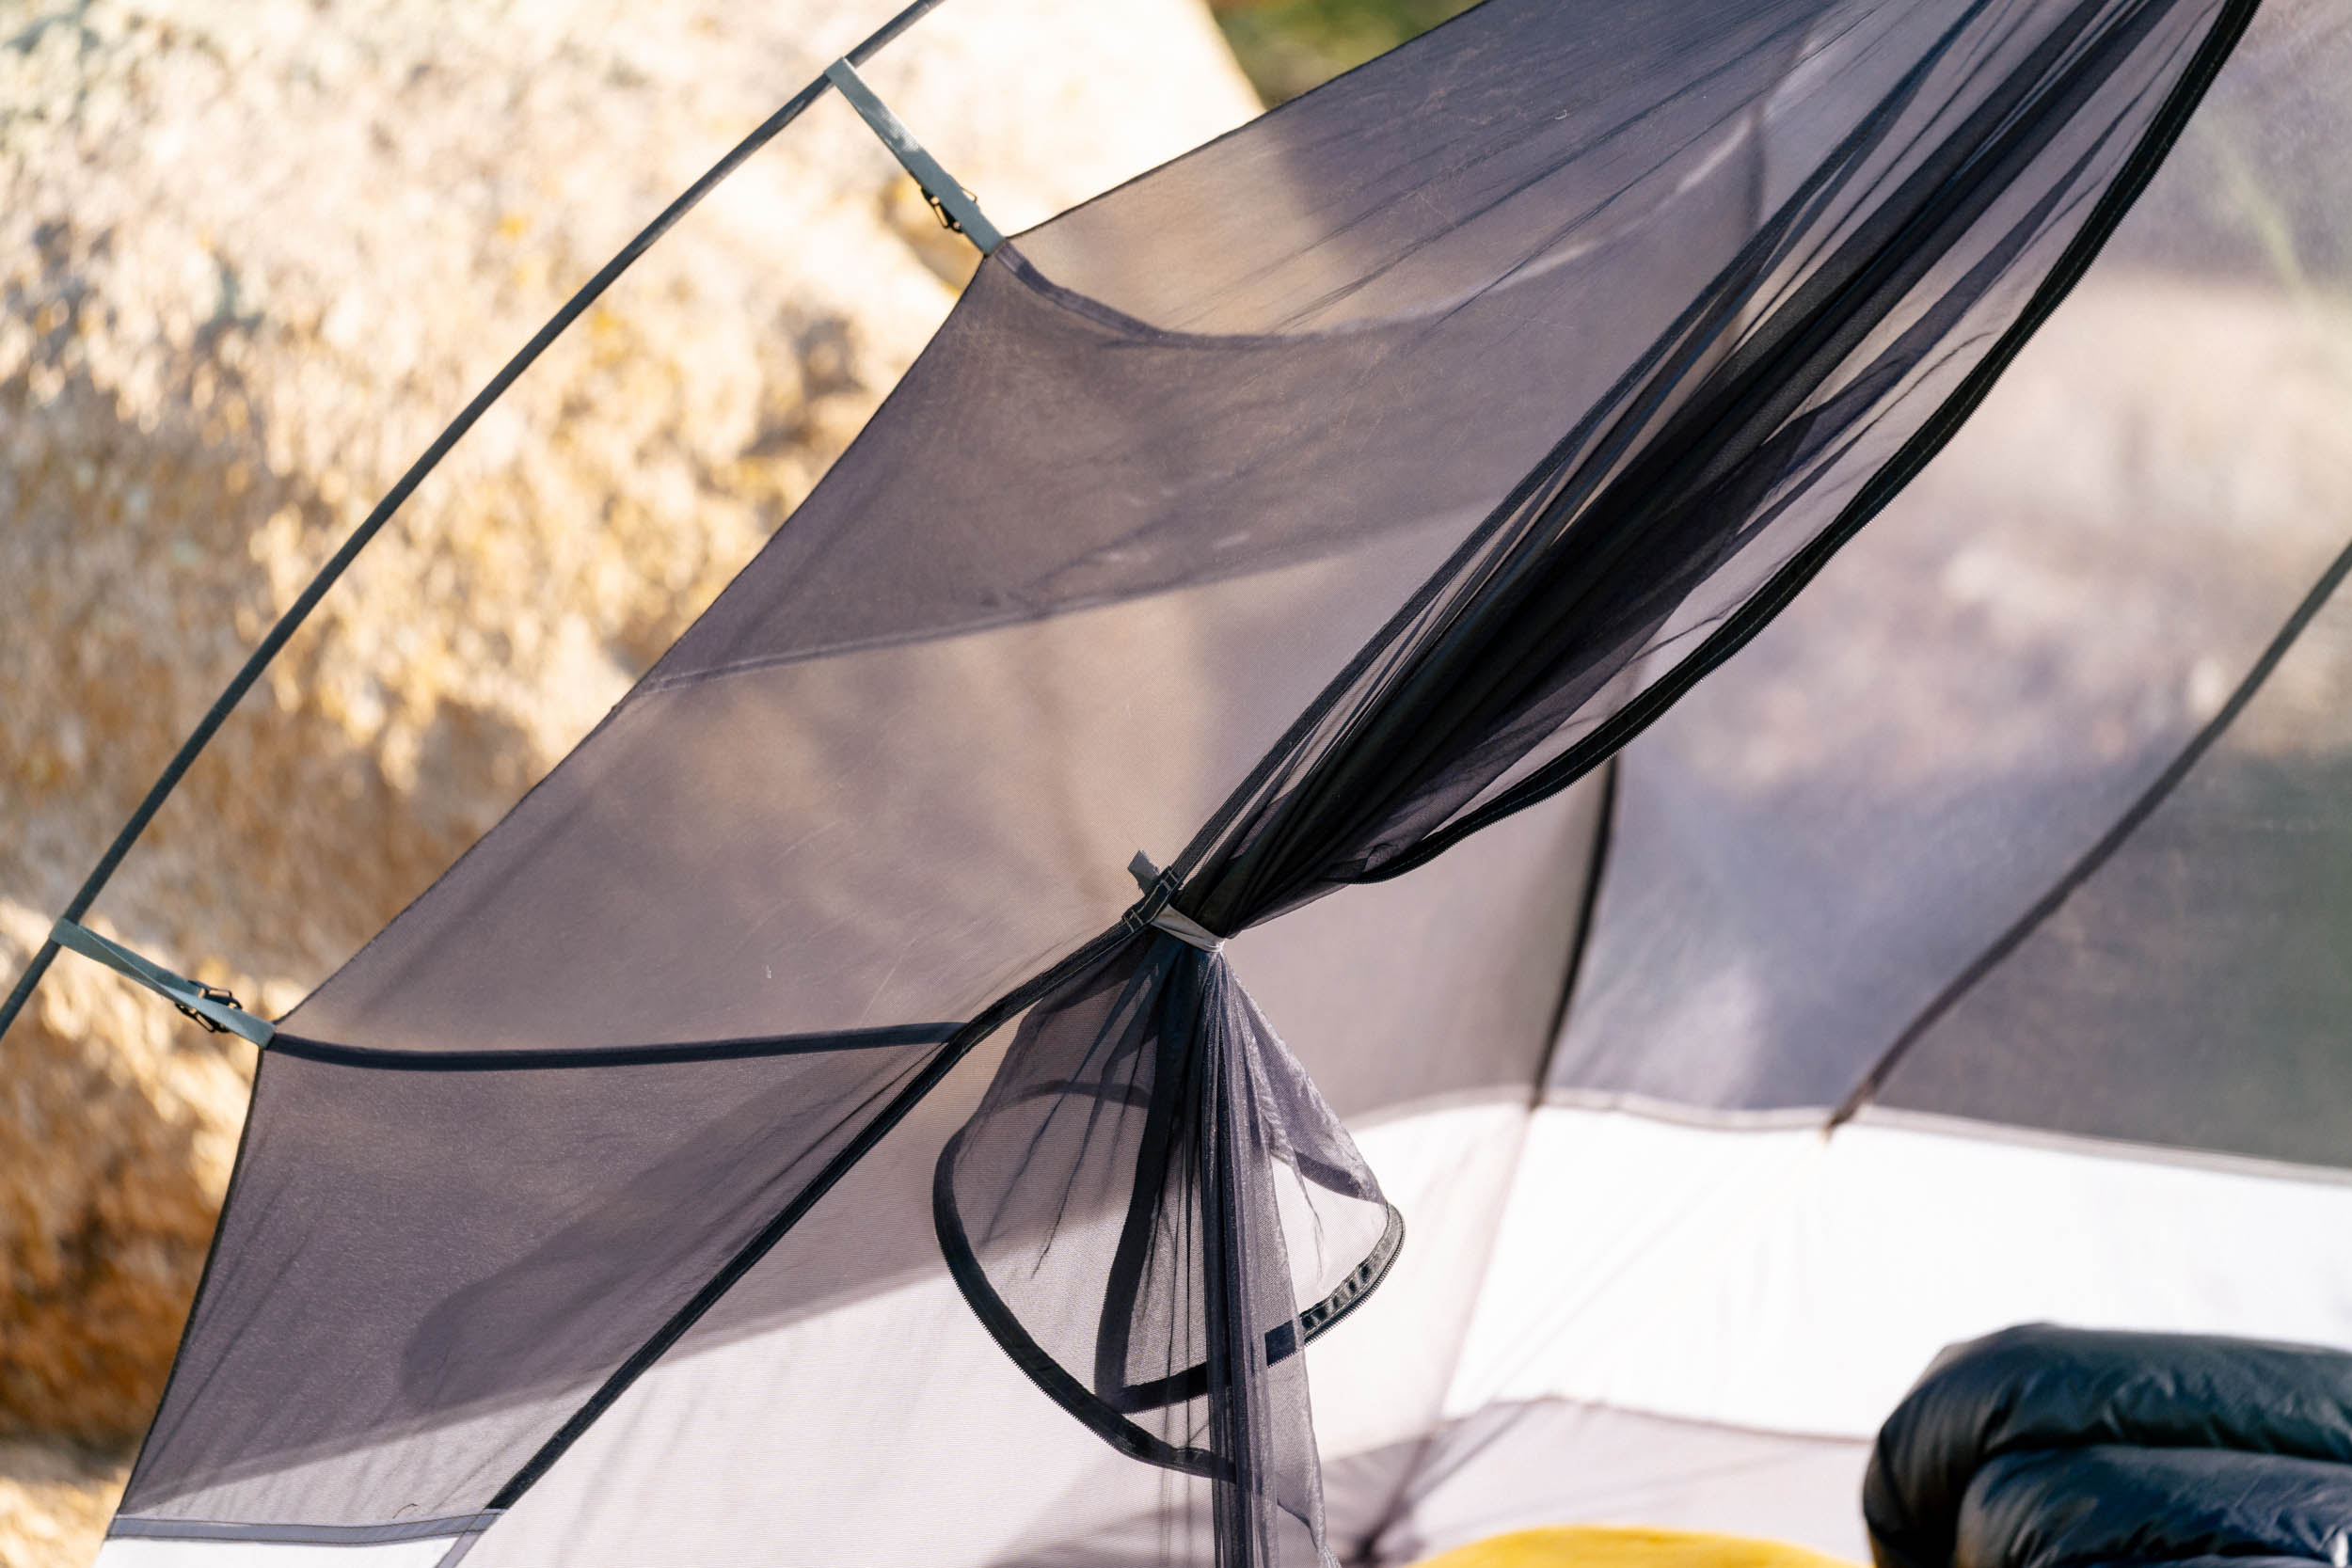
The fly door mirrors the inner door with an angled, offset zipper: one side for main entry and the other closer to the vestibule. Both the inner and fly include magnetic door toggles, which are quick, intuitive, and satisfying to use. Up top, there are two vents held open with Velcro props that I almost always kept open for ventilation. The whole system is supported by Utah-made Easton carbon poles. Both the inner and fly connect at the same points, so everything lines up easily and sets up quickly.
Pitching the X-Dome 1+
Speaking of setup, the first time I pitched this tent, it wasn’t entirely intuitive, and that’s not necessarily a bad thing. I always run what I call the “intuitive test” when reviewing gear: I try to set it up without reading the instructions to see how straightforward it is. I bet half of you do the same. I’ll spare you the full story, but it was immediately clear that this tent is built a little differently than anything I’ve used before.


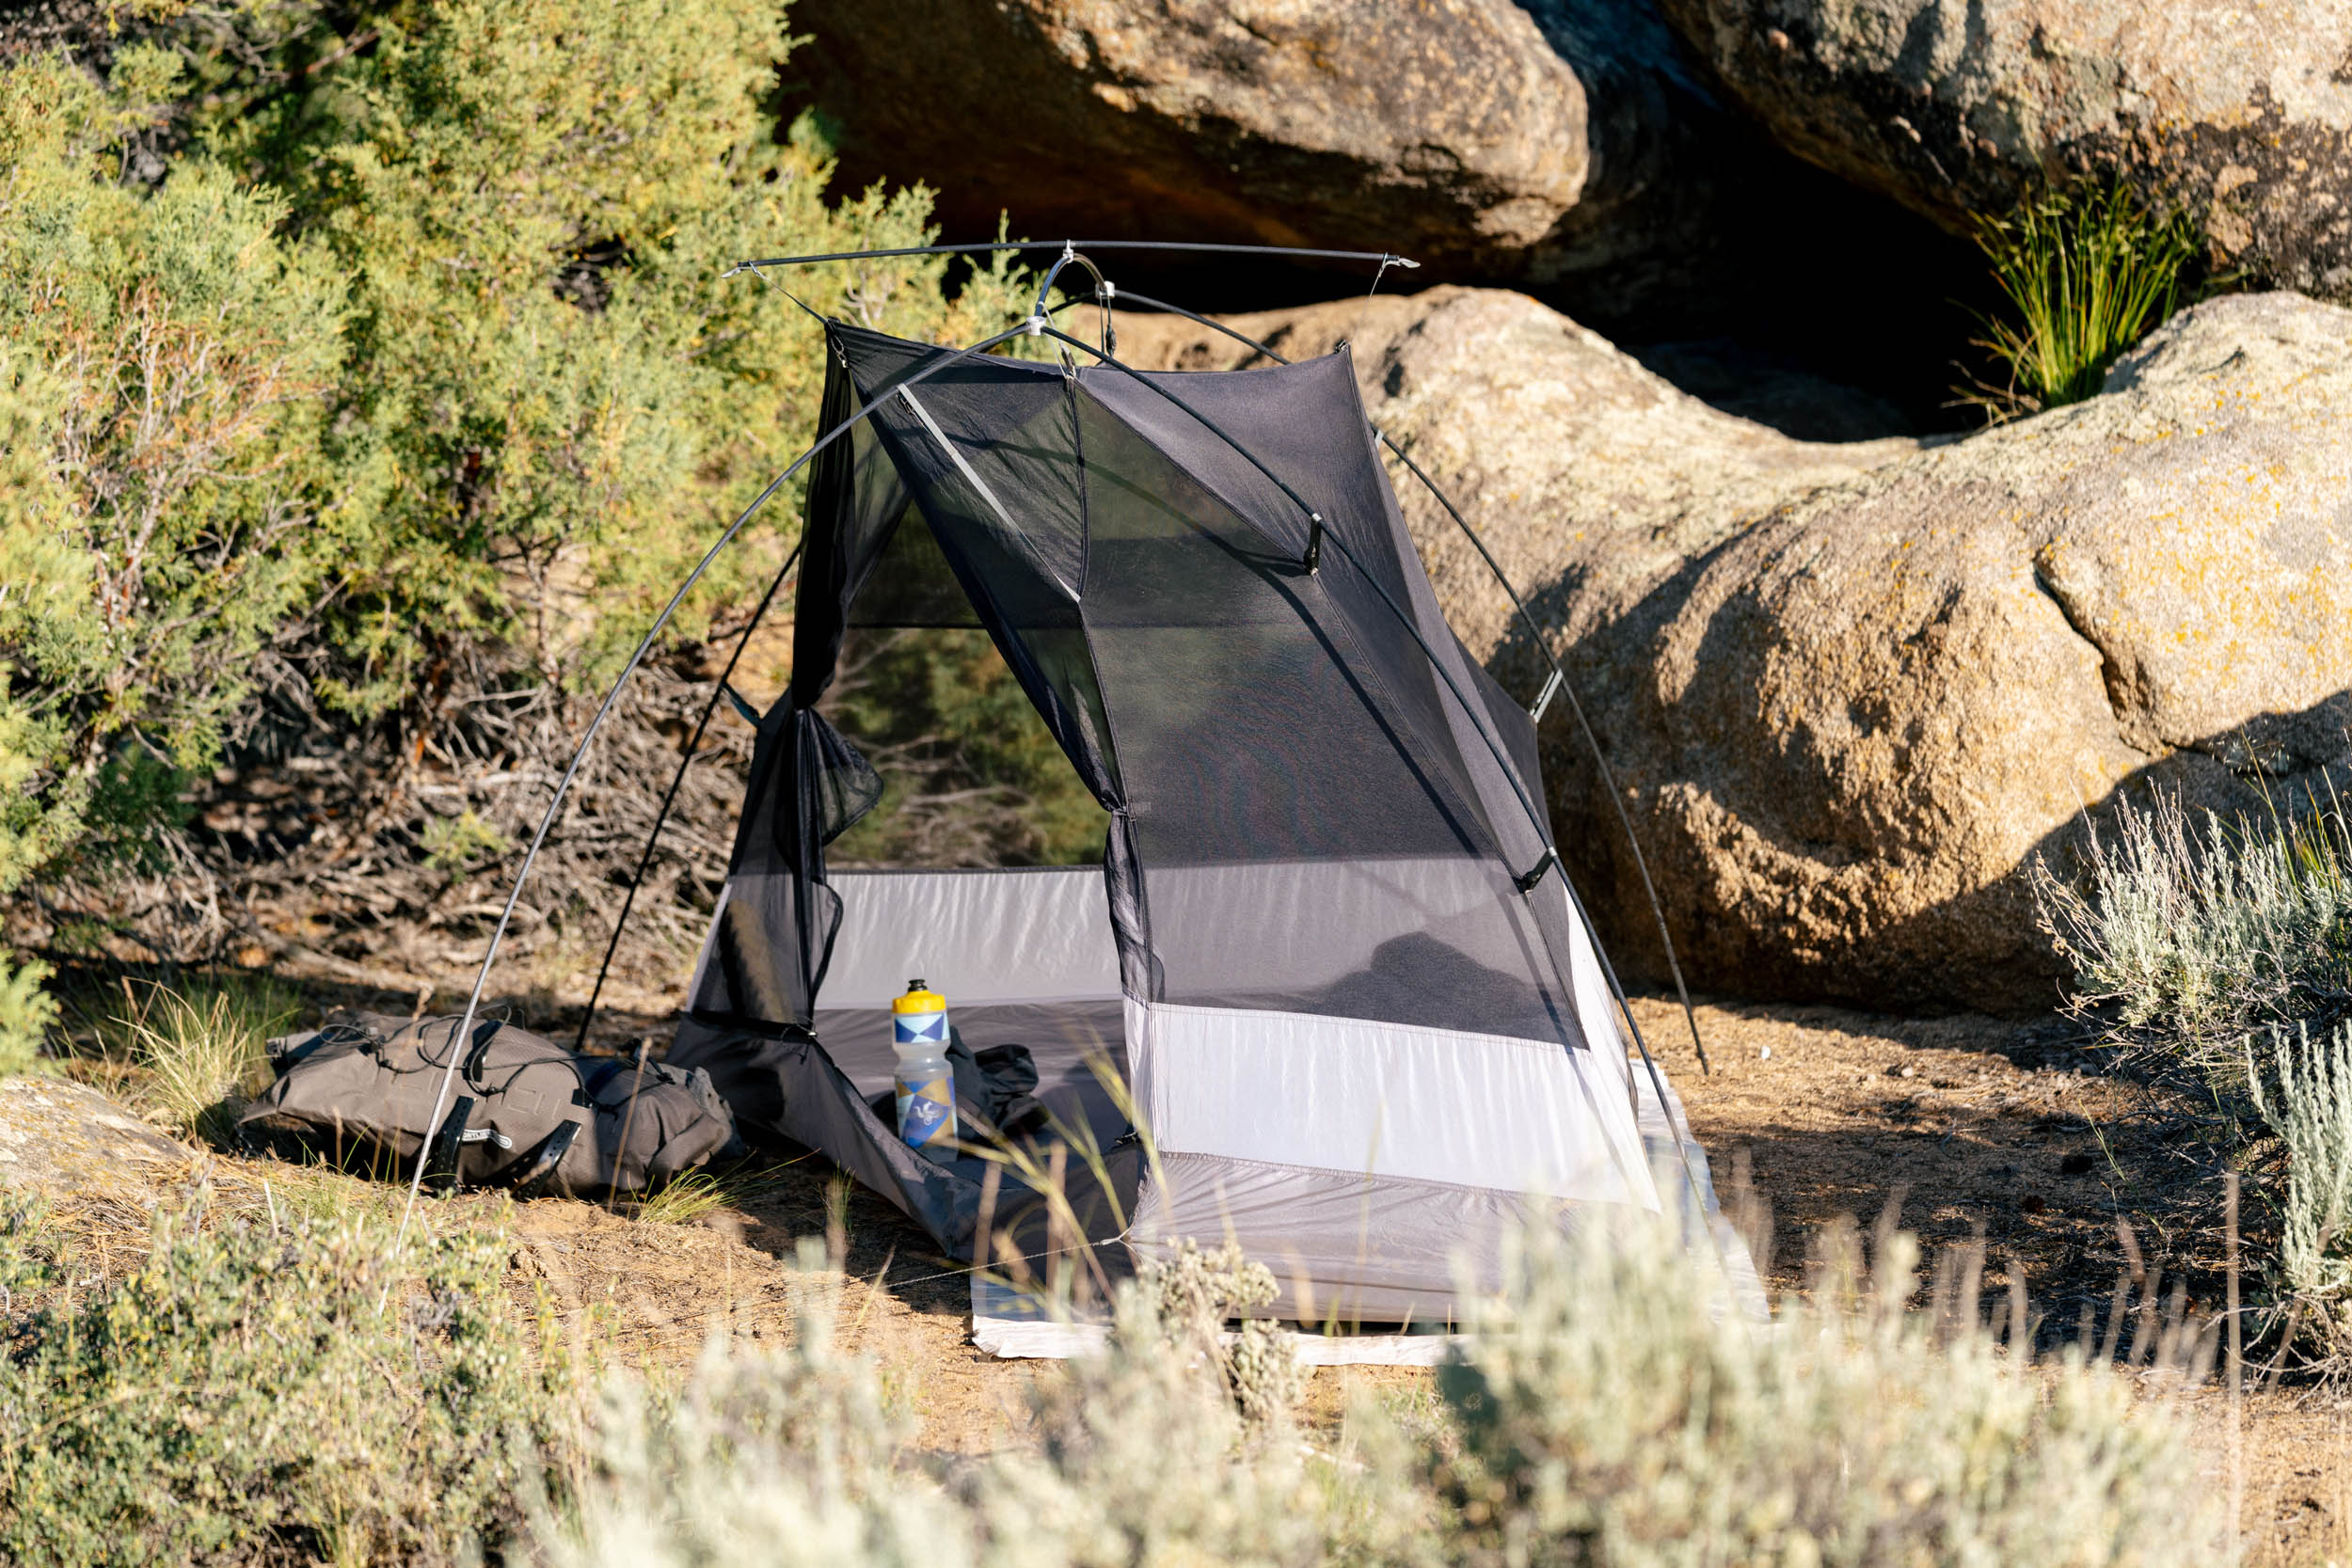
Technically, there are three ways to pitch it: just the inner, just the fly, or both together with the inner already attached to the fly. That third method is the one I used most of the time, and it’s also the easiest. I usually camp with at least some chance of rain in the forecast, so having the whole system pre-attached just makes sense. And if you’re in a wetter climate, especially my friends in the UK, this setup will likely be right up your alley.
One thing worth noting: while a ground cloth isn’t required, I brought along a Tyvek sheet for most of my time with the tent. It was nice to have, even just for extra coverage in the vestibule. It’s always good to have that added layer underneath in case things get especially wet. Durston also offers a dedicated groundsheet as an add-on if you want a more precise fit.
Pitch Options
Out of the box, I recommend pitching the fly first. I learned that the hard way on a dark night in Arizona this winter. You can either stake out the fly before adding the poles, or do what I did the first time: set up the poles and fly together, then stake it down afterward. But nearly every other time, I found it easier to stake the four corner loops first, then set up the poles and adjust as needed from there.
Once the fly is up, you’ve got shelter. Throw down a groundsheet and you’re good to go if you’re going minimalist. For the full inner setup, simply insert the pole tips through the small catches at the four corners of the inner tent, then clip the buckles into the fly. It’s best to start with the back of the tent and work your way toward the door. You can also tug on the small webbing straps and ladder-lock buckles near the pole catches to tension the fly.

Here’s the beauty of the system: if it’s pouring rain, you can crawl inside the pitched fly and set up the inner tent from the inside, staying dry while you do it. Even better, you can leave the inner tent attached to the fly when packing it up, so it’s ready to go next time.
Now, if you’re expecting a dry night, there’s nothing better than ditching the fly altogether or just removing part of it to open things up and improve ventilation. It’s a modular system, so you can mix and match: remove half the fly for more airflow, or pop it back on quickly if a storm rolls in.


Between staking or not staking first, pitching the fly or the inner first, or even flipping the middle pole upside down or right side up, there’s really no one right way to set this tent up. Just one strong word of advice: don’t try attaching the inner tent to the fly unless the fly is already pitched. Trust me on that one.
In use
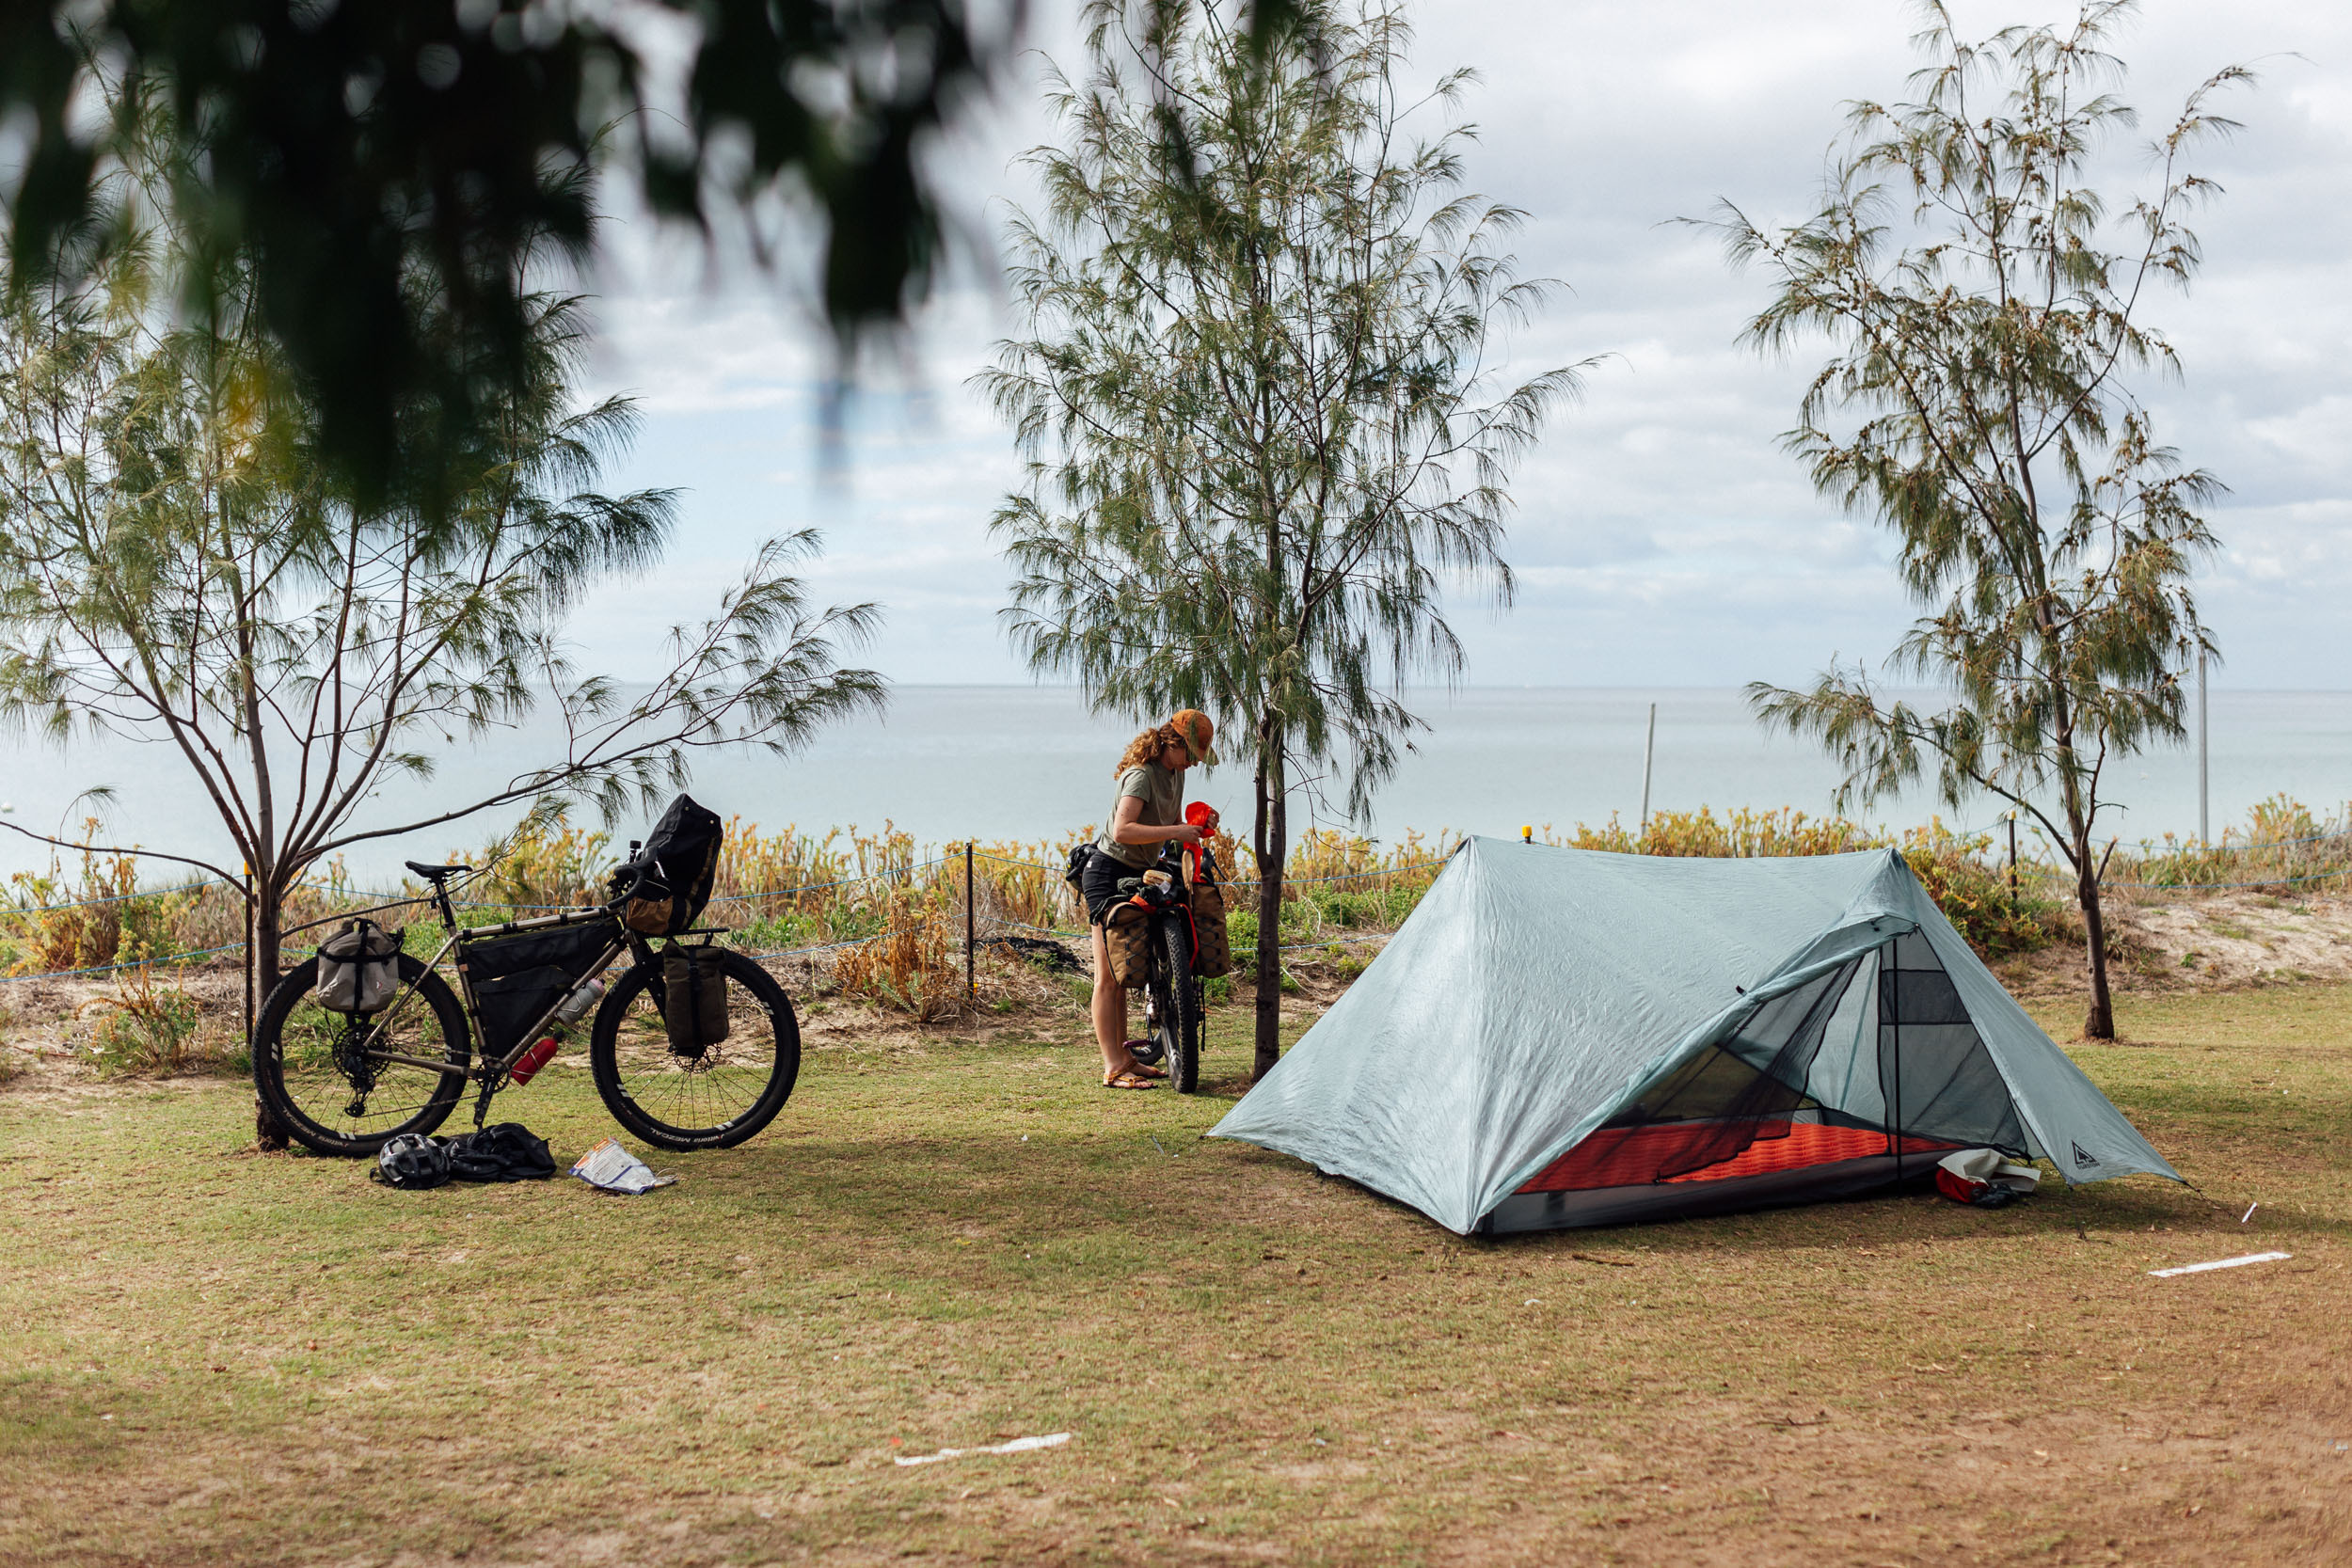
I’ve been testing this tent since February, but when I first got it, I was a little hesitant. Like many bikepackers, finding space on the bike for your shelter—while obviously important—is usually the biggest challenge when packing. And before I even looked at the weight, I was unsure about going with a 1+ design. After all, I’m a pretty small guy, don’t need a ton of room, and always struggle to find space on my bike.
But once I actually packed it into my rear stuff sack, it turned out to be more compact than expected. The only tricky piece was the long Easton poles. I squeezed them into my Gila Monster frame bag in one setup and tossed them on a rear rack another time. That said, this would be a non-issue with the short pole version, which I didn’t get for testing but would recommend for bikepacking. Just keep in mind the short poles are a little heavier.


We already covered the setup, which is clearly one of this tent’s best features, but one thing to keep in mind in real-world use is the footprint. It’s bigger than your average one-person tent, so if you’re camping with a group or trying to squeeze into a tight patch of ground, space might be an issue. It’s the trade-off for all that extra interior room—something you’d run into with most two-person tents.
I used this tent in all kinds of conditions, from chilly Arizona nights and rainy spring outings to early summer downpours and hot, humid evenings. And I’ll say this: the tent thrives in the elements. I never had to set it up in a full-blown storm, but I came close a few times. And knowing I could pitch the fly first gave me peace of mind. Being able to keep the inner tent attached at all times just makes the whole process quicker and easier.

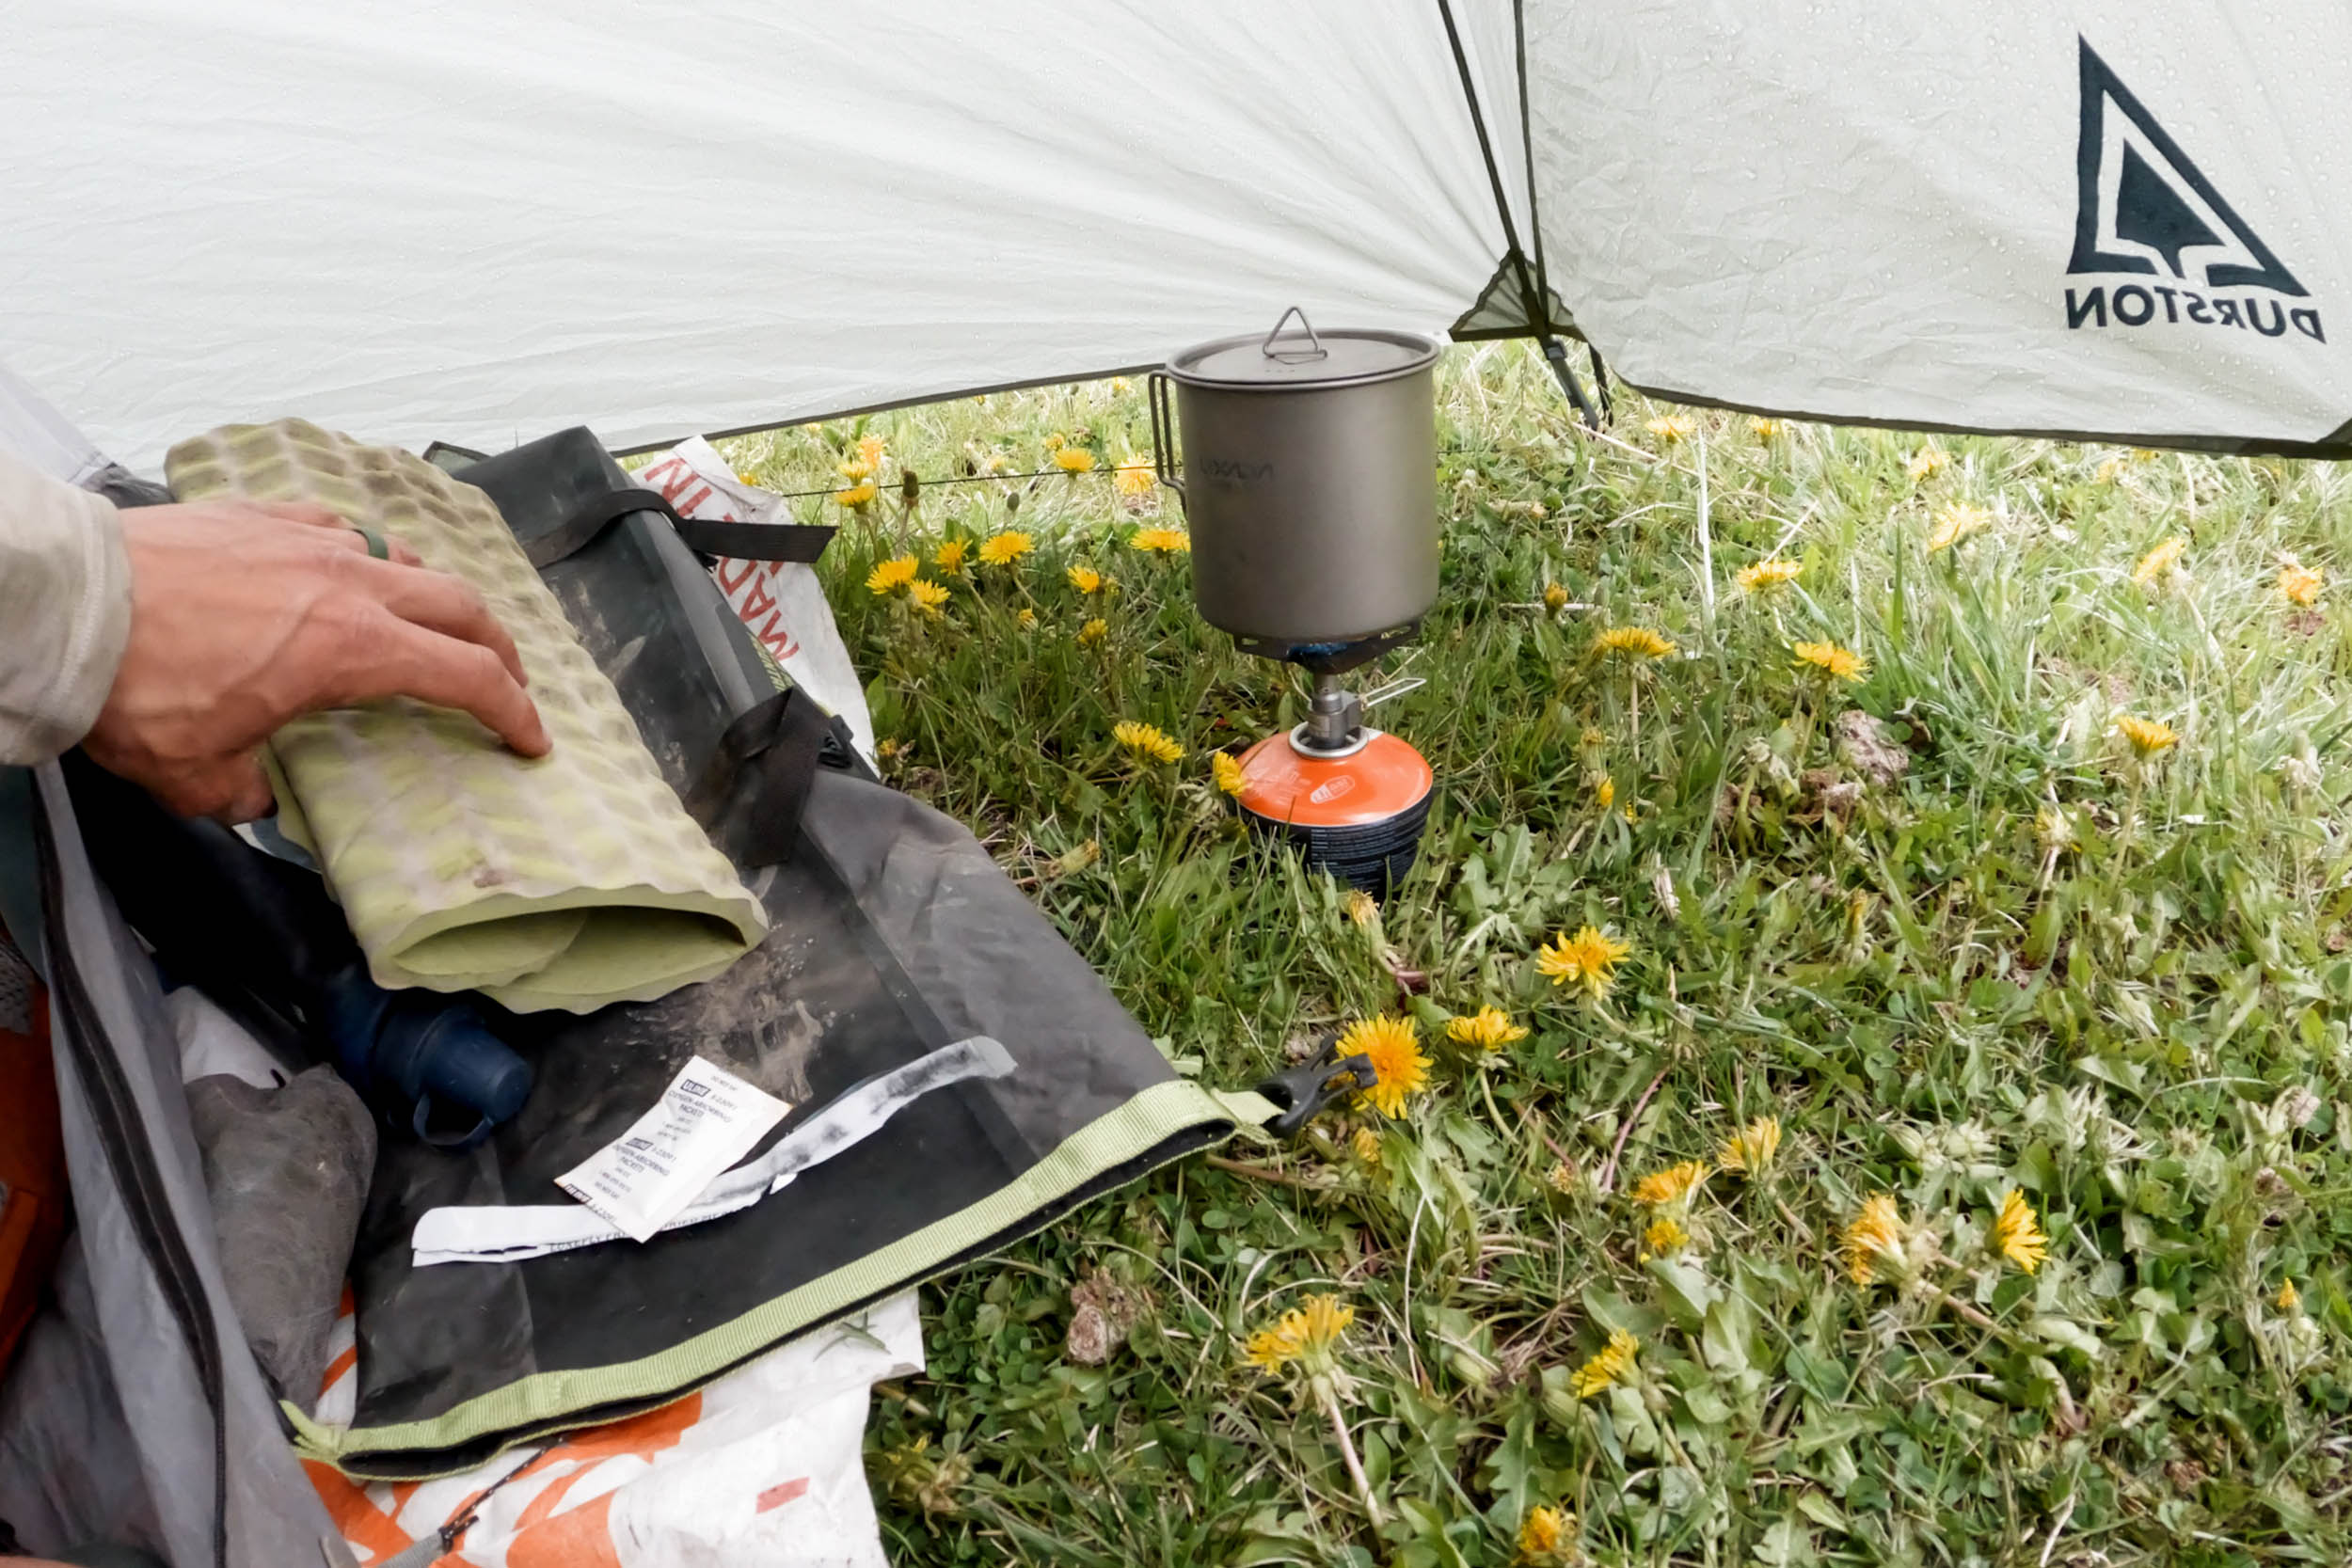
Over the course of several hours of steady rain, a couple of brief hailstorms, and some gusty wind events, the tent never once felt like it was faltering. And that big vestibule? It gave me enough room to boil water in the rain, which was clutch on more than one occasion.
Sure, I wasn’t testing it in the harshest conditions, but between the variable-radius pole design, the silpoly fly, and the attention to detail in the construction, I never had issues with water intrusion or wetting out. There’s great separation between the fly and inner, even without a big structural pole in the middle, which I was a little skeptical about at first. But even in wind and rain, the two layers rarely touched. And when they did, it was usually at the head or foot of the tent—easy spots to guy out. Overall, the fly offers excellent coverage and can be cinched nice and close to the ground.


Speaking of which, the tent has something like 12 guy-out points. That’s probably overkill for most trips, but if you’re headed to Iceland or another wildly windy place, it’s a great feature to have. I only ever needed the standard stake positions.
Getting in and out of the tent is super easy, especially when you unzip the fly to the top. And once you’re inside, it doesn’t feel like a typical one-person tent. Two people could fit if they didn’t mind cuddling, though foot space might be tight. Usually, I end up brushing against tent walls or sliding down as I sleep, but in this tent, I hardly ever did, even when sleeping straight rather than at an angle.
Finally, I tested this tent in fairly arid conditions, albeit with plenty of rain. The Western US is generally pretty dry, and I was impressed with the airflow. As I mentioned, the two vents stayed open nearly the entire time, and combined with the sheer size of the tent, moisture either dispersed or escaped quickly. Come morning, with just a little breeze or sun, the tent would dry out in a heartbeat.
Comparisons
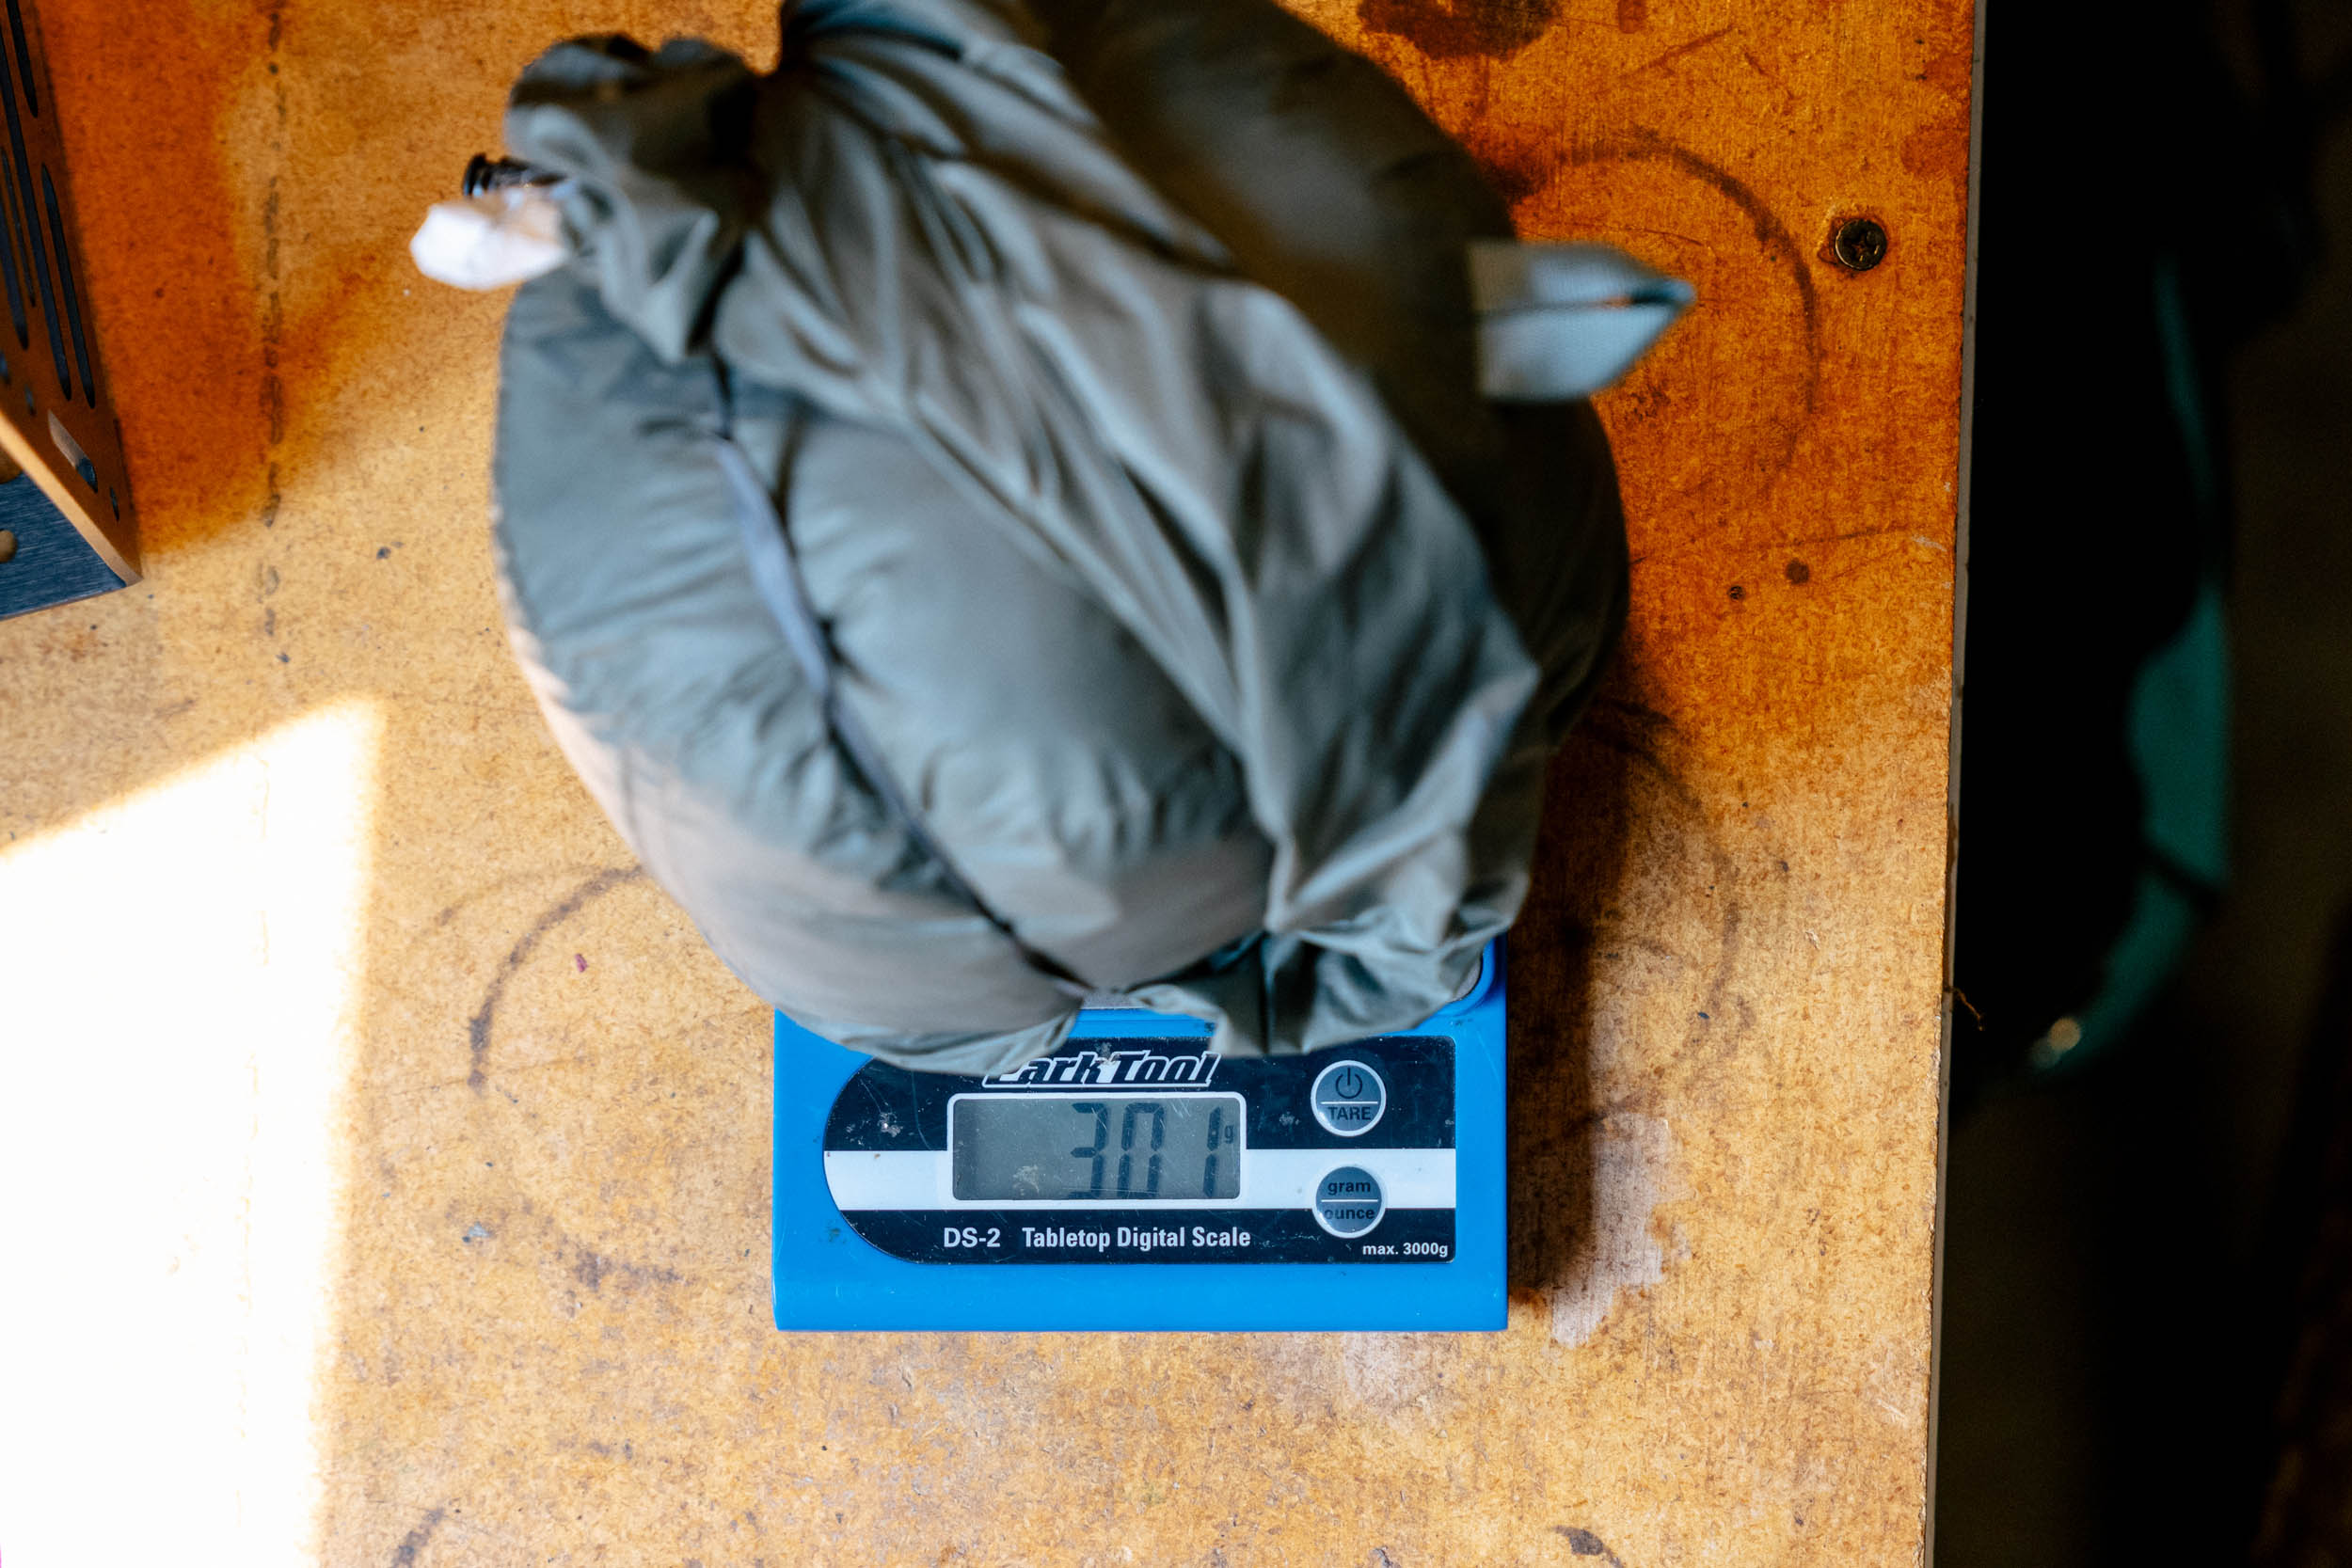
For actual weights: the fly comes in at 408 grams, the inner is 301 grams, the poles are 281 grams (287 grams with the stake bag), and the eight stakes plus their bag add up to 102 grams. The way I packed it—fly and inner out of the included stuff sack, and poles and stakes in their own little bags—my total came to 2 pounds and 6.73 ounces (1,098 grams) at the end of my test period (with a bit of grit and grime on the tent). Not the lightest tent I’ve used, but not far off. And frankly, I’d gladly trade an ounce or two for the space and comfort it offers.
Just to throw out a few comparisons: the Slingfin Portal 1 I recently tested came in at 2 pounds and 6.7 ounces (1,097 grams), the MSR Hubba 1 Bikepack landed at 2 pounds and 5.6 ounces (1,066 grams), and the Mountain Hardwear Nimbus hovers right around 2 pounds (907 grams). So, we’re only talking about a minimal difference in weight for a tent that offers significantly more in terms of features.


The X-Dome 1+ is best in class for overall interior space and headroom, incredibly storm-worthy, and features one of the most modular designs I’ve seen, all for a very minor weight penalty. And that’s not even the full story. The price might be the real icing on the cake: the X-Dome 1+ comes in at $379 USD, which is cheaper than any of those other tents, and less expensive than most ultralight one-person shelters—except, I guess, the Big Agnes Fly Creek, which always seems to be on sale.
It’s worth noting that the solid inner and short pole set cost extra, but even then, you’re looking at just over $400 for a well-built, highly functional tent that’s made to last. While the tents are designed in Canada, all non-Dyneema models are manufactured in Vietnam at the same factory that produces shelters for brands like Tarptent, Big Agnes, and many others we’ve highlighted on the site.
- Model Tested: Durston X-Dome 1+
- Actual Weight: 1,098 grams (2 pounds and 6.7 ounces)
- Place of Manufacture: Vietnam
- Price: $379
- Manufacturer’s Details: Durston
Pros
- A refreshing take on a freestanding tent
- Loads of internal space
- Massive headroom
- Huge, usable vestibule for gear
- Fly-first pitch with modular setup options
- Lightweight
- Competitively priced
Cons
- Large footprint might make it tricky to find a spot to pitch
- Long pole set isn’t ideal for smaller bikepacking bags
- Could use an additional pocket at the ceiling for a light
- Poles can be tough to remove from the pole catches
Wrap Up
This is hands down the most exciting tent I’ve tested since the Slingfin Portal 1. But what sets the X-Dome 1+ apart is that it completely redefines what a one-person tent can be. From the massive vestibule that keeps all of my gear dry during a rainstorm to the roomy interior and generous headroom and the ability to pitch the fly first or run a mullet-style setup—with the inner up front and the fly only in back—its modularity is truly something unique. And I don’t use that word lightly.
When you combine that flexibility with its weight and price, it’s hard to come up with a reason not to buy this tent. Sure, the larger footprint can make it trickier to find a flat spot, and the long poles might pose a packing challenge. But with a short pole set available, that’s an easy fix.
To be fair, the Portal 1 has some great features of its own—like a backup zipper pull, more interior pockets, and next-level stitching details. So if you’re looking for something a bit more compact and don’t need the extra space, there’s still a case to be made for it, but the X-Dome 1+ might just be the most practical lightweight bikepacking sleep solution I’ve ever tested.
Please keep the conversation civil, constructive, and inclusive, or your comment will be removed.