Planning a Route

Bikepacking routes can be as varied as the wide array of bikes and bags that you can take on them. They can be long or short—such as a sub-24-hour overnighter or a multi-week expedition—based on gravel, dirt roads, or singletrack, and roll through small towns, into rural farmland, or deep into the backcountry. Routes might begin close to home and be logistically straightforward to organize, utilizing both favorite rides and unknown trails, or they may require extensive planning and travel. You can head out to ride established bikepacking routes or make up your own. As important as it is to have a reliable bike and an efficient, well-thought-out gear list, choosing the right route is the key to your enjoyment, whether it involves forging your own path or following an existing one.

Bikepacking 101, Planning a Route

The site is packed with an ever-growing resource of bikepacking routes to suit all abilities. While it may seem as simple as downloading a GPX file and hitting the trail, there are many factors to consider when deciding on an existing route. If you’re planning on doing a variation of a pre-established route or creating one of your own, there are a number of additional details to look after. Additionally, there are nuances and complexities to navigating any route once you decide where to go. But before we dig into the tools, techniques, and things to consider, it’s important to understand what makes some routes more difficult than others.

Route Difficulty

By nature, pedaling a bike loaded with gear is slower and more strenuous than riding an unladen bike. This is important to keep in mind when planning any bikepacking trip, particularly your first. Beginner bikepackers should expect to go one-half to two-thirds the speed and distance they might go on a typical unloaded ride.

Every route published on BIKEPACKING.com is assigned an overall difficulty rating between 1 and 10 to help readers discern how challenging of an experience they can expect when setting out to ride it. Route difficulty ratings are based on the opinion and experience of individual route creators and may vary from route to route. To help further define this number and create clearer expectations, we provide a few sentences in each route guide to describe this rating, notes within the Must Know tab, and three additional metrics.

Most of these metrics, save the Climbing Scale, are subjective and can change based on weather, time of year, individual fitness and abilities, and other such environmental factors. For example, some routes may be much more challenging at certain times—such as clay roads that turn into “death mud” that can stop you in your tracks when wet. Do your own due diligence and research before setting out on any of the routes listed on this website.

Technical Difficulty

This metric is used to define the technical nature of the surfaces found on the route. For example, a route with a technical rating of 1 to 3 might be mostly smooth, graded gravel with the occasional obstacle or loose section. A route rated 4 to 7 on this scale may have more varied surfaces with uneven dirt roads, off-camber areas, relatively non-technical singletrack, or a few challenging obstacles. On a route with a technical rating of 8 to 10, you might expect steep riding, exposure, hike-a-bike, and rocky and rooty technical singletrack with obstacles.

Physical Demand

This metric defines the strenuousness of the route. Routes with relatively flat and easy terrain will have a rating from 1 to 3, whereas hillier or mountainous routes with occasional long climbs might come with a 4 to 7 physical demand rating. Rides with regular steep grades, relentless climbing, and those at high elevations might receive an 8 to 10 in this category.

Resupply and Logistics

The physical and technical difficulty ratings of a route are important considerations. However, these numbers leave out several critical factors. For example, some routes might be relatively flat and smooth but still remote, long, or devoid of resupply options. The resupply and logistics metric factors in the ease of food and water availability, transport to and from the beginning or end, and other factors that affect the logistical difficulties of the route, among other logistical considerations. Perhaps the most basic element of this metric is what type of route it is. Whether they’re short or long, bikepacking routes fall into one of two categories:

Loop one way route

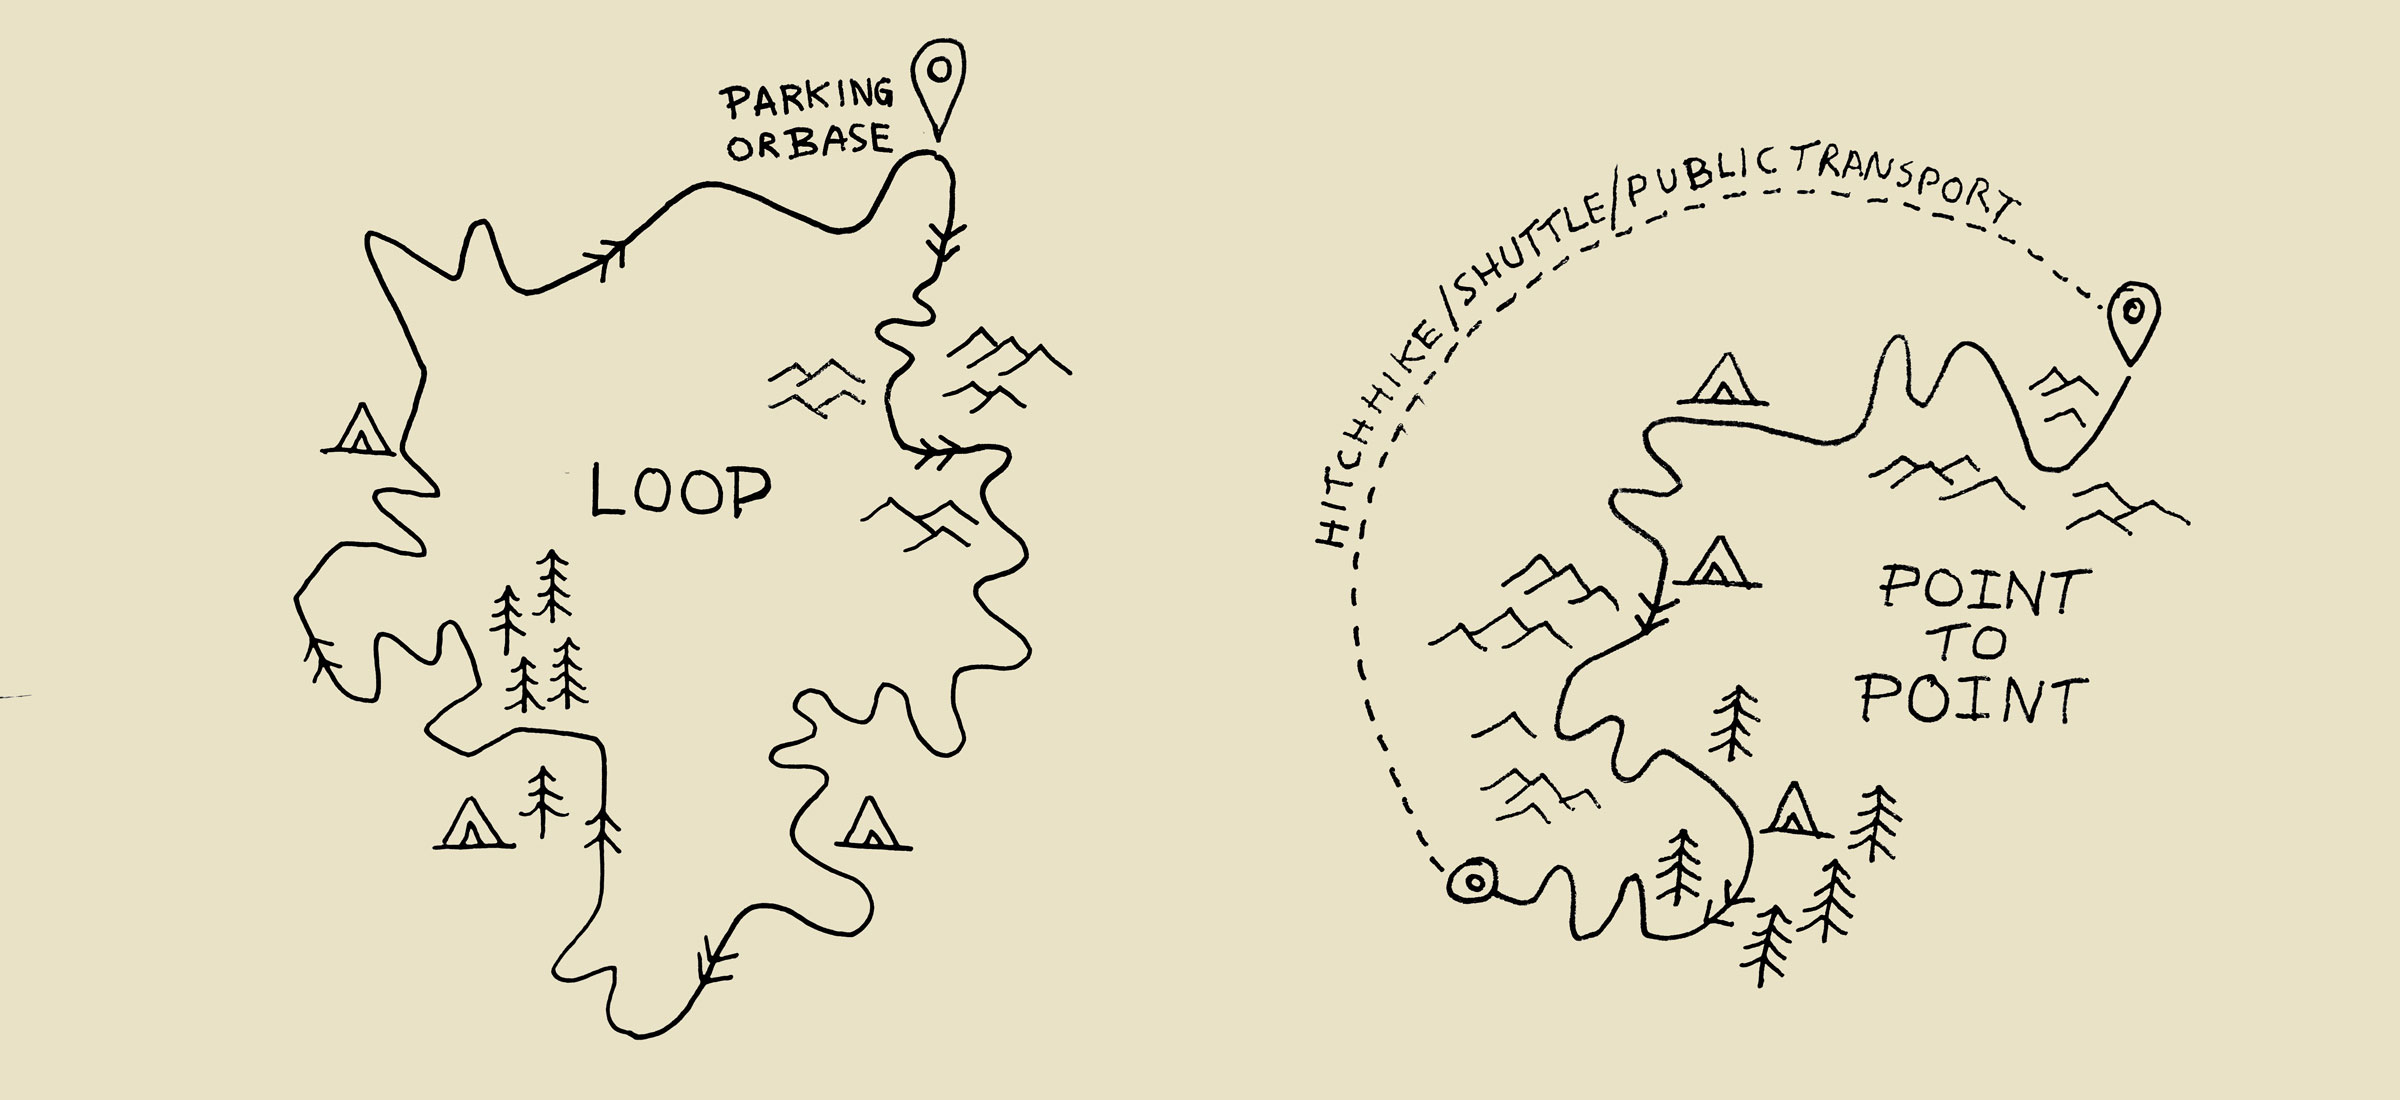
1. Loops: A loop starts and finishes at the same place. Starting points often include places like parks, historical landmarks, public transportation hubs, or parking areas. For time and tactical reasons, bikepackers often prefer loops, especially for shorter trips, so the logistics of post-ride transportation don’t take time away from riding. Note that most of the overnighters in our Local Overnighter archive are loops. Overnighters are meant to be simple, quick getaways where the loop format makes the most sense.

2. Linear routes: A linear route, or through-route, is a one-way ride that starts and finishes in two separate locations. This requires an additional logistical component that involves transportation from the route’s terminus back to the starting point or to a different location altogether. Connecting through-routes is great when on a longer trip, but if time is a constraint, the added logistical challenge can be cumbersome. Transport may include hitchhiking, arranging a shuttle, or taking public transportation (train, bus, taxi, etc.). We’ve also used rental cars and U-Haul trucks.

Climbing Scale

Another important metric to analyze is where your intended route falls on the Climbing Scale. This is the only metric in this list that is completely objective, with each route programmatically assigned a value from 1 to 10 based on average feet per mile (meter per kilometer). Bear in mind this is an average over a whole route. Some routes may have steeper climbs than others that this number may not reflect. It also doesn’t differentiate terrain—a dirt road climb may be tougher than a paved one—or elevation—climbing at lower elevations is easier than doing so at higher elevations. Here’s how it breaks down with some route examples to compare (numbers in parentheses represent feet per mile and meters per kilometer):

Value Ascent/Distance Route Examples (FT/MI)
1-2
Easy
0-39 FT/MI
0-7 M/KM
Rail trails such as the Greenbrier in West Virginia; Camino Del Diablo (17); Newfoundland T-railway (31); Monumental Loop (35)
3-4
Fair
40-69 FT/MI
8-13 M/KM
New Mexico Off-Road Runner (45); Baja Divide (55); Great Divide Mountain Bike Route (57); BC Trail (63); Peaks & Plateaus (68)
5-6
Moderate
70-99 FT/MI
13-19 M/KM
Stagecoach 400 (73); The Coconino Loop (86); Highland Trail 550 (87); Arizona Trail (88); Grand Pacifico Grand Dirt Tour (95)
7-8
Strenuous
100-129 FT/MI
19-24 M/KM
Oregon Timber Trail (100); VTXL (100); Tahoe Twirl (102); The Wolf’s Lair (117); The Vapor Trail (125)
9-10
Very Strenuous
130-150+ FT/MI
25-29+ M/KM
Caucasus Crossing (133); Colorado Trail (137); Oh Boyaca! (145); Hope 1000 (155); Veneto Divide (183)

Planning a Bikepacking Route

Pace and Distance

Now that you have a general understanding of what makes some bikepacking routes more challenging than others, how far should you expect to pedal each day? Broadly speaking, the average bikepacking trip usually involves riding between 25 to 75 miles (40 to 120 kilometers) per day, depending on your personal fitness, the weight of your loaded bike, weather conditions, the average grade of the route, and the amount of time you spend in the saddle. As hinted at in the previous section, the other major element that has a bearing on the daily distance you might cover is the difficulty of the route’s surface and terrain. All of these factors should be scrutinized when planning how far you can go and how much time you’ll need to take on a given route.

To illustrate, here are four simulated route types, each with four pace metrics:

  1. Moving time: the hours riders might spend pedaling (not including snack time);
  2. Average speed: a loose estimate of averages based on the terrain;
  3. Distance per day: a rough estimate of mileage;
  4. Elevation per day: the amount of total ascent a rider might expect in a single day.

Note that these four metrics don’t necessarily interrelate, as a cyclist’s pace may be governed by one or the other. Use these to get a loose idea of what to expect. You can also substitute rider skill level for pace: Slow might represent a novice weekend cyclist; Relaxed could be a weekend bikepacker; Efficient might represent a more experienced individual; Fast might be the pace of someone who’s very fit and on a schedule; and Ultra could represent the pace of a well-trained ultra-endurance athlete.

All-Road

The first example includes routes with a difficulty level of 1 to 4 out of 10 that are approachable on a rigid mountain bike or gravel bike. This type of route might be unpaved 50 to 60 percent of the time and feature an even mix of fast-rolling tarmac with unpaved sections being relatively smooth gravel. Such a route may present moderate climbs with a Climbing Scale rating of 2 or 3. Example routes might include overnighters like the Finger Lakes Overnighter in New York, the New Forest Gravel Taster in the United Kingdom, or the Havel Wetland Wanderer in Germany.

Imperial
Metric
Pace Hours Moving
Avg Speed (MPH)
Avg Speed (KPH)
Miles per Day
KM per Day
Elevation per Day (FT)
Elevation per Day (M)
Slow 4-6
6
10
24-36
39-58
2500
762
Relaxed 5-8
7.5
12
37-60
60-97
3500
1067
Efficient 7-10
9
14
61-90
98-145
5000
1524
Fast 9-11
10
16
91-110
146-161
7000
2134
Ultra 10-15+
11+
18+
111-165+
179-266+
8500+
2591+

Mixed Surface

The second example might be a route with a difficulty level of 4 to 6 out of 10 that is approachable on a rigid mountain bike, hardtail or Divide-style bike. This type of route might be 60 to 70 percent unpaved with a mix of gravel, chunkier dirt roads, and some mellow singletrack. Such a route may present moderate and challenging climbs with a Climbing Scale rating of 3-5. Think of routes like the Great Divide Mountain Bike Route, The Monumental Loop in New Mexico, or the Ardennes Arbelate in Belgium.

Imperial
Metric
Pace Hours Moving
Avg Speed (MPH)
Avg Speed (KPH)
Miles per Day
KM per Day
Elevation per Day (FT)
Elevation per Day (M)
Slow 4-6
5
8
20-30
39-48
2000
610
Relaxed 5-8
6
10
31-50
49-81
3000
915
Efficient 7-10
7.5
12
51-75
82-121
4500
1372
Fast 9-11
9
14
76-100
122-161
6000
1829
Ultra 10-15+
10+
16+
101-150+
162-241+
7500+
2286+

Rough Stuff

This example route could have a difficulty level of 6 to 8 and feature around 70 to 80 percent unpaved surfaces with significant stretches of rutted, rocky, and chunky dirt roads. Routes like this may present the need to hike your bike on occasion. Consider challenging ascents with a Climbing Scale rating of 4 to 7. Routes like the Grand Staircase Loop in Utah, the San Jose del Pacifico in Mexico, and the Baja Divide in Mexico might fall into this category.

Imperial
Metric
Pace Hours Moving
Avg Speed (MPH)
Avg Speed (KPH)
Miles per Day
KM per Day
Elevation per Day (FT)
Elevation per Day (M)
Slow 4-6
4
6
16-24
26-39
1750
533
Relaxed 5-8
5
8
25-40
40-65
2500
762
Efficient 7-10
6
10
41-60
66-97
3500
1067
Fast 9-11
7
11
61-77
98-124
5000
1524
Ultra 10-15+
8+
13+
78-120+
125-193+
7000+
2134+

Singletrack-Heavy

A singletrack-heavy backcountry route might prove a bit more challenging with a difficulty level of around 8 or 9, 80 to 100 percent unpaved surfaces, and prolonged stretches of singletrack trails that could be technical at times and require the occasional hike-a-bike. With this style of route, you could expect challenging climbs with a Climbing Scale rating of 6 to 8. Route examples include the Coconino Loop or AZT in Arizona, the Highland Trail 550 in Scotland, and the Colorado Trail.

Imperial
Metric
Pace Hours Moving
Avg Speed (MPH)
Avg Speed (KPH)
Miles per Day
KM per Day
Elevation per Day (FT)
Elevation per Day (M)
Slow 4-6
3
5
12-18
19-29
1500
457
Relaxed 5-8
4
6
19-32
30-52
2000
610
Efficient 7-10
5
8
33-50
53-81
3500
1067
Fast 9-11
6
10
51-66
82-107
4500
1372
Ultra 10-15+
7+
11+
67-105+
108-169+
6000+
1829+

Plan Your Route

With the groundwork in place, it’s time to choose a bikepacking route or plan your own. If you take the latter path, know that there’s a lot to learn. We highly recommend familiarizing yourself with several digital mapping platforms and baselayers to gain a better understanding of the land where you intend to ride to get the most from your bikepacking adventures. It may seem overwhelming at first, but it will all start to make sense with a little practice.

Tools and Apps

What a time to be alive and to be into off-pavement cycling! With the proliferation of detailed map layers and GPS technology built right into our phones, there are many great applications out there that enable users to find new trails and tracks, plan routes in detail, see what other folks have ridden, and understand surfaces and land types. Here are three of our favorites:

  • Ride with GPS: As evidenced on the site, Ride with GPS (RWGPS) is one of our preferred tools. It offers a complete, turnkey platform to plan and follow routes. The Route Planner, which is available on the web or as a mobile app, offers a rich feature set, particularly for creating routes. As a result, it has a relatively steep learning curve, but it’s well worth the effort. In addition, the navigational app allows you to download map layers offline and navigate as you go. RWGPS offers a library of informative videos and articles to help get started. Find those here.
  • Gaia: Gaia GPS (now owned by Outside) is another great application that offers a few features that we love, including the ability to download detailed baselayers for offline use, several unique maps—such as public and private land layers in the US—and the ability to quickly and easily add points of interest (POIs) as you go.
  • Trailforks: When it comes to singletrack trails, Trailforks is home to the largest database of mountain bike trails in the world. Not only does it feature an impressive map search, but trails can also be browsed by state and trail network. All the content, including photos, videos, and reviews, is user contributed by an audience backed by Pinkbike (owned by Outside), which has led to massive growth over the last few years.

Layers Upon Layers

Google Earth and satellite imagery have opened a lot of doors to two-wheeled exploration. The ability to view detailed satellite imagery from the comforts of your home or out on the trail with your smartphone is a game changer when it comes to remote bikepacking. But that only scratches the surface. There are dozens of great map layers that offer endless information to help plan routes and add perspective to your trips. Here are the essentials:

  • OSM Cycle: The OpenCycleMap global cycling map is based on data from the open-source OpenStreetMap project. It includes a wealth of cycling-related information, as well as a good basemap for dirt roads, gravel, and singletrack. It’s available in both RWGPS and Gaia and provides a valuable backdrop that we use as our primary basemap.
  • Public/Private Land: Gaia GPS offers public and private land layers with their Premium subscription (our Bikepacking Collective members receive a 20 to 50 percent discount). These layers are particularly handy in the US when planning routes on questionable dirt roads that may go through privately owned land. The public land layer is also useful when looking for places to camp.
  • Nat Geo Trails Illustrated: Nat Geo also offers the Trails Illustrated maps as a layer in Gaia GPS. This layer is useful if your route involves US national forest land or other recreational land that has an associated Trails Illustrated map.
  • Heat Maps: Popularized by Strava, heat maps visualize ride data from an online community to display where people ride. Ride with GPS also offers heat maps, aggregating their user data into an invaluable layer for use when researching the best bike routes through cities and elsewhere.
  • Native Land: The lands we travel through in North America were occupied long before the establishment of European colonies. Landscapes that we consider to be “untouched wilderness” were home to the Indigenous peoples of this continent since time immemorial and are still an integral part of their cultural identity. Native-Land.ca offers a map interface with a layer showing Indigenous land boundaries so we can recognize whose land we’re using.

Planning a Bikepacking Route

Tips for Creating Your Route

There’s an art to creating a good bikepacking route. It’s about balancing challenges and rewards and finding the perfect rest stops and campsites along the way. What makes a route special? Scenic campsites, places to eat, breweries, bucket-list trails, fun descents, and cultural and historical places of interest, to name a few. Maybe there are hot springs or swimming holes in the middle too.

We recommend starting with an overnighter route. If it’s your first time bikepacking, keep it simple. You might even pick a short, familiar loop of around 10 to 20 miles (15 to 30 kilometers) near home for a quick overnight trip. Use trails or roads that are familiar to you as a trial run, and keep to a comfortable, established campsite. Here are a few tips for building a successful route:

  • Base your route on a good campsite. When designing the route, lay it out around a great campsite where you want to spend the night, allowing adequate mileage the day leading up to camp and the day after. This is probably the most important step in creating a route, and most overnighter routes are built with a campsite in mind.
  • Remember the factors that affect pace outlined earlier? Keep those in mind when designing your route to make sure you have enough time to get to camp.
  • Stay off the busy roads and keep your route safe. Most of our routes are made up of at least 60% unpaved surfaces, but we prefer routes in which the majority of the time spent riding is off pavement. This allows us to stay safe and admire the surroundings.
  • Use points of interest (POIs). Basing routes around particular sights or stops is a fun approach. Breweries, historical landmarks, hot springs, swimming holes, and scenic viewpoints can all add interest to a route.
  • Create a rhythm. Starting and finishing a route with a climb isn’t an ideal approach. Space out the suffering and the rewards, and make sure the ratio of the two trends toward fun to keep it enjoyable.
  • Use greenways. Tie in a greenway or cycle-specific path to the route. Anything that helps avoid traffic is welcome in our book.
  • Watch resupply points. It’s good practice to plan where resupply points are and determine the distance between them; the same goes for potable or filterable water.
  • Consider where it starts and ends. Making a loop from a memorable and safe starting point is always a good idea. Consider starting it at a landmark, bike shop, place of historical significance, and/or area with a good place to leave a vehicle. If your route is linear in nature, think about ways of making it accessible via public transportation or have good spots to park cars for a shuttle.

Dig into some more resources on this subject:

Following a Route

For most bikepacking adventures, GPS navigation is a requisite part of the trip. While traditional paper maps are great for planning and provide crucial backups on the trail, a bar-mounted GPS head unit or GPS-enabled smartphone with a trusted app is an essential tool. Becoming comfortable with them will broaden your horizons immeasurably and will also help to maintain the flow of your ride, especially on singletrack, since you won’t have to stop to pull out and consult a map at every intersection.

GPS or Smartphone

A dedicated GPS unit is built to handle rough terrain and mixed weather conditions and works especially well when following singletrack. The reliable Garmin eTrex (20/22x/30/32x) series offers several well-priced models that are perfect for the job. There are also a few good options from Wahoo, like the ELEMNT BOLT. However, smartphones make an excellent alternative, especially when housed in a protective case. Although they suffer from a shorter battery life and have to be handled more carefully, they’re far easier and more intuitive to use. As mentioned, Ride with GPS and Gaia are among the best apps on offer. Each requires a fee to get the full-featured version, but it’s well worth it, and each includes a selection of basemaps for around the world. Maps can be downloaded onto the device, allowing the phone to be used as a GPS where there’s no cell coverage.

The reality is that it’s best to bring both. Unfortunately, it’s not unheard of for a GPS unit to malfunction in the field. It doesn’t happen often, but we’ve heard about it happening too many times. We highly recommend bringing a backup of your route GPX: one installed on your head unit GPS and one on your phone in an app such as RWGPS or Gaia.

Here are a few related articles and resources:

Keeping Gizmos Charged

If you’re following a route where there are no facilities to recharge your devices, make sure to plan ahead. For short trips, a cache battery bank will do. For extended trips, consider bringing a solar panel or a dynamo hub if there’s no access to power outlets for long periods. Most USB-powered devices, such as a Wahoo BOLT or smartphone, can be quickly and conveniently charged via the wall socket in a gas station and a solar panel when conditions are right. Dynamo hubs, used in conjunction with a device like Sinewave’s Revolution, are also handy. Use them to charge a buffer battery to top up your phone at the end of the day.

Paper Maps

Although they’re a little cumbersome to carry, paper maps are perfect for planning a ride and can also provide a useful backup to their electronic equivalents while out on the trail. DeLorme’s (now Garmin’s) state-by-state Atlas and Gazetteer series is an excellent resource for discovering lesser-traveled paved and unpaved roads in your area. National Geographic Trails Illustrated maps are recommended for national forests and surroundings, as are US Forest Service maps. Most are made of waterproof vinyl material. Overseas companies to look for include ITM, Reise Know-How, and Gizi. Try cross-referencing a few, selecting a few grids, and comparing the level of detail in each to get the best map for your needs.

border

Acknowledgements: We’d like to thank Dean Liebau for creating the bike and gear illustrations for the revised Bikepacking 101 Handbook and Alex Hotchin for letting us use excerpts from some of her beautiful maps throughout this guide.

bikepacking collective

Revised and expanded in 2023, the Bikepacking 101 Handbook (2nd ed.) required thousands of hours of research, design, and writing, all of which was made possible through the generous support of our Bikepacking Collective members. As with all of our detailed route guides, in-depth reviews, and daily news, stories, and event coverage, this 20,000-word resource is available to the public for free. If you appreciate what we do here at BIKEPACKING.com, consider joining to support our efforts.